If you’re craving a playful twist on classic quesadillas that makes dinner feel effortless yet exciting, let me introduce you to the Sheet Pan Chicken Quesadillas Recipe. This dish brings together crisp, golden tortillas layered with melty cheddar, tender shredded chicken, vibrant tomatoes, and a medley of fresh ingredients—all baked right on a single sheet pan for maximum flavor and minimum fuss. Perfect for feeding a crowd or meal prepping, this recipe is a simple way to enjoy all the best parts of a quesadilla without the mess or babysitting at the stove.
Ingredients You’ll Need
This Sheet Pan Chicken Quesadillas Recipe shines because of its straightforward, wholesome ingredients. Each one adds a burst of color, texture, or hearty flavor that builds layers of deliciousness as you go.
- Flour Tortillas (9, 8-inch): The soft base that crisps beautifully while folding around all the tasty fillings.
- Shredded Cheddar Cheese (16 ounces): Lots of melty cheese is essential for that gooey, comforting texture.
- Chopped Tomatoes (1 cup): Freshness and juiciness to balance the richness.
- Green Onions (1/2 cup chopped): A mild onion flavor to add brightness without overpowering.
- Cilantro (1/2 cup, optional): A fragrant herbal touch that elevates each bite.
- Shredded Chicken (2 cups): Tender protein that makes this quesadilla satisfying and filling.
- Pinto Beans (1 can, 15 ounces): Adds creaminess and fiber, packed with earthy flavor.
- Frozen Corn (1 cup): Sweet kernels that pop with every bite, no need to thaw!
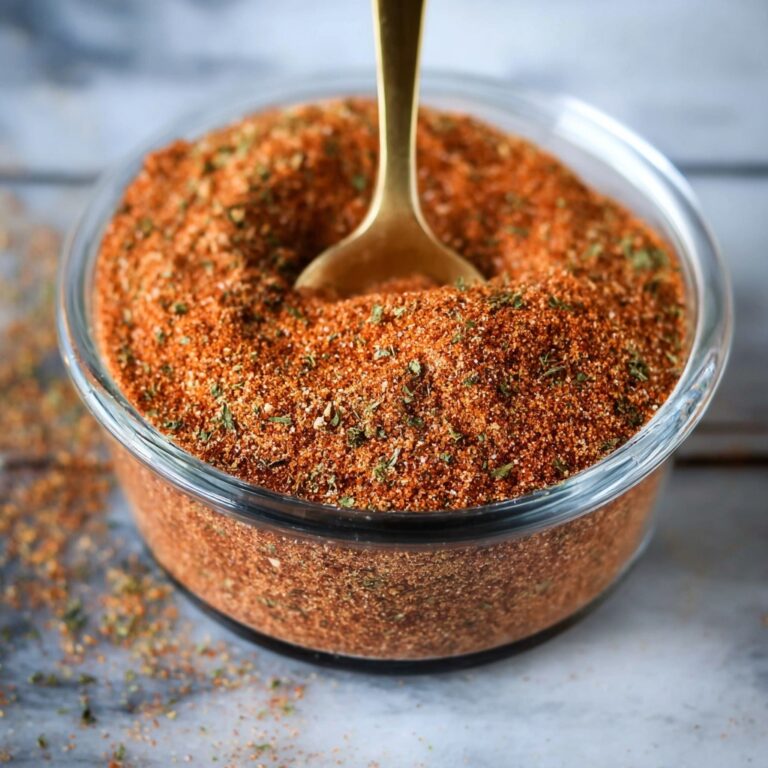
- Chipotle Sauce: A smoky, spicy dip that pairs beautifully with the quesadilla’s richness.
- Sour Cream: Cool, creamy accompaniment to balance the heat.
- Lime Slices: For squeezing, adding a zingy freshness that wakes up the flavors.
How to Make Sheet Pan Chicken Quesadillas Recipe
Step 1: Preheat and Prep
Set your oven to 425 degrees F to ensure it’s nice and hot for baking. While it’s warming up, get your ingredients ready—shred that cheddar cheese if it’s not pre-shredded, chop your tomatoes, green onions, cilantro (if using), and chicken. Having everything chopped and measured beforehand makes the whole assembly process much smoother and more enjoyable.
Step 2: Arrange the Tortillas
On your sheet pan, place two tortillas right in the center, then arrange the remaining seven tortillas overlapping around all sides so they cover the entire pan. The tortillas should slightly hang over the edges, creating a giant base that when folded will neatly encase your fillings. This layering trick ensures even crisping and a perfect structure for folding later.
Step 3: Add the First Layer of Cheese
Sprinkle about half the shredded cheddar all over the tortillas, leaving a generous border to allow folding. The cheese acts as glue, melting between layers to hold all your fillings together while providing that irresistible, creamy melt we all crave in a quesadilla.
Step 4: Sprinkle on the Fresh Ingredients
Now it’s time to add the color and flavor bursts. Distribute the chopped tomatoes, green onions, cilantro (if using), and shredded chicken evenly over that cheesy layer. This step ensures each bite includes juicy, savory, and fresh notes that keep the quesadilla vibrant and satisfying.
Step 5: Add Beans and Corn
Drain the pinto beans well to avoid soggy tortillas, then sprinkle evenly across the pan. Follow up with a cup of frozen corn kernels—they’ll roast beautifully in the oven, adding sweet pops of texture without any extra thawing effort.
Step 6: Top with More Cheese and Tortillas
Finish layering with the remaining shredded cheddar, letting your heart guide how much cheese feels just right. Place two more tortillas on top of the center fillings, then gently fold the overhanging edges toward the center tortilla to form a giant quesadilla. A bowl or second sheet pan can help hold the folded edges in place.
Step 7: Bake to Perfection
Nestle a second sheet pan on top to press the quesadilla lightly, then pop it in the preheated oven. Bake for 20 to 25 minutes until the tortillas turn golden brown and irresistibly crispy. The cheese will be gooey inside, and the whole creation will confidently hold together for slicing.
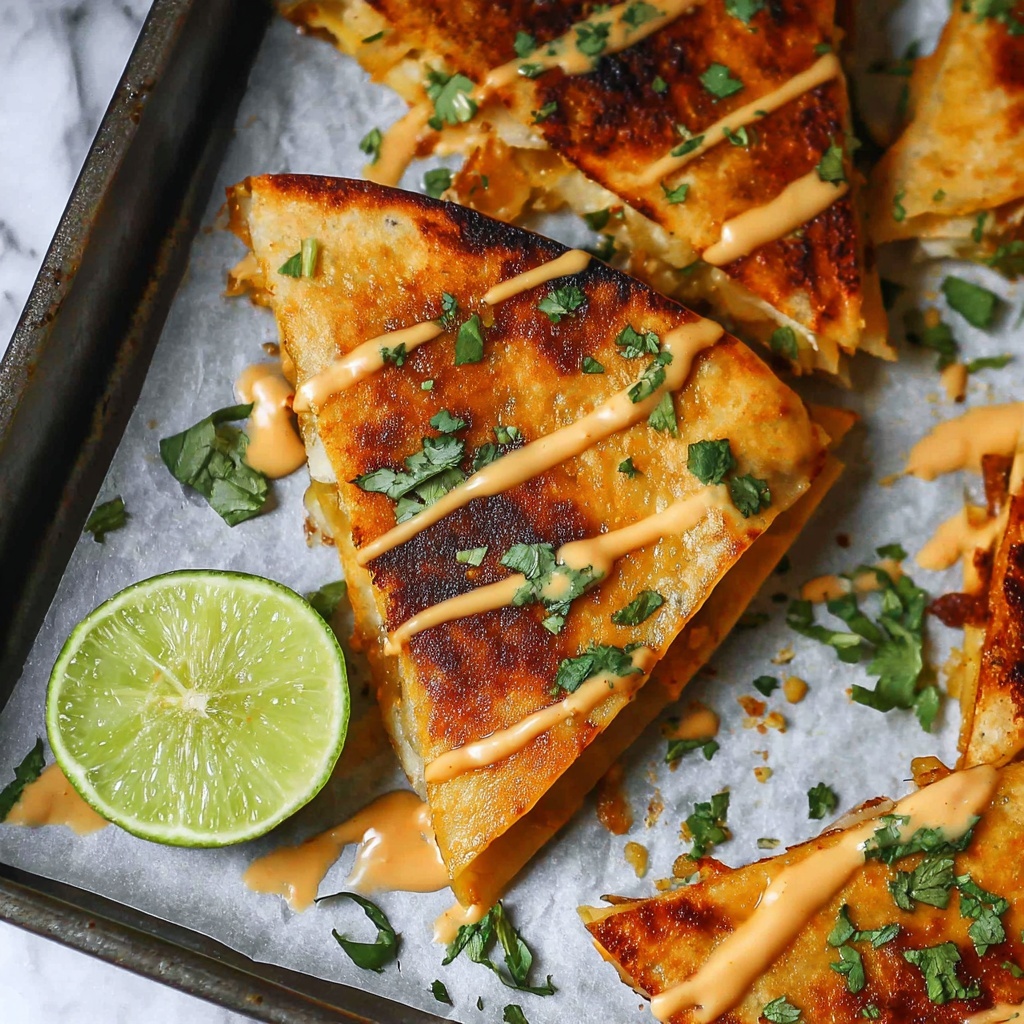
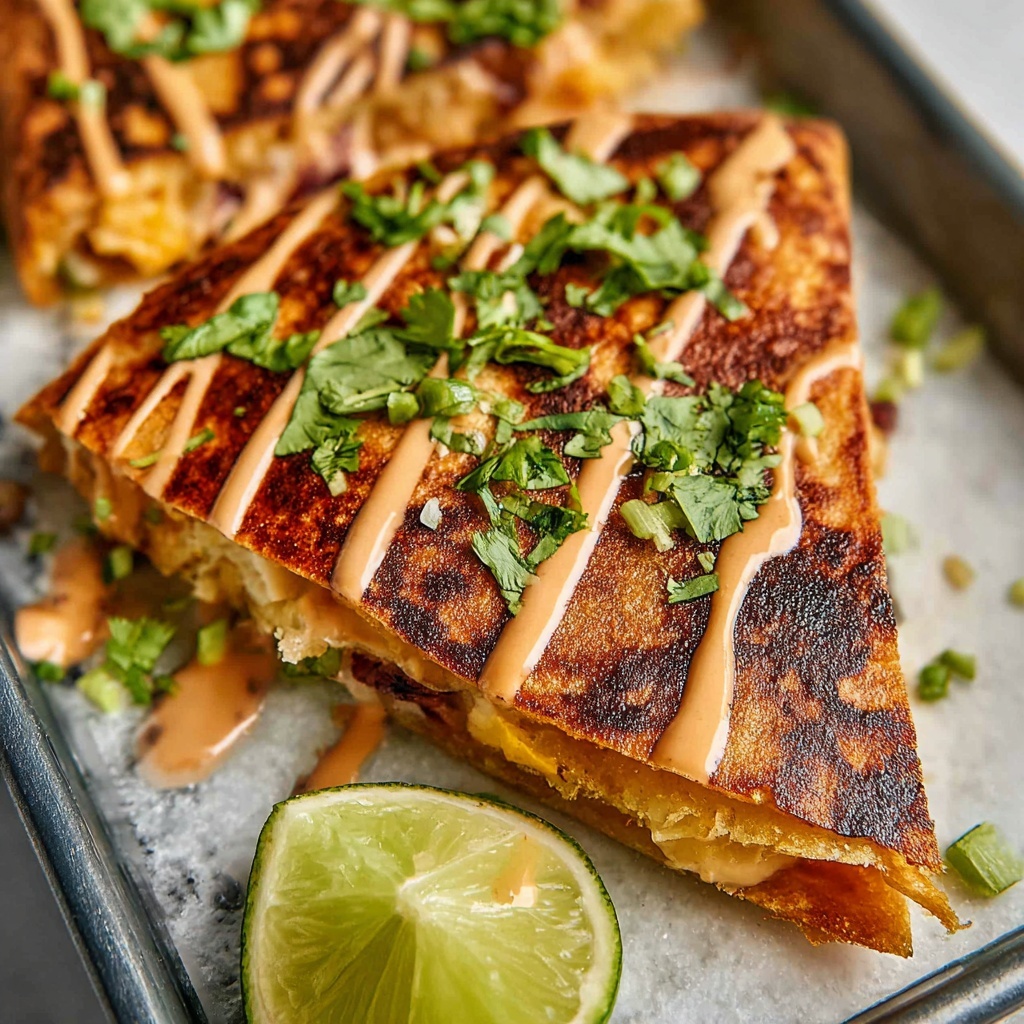
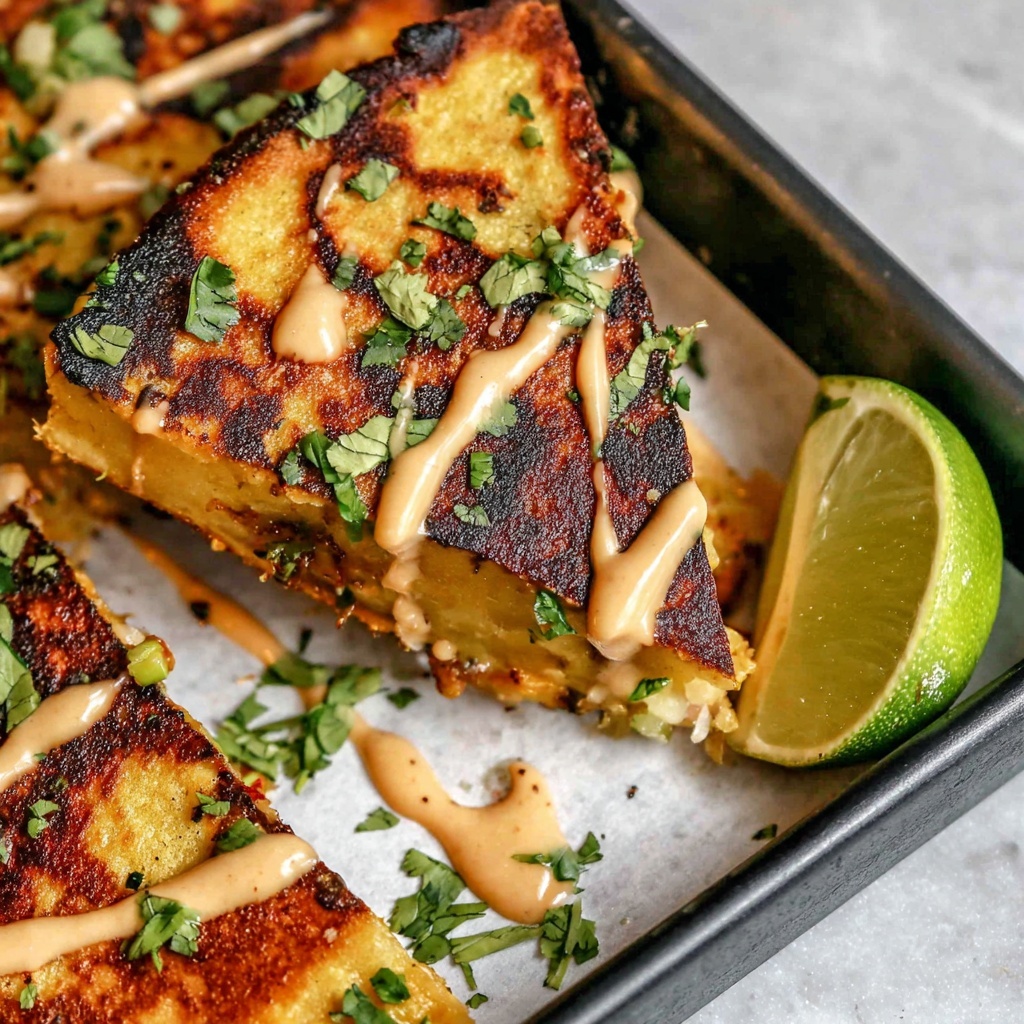
Step 8: Slice and Serve
Allow the quesadilla to rest for about five minutes after baking so it sets slightly, making it easier to cut. Slice into six squares or cut those squares into triangles if you want smaller, shareable pieces—a perfect crowd-pleaser for any gathering.
How to Serve Sheet Pan Chicken Quesadillas Recipe
Garnishes
To make these quesadillas even more irresistible, serve alongside dollops of sour cream and a smoky chipotle mayo dip. Fresh lime slices offer a bright squeeze that enhances all the flavors. If you’re feeling adventurous, sprinkle some chopped cilantro over the top for a final fresh herbaceous note.
Side Dishes
Pairing these quesadillas with a crisp green salad or a simple Mexican street corn salad adds a refreshing counterpoint. Black beans seasoned with cumin, or even a vibrant avocado salsa, also complement the hearty richness without overwhelming the palate.
Creative Ways to Present
For a festive touch, arrange the sliced quesadilla squares like a fun appetizer platter, surrounded by a trio of dips like guacamole, chipotle mayo, and classic salsa roja. Alternatively, wrap wedges individually in foil for on-the-go lunches or easy party snacks that keep the cheesy goodness intact.
Make Ahead and Storage
Storing Leftovers
Leftover quesadillas can be stored in an airtight container in the refrigerator for up to five days. This makes them a fantastic option for busy weeknights or quick lunches with zero extra prep needed.
Freezing
If you want to keep these beauties longer, freeze individual slices after flash freezing them on a tray for about 30 minutes. Then transfer the pieces into freezer ziplock bags. This method prevents the quesadillas from sticking together and preserves their crispiness during freezing.
Reheating
To reheat, use the same sheet pan method you employed for the initial bake: place slices between two pans and bake until warmed through and the tortillas regain their crisp texture. Alternatively, a quick toast on a frying pan works well for reheating smaller portions. Be aware frozen slices will need more time to heat thoroughly.
FAQs
Can I use other types of cheese instead of cheddar?
Absolutely! While cheddar is classic for its sharpness and melt, you can swap in Monterey Jack, mozzarella, or a Mexican cheese blend to mix up the flavors while keeping that gooey texture.
What can I do if I don’t have a sheet pan large enough?
If your sheet pan isn’t big enough, try using two smaller pans or a large baking dish instead. The key is ensuring the tortillas overlap and cover the base so fillings stay enclosed during baking.
Is this recipe adaptable for vegetarians?
Definitely! Simply omit the shredded chicken and add extra beans, sautéed vegetables, or even roasted peppers to keep it hearty and flavorful without meat.
How spicy is the chipotle sauce, and can I make it milder?
The chipotle sauce brings a smoky heat that you can adjust by reducing chipotle amounts or mixing it with more mayo or sour cream. There are also milder sauce alternatives if you prefer something gentler on the palate.
Can I prepare this recipe ahead of time and bake it later?
Yes! Assemble the quesadilla on the sheet pan, cover it tightly with plastic wrap and foil, and keep it refrigerated for up to 24 hours before baking. This makes it a super convenient option for meal prepping or hosting.
Final Thoughts
This Sheet Pan Chicken Quesadillas Recipe has quickly become one of my absolute favorites for easy, crowd-pleasing meals that don’t skimp on flavor or fun. Its simplicity in setup, combined with the delicious layering of cheesy, fresh, and savory ingredients baked to glorious crispness, means it’s sure to become a regular in your kitchen rotation. Give it a try and watch how effortlessly it brings everyone together around the table with smiles and happy appetites!
Print
Sheet Pan Chicken Quesadillas Recipe
- Prep Time: 15 minutes
- Cook Time: 20 minutes
- Total Time: 35 minutes
- Yield: 6 servings
- Category: Main Course
- Method: Baking
- Cuisine: Mexican-American
Description
ThisSheet Pan Chicken Quesadillas recipe offers a large, shareable quesadilla baked to crispy perfection on a single sheet pan. Loaded with shredded chicken, pinto beans, corn, fresh tomatoes, green onions, cilantro, and cheese, it’s a crowd-pleaser that saves time and effort by assembling and baking the entire meal at once. Served with homemade chipotle mayo or sour cream, it’s ideal for family dinners or casual gatherings.
Ingredients
Main Ingredients
- 9 (8-inch) flour tortillas (medium or soft taco size)
- 16 ounces shredded cheddar cheese (about 4 cups, divided)
- 1 cup tomatoes, chopped (about 1 large tomato or 2 small)
- 1/2 cup green onions, chopped
- 1/2 cup cilantro, chopped (optional)
- 2 cups shredded cooked chicken (rotisserie chicken recommended)
- 1 (15-ounce) can pinto beans, drained
- 1 cup frozen corn (no need to thaw)
For Serving
- Homemade Chipotle Sauce
- Sour cream
- Lime slices
Instructions
- Preheat Oven: Preheat your oven to 425 degrees F to prepare for baking the quesadilla.
- Prep Ingredients: Shred the cheese if not pre-shredded. Dice tomatoes, chop green onions and cilantro (if using), and shred chicken if necessary.
- Arrange Tortillas: On a sheet pan, layer 9 tortillas with two in the center and the other 7 overlapping around all sides so the tortillas hang off the edges, covering the pan completely.
- Add Cheese Layer: Sprinkle 2 cups of shredded cheddar cheese evenly over the tortilla base, leaving a good border around edges to allow folding.
- Add Toppings: Spread 1 cup diced tomatoes, 1/2 cup chopped green onions, 1/2 cup cilantro (optional), and 2 cups shredded chicken over the cheese layer.
- Add Beans: Drain the pinto beans (rinse if preferred) and distribute evenly over the toppings, making sure excess liquid is removed to avoid soggy tortillas.
- Add Corn: Sprinkle 1 cup of frozen corn evenly on top; no thawing needed.
- Top with Cheese: Add the remaining 2 cups of shredded cheddar cheese evenly over the entire pan.
- Assemble & Fold: Place 2 or more tortillas in the center on top of the fillings. Carefully fold the overhanging edge tortillas toward the center tortilla, using a bowl or another sheet pan to keep folded edges secure.
- Press with Second Pan: Place a second sheet pan upside down over the assembled quesadilla to press it down gently. Avoid adding extra weight to prevent ingredient spill.
- Bake: Bake in the preheated oven for 20-25 minutes until tortillas are golden brown and crispy. Let rest for 5 minutes to set before slicing.
- Prepare Dip: While baking, prepare homemade chipotle mayo or use sour cream/lime slices to serve with quesadillas.
- Serve & Store: Slice into 6 large squares or 12 triangles. Store leftovers in an airtight container in the fridge for up to 5 days or freeze after flash freezing. Reheat using oven or skillet methods.
Notes
- Ensure tortillas overlap well and cover the sheet pan completely to hold fillings securely when folding.
- Drain beans thoroughly to avoid soggy quesadillas.
- Frozen corn can be added directly without thawing, saving prep time.
- Pressing with a second sheet pan helps the quesadilla cook evenly and hold together but avoid extra weight to prevent spills.
- Leftovers reheat well using the double-pan oven method or on a frying pan for crispy edges.
- For a vegetarian version, omit chicken and add extra beans, corn, and vegetables.


