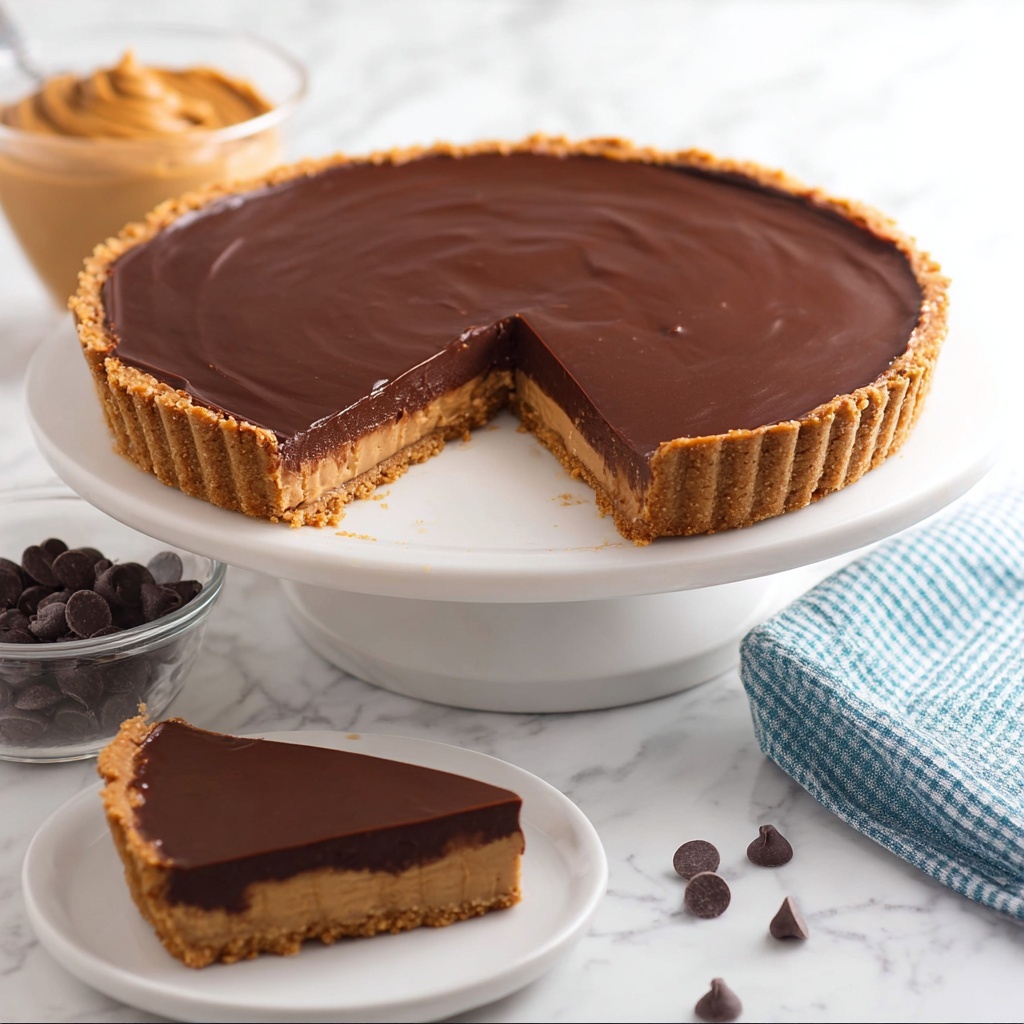
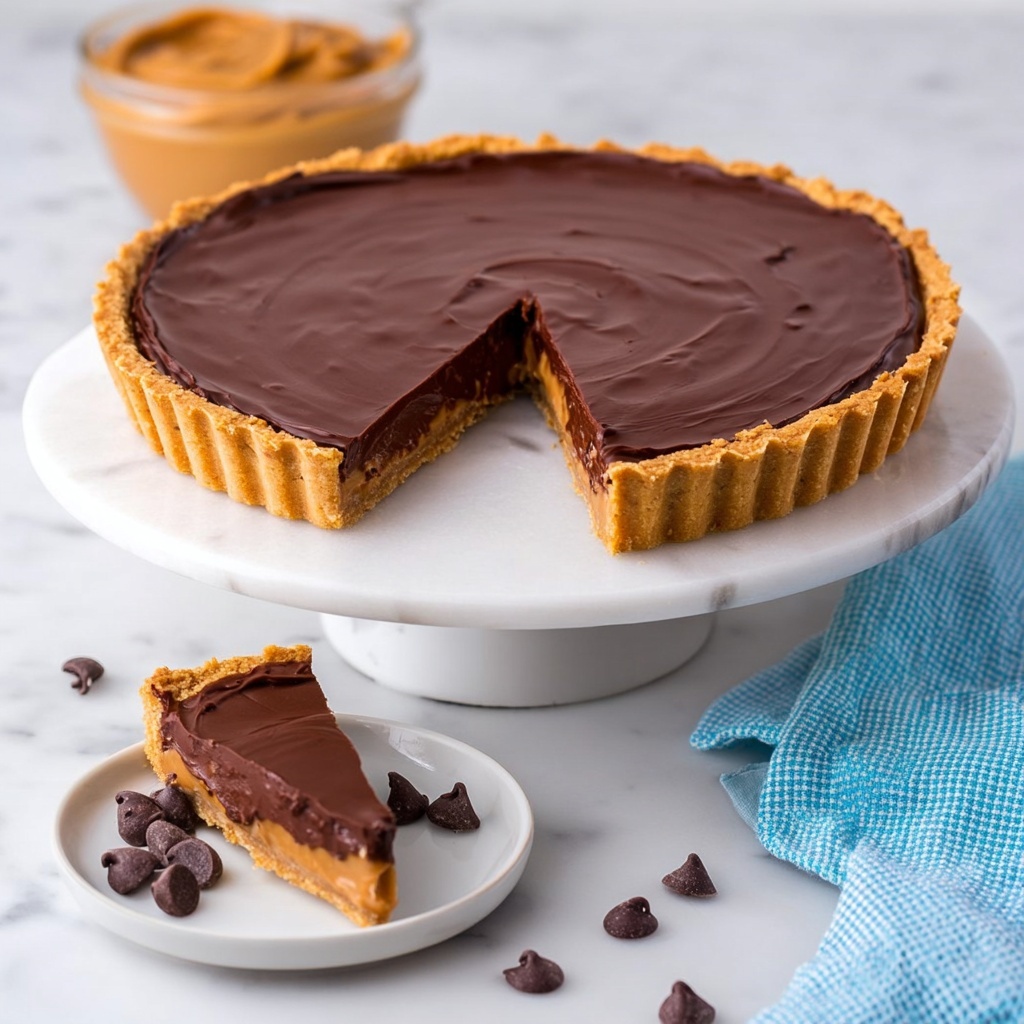
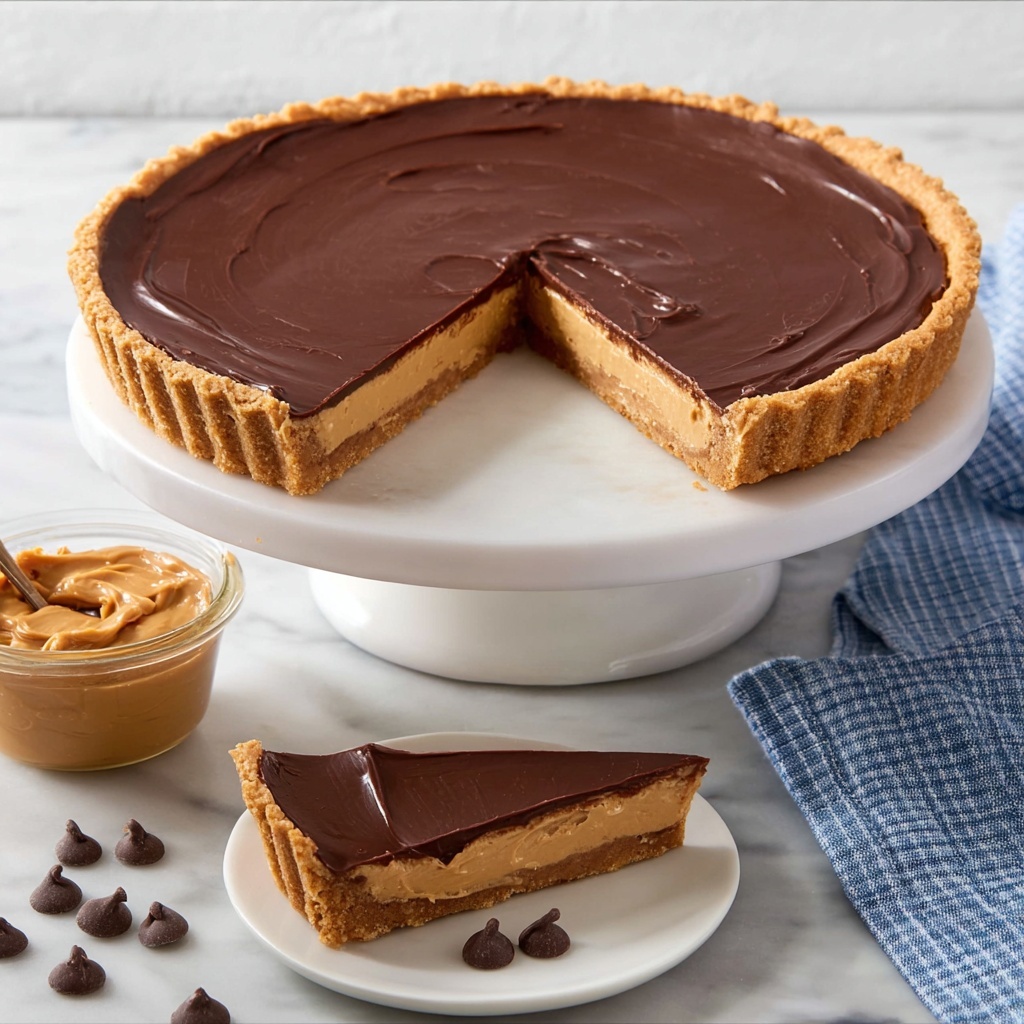
If you have a serious sweet tooth and love the magical combination of chocolate and peanut butter, this Reese’s Peanut Butter Cup Pie Recipe is going to become your new obsession. Imagine a velvety peanut butter layer sandwiched between rich, silky milk chocolate shells that coat the pie like a dream. This no-bake pie blends creamy, crunchy, and sweet textures perfectly, delivering the same classic flavor you adore in Reese’s peanut butter cups but in a show-stopping dessert perfect for any occasion.
Ingredients You’ll Need
This Reese’s Peanut Butter Cup Pie Recipe is surprisingly simple in terms of ingredients, but each one plays a critical role. From the creamy peanut butter to the luscious milk chocolate, these essentials create the perfect balance of flavor, texture, and indulgence.
- 4 cups milk chocolate chips (divided): Used to form the chocolate crust and delicious topping, ensuring a smooth, creamy chocolate experience.
- 2 Tbsp vegetable shortening: Helps melt the chocolate smoothly without seizing, giving that perfect glossy finish.
- 2 cups creamy peanut butter: The star ingredient for a rich, nutty, and buttery filling with that signature Reese’s taste.
- 2 cups powdered sugar (sifted): Adds sweetness and a fine texture to the peanut butter mixture.
- 8 Tbsp butter (softened): Brings creaminess and body to the filling, helping it hold together beautifully.
How to Make Reese’s Peanut Butter Cup Pie Recipe
Step 1: Create the Chocolate Base
Start by placing 2 cups of the milk chocolate chips and 1 tablespoon of vegetable shortening into a small glass bowl. Melt the mixture in the microwave in 30-second bursts, stirring each time, until it’s glossy, smooth, and fully melted. This chocolate will form the sturdy yet silky crust that encapsulates your peanut butter filling.
Step 2: Coat the Tart Pan
Next, pour the melted chocolate into a 10-inch tart pan, using a spatula or the back of a spoon to spread the chocolate evenly up the bottom and sides of the pan. This creates the chocolate “shell” that crisps up just right once chilled. Place the pan in the refrigerator and let the chocolate set completely before moving on.
Step 3: Mix the Peanut Butter Filling
In a large bowl, combine the creamy peanut butter, sifted powdered sugar, and softened butter. Mix thoroughly until the mixture is smooth and silky, with no lumps. This filling is the luscious heart of the pie, perfectly sweet, nutty, and incredibly creamy.
Step 4: Fill the Chocolate Shell
Spoon the peanut butter mixture into the chilled chocolate-coated tart pan. Use a spatula to spread it out evenly, creating a smooth, flat surface. This thick peanut butter layer promises every bite is packed with that classic Reese’s flavor.
Step 5: Add the Chocolate Topping
Now melt the remaining 2 cups of chocolate chips with 1 tablespoon of vegetable shortening, just as you did before. Pour this melted chocolate over the peanut butter filling, spreading it uniformly for a smooth, glossy top that locks in the pie’s flavor and looks spectacular.
Step 6: Chill and Set
Return the pie to the refrigerator and chill for at least one hour or until the top chocolate layer is fully set. This step is crucial for allowing the flavors to meld and the pie to firm up to the perfect sliceable consistency.
Step 7: Slice and Serve
Once chilled and firm, slice your Reese’s Peanut Butter Cup Pie Recipe into 12 generous pieces and get ready to indulge. Each slice is an absolute delight of rich chocolate and peanut butter bliss.
How to Serve Reese’s Peanut Butter Cup Pie Recipe
Garnishes
Elevate your pie presentation with whipped cream dollops, chopped Reese’s peanut butter cups, or a light drizzle of caramel sauce. A sprinkle of crushed peanuts can add a subtle crunch and a rustic flair to each slice, perfect for impressing guests or making an ordinary day extraordinary.
Side Dishes
This pie pairs beautifully with fresh fruit like strawberries or banana slices, which balance the richness with a hint of natural sweetness and freshness. A simple scoop of vanilla ice cream alongside adds a cool, creamy contrast that’s irresistible.
Creative Ways to Present
For a party, serve the pie in mini tart pans or make individual jars layered with whipped cream and chopped peanut butter cups. Wrapping slices in parchment paper tied with ribbon makes a charming gift or take-home treat that everyone will love.
Make Ahead and Storage
Storing Leftovers
Store any leftover pie in an airtight container in the refrigerator. Because of the creamy filling and chocolate layers, it keeps beautifully for up to 4 days without losing its decadent texture or flavor.
Freezing
You can freeze this Reese’s Peanut Butter Cup Pie Recipe for up to 2 months. Wrap the whole pie or individual slices tightly in plastic wrap and then foil to prevent freezer burn. Thaw overnight in the fridge before serving to maintain the best texture.
Reheating
This pie is best enjoyed chilled, so reheating is not necessary. If you prefer softer chocolate, leave the slice out at room temperature for about 10-15 minutes before digging in to enhance the melt-in-your-mouth experience.
FAQs
Can I use crunchy peanut butter instead of creamy?
Absolutely! Using crunchy peanut butter will add a lovely texture and nutty crunch that some people love, but creamy peanut butter gives the smoothest filling and classic Reese’s flavor balance.
Is this pie suitable for freezing ahead of a party?
Yes, this pie freezes very well, making it a perfect make-ahead dessert. Just be sure it’s properly wrapped to maintain freshness and texture.
Can I substitute dark or white chocolate for milk chocolate chips?
You can, but milk chocolate is recommended for the authentic Reese’s peanut butter cup taste. Dark chocolate adds a richer, slightly bitter contrast, while white chocolate will give the pie a sweeter, milder flavor.
How long does it take to set the chocolate layers?
The chocolate should set in the fridge for at least one hour. For the best results, chilling longer ensures it’s firm enough for clean slices.
Can this pie be made gluten-free?
Yes! The recipe as is contains no gluten ingredients, but always double-check your chocolate chips and other ingredients to confirm they are labeled gluten-free.
Final Thoughts
If you want to make a dessert that’s as fun to eat as it is to make, you really must try this Reese’s Peanut Butter Cup Pie Recipe. It’s a guaranteed crowd-pleaser with its luscious layers and classic flavors that everyone adores. Whether you’re celebrating a holiday or just craving something sweet and satisfying, this pie will quickly become your go-to treat to share with friends and family.
Print
Reese’s Peanut Butter Cup Pie Recipe
- Prep Time: 10 minutes
- Cook Time: 0 minutes
- Total Time: 1 hour 10 minutes
- Yield: 12 slices
- Category: Dessert
- Method: No-Cook
- Cuisine: American
Description
This Reese’s Peanut Butter Cup Pie is a decadent no-bake dessert that combines creamy peanut butter with rich milk chocolate in a smooth, luscious pie. Perfect for peanut butter and chocolate lovers, this pie features a chocolate-coated crust, a creamy peanut butter filling, and is topped with a glossy chocolate layer. Ready to enjoy in just over an hour, it’s ideal for parties, special occasions, or any time you crave a deliciously indulgent treat.
Ingredients
Chocolate Coating
- 4 cups milk chocolate chips (divided)
- 2 Tbsp vegetable shortening (divided)
Peanut Butter Filling
- 2 cups creamy peanut butter
- 2 cups powdered sugar (sifted)
- 8 Tbsp butter (softened)
Instructions
- Prepare the chocolate base: In a small glass bowl, combine 2 cups of milk chocolate chips with 1 tablespoon of vegetable shortening.
- Melt chocolate mixture: Heat the bowl in the microwave in 30-second intervals, stirring between each, until the chocolate is fully melted and smooth.
- Coat tart pan with chocolate: Pour the melted chocolate into a 10-inch tart pan, spreading it evenly to coat the bottom and sides. Place the pan in the refrigerator to set the chocolate layer.
- Make peanut butter filling: In a large bowl, mix together the creamy peanut butter, sifted powdered sugar, and softened butter until the mixture is smooth and well combined.
- Fill the crust: Spoon the peanut butter mixture into the chilled tart pan over the set chocolate base, spreading it evenly and smoothing the top.
- Melt remaining chocolate: Melt the remaining 2 cups of milk chocolate chips with 1 tablespoon of vegetable shortening using the same microwave method as before.
- Top the pie: Pour the melted chocolate over the peanut butter filling, spreading it to cover the entire surface evenly, creating a smooth top layer.
- Chill to set: Refrigerate the pie for about 1 hour, or until the chocolate is firm and set.
- Serve: Slice into 12 pieces and serve chilled for a deliciously creamy and chocolaty dessert.
Notes
- Use creamy peanut butter for a smooth texture; chunky peanut butter will alter the pie’s consistency.
- For easier spreading, warm the melted chocolate slightly if it starts to harden before pouring.
- Ensure the powdered sugar is sifted to avoid lumps in the peanut butter filling.
- Store leftovers covered in the refrigerator for up to 4 days.
- To make slicing cleaner, warm the knife slightly before each cut.
