
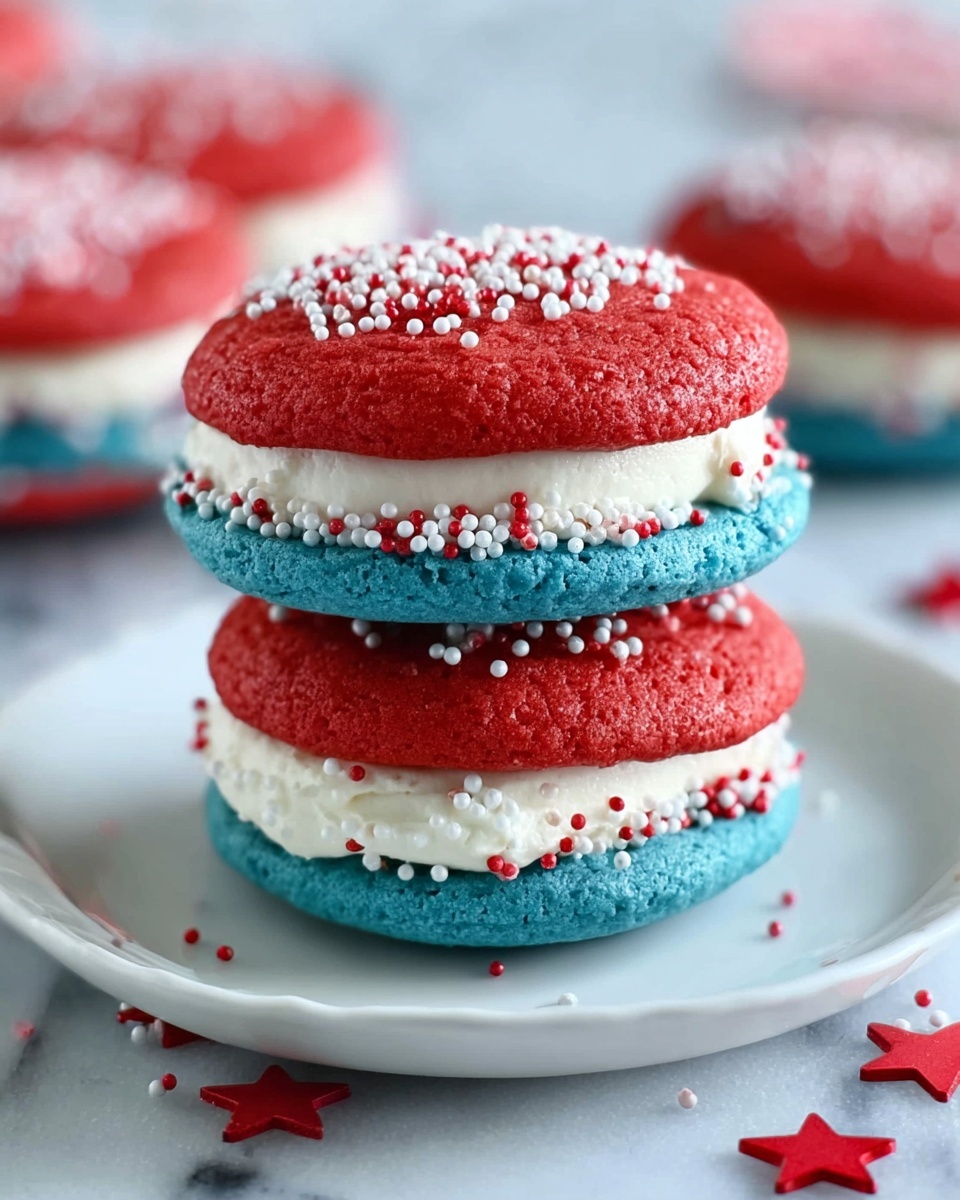
If you are searching for a festive and utterly delightful treat to wow your friends and family, look no further than this Red, White and Blue Whoopie Pies Recipe. These charming sandwich cookies are bursting with patriotic colors and bursting with flavor, perfect for summer celebrations, Independence Day, or any time you want to add a splash of fun to your dessert table. Soft, cakey cookies colored in vibrant red and blue sandwich a luscious cream cheese filling, all edged with sprinkles that bring the whole look and taste to life. Trust me, once you try these, they’ll become an instant favorite for every occasion!

Ingredients You’ll Need
This Red, White and Blue Whoopie Pies Recipe relies on simple, everyday ingredients that come together to create something truly show-stopping. Each ingredient plays a vital role in texture, flavor, or color, so it’s best not to skip or substitute without care.
- White cake mix: The perfect base providing that tender, cakey structure for your whoopie pies.
- Instant vanilla pudding mix: Adds extra moisture and richness to the cookie dough for a soft bite.
- Unsalted butter: Contributes richness and tenderness to the dough; make sure it’s softened for easy mixing.
- Large eggs: Bind the dough together and help with structure; room temperature eggs blend best.
- Red and blue food coloring: Essential for that patriotic color pop; gel colors work brilliantly for vibrant hues.
- Red, white, and blue sprinkles: Bring a festive and fun finish, adding texture and eye-catching charm.
- Cream cheese: Softened cream cheese lends a tangy, creamy foundation for the filling.
- Powdered sugar: Sweetens and stabilizes the filling for that melt-in-your-mouth creaminess.
- Vanilla extract: Adds warm, inviting flavor that ties the filling perfectly to the cookies.
How to Make Red, White and Blue Whoopie Pies Recipe
Step 1: Preheat Oven and Prepare Baking Sheets
Let’s get things started by positioning your oven rack in the center, then preheating it to a steady 350°F (175°C). This ensures even baking and perfect texture. Line two baking sheets with parchment paper to prevent sticking and make cleanup super easy.
Step 2: Make the Cookie Dough
In a stand mixer fitted with a paddle attachment, combine your white cake mix and instant vanilla pudding until they are perfectly blended. Add in the softened butter and eggs, then beat everything on medium speed until smooth and thick. This dough is what’s going to give your whoopie pies that signature cakey softness!
Step 3: Color the Dough
Divide the dough evenly into two bowls. Now here’s the fun part: add red food coloring to one bowl and blue to the other, stirring each until the colors appear as vibrant and uniform as a summer sky. No streaks allowed!
Step 4: Shape the Cookies
Using a tablespoon or small cookie scoop, drop rounded mounds of dough onto your lined baking sheets. Make sure to space them about 2 inches apart to give the cookies room to spread without merging into each other.
Step 5: Bake and Cool
Bake one sheet at a time for around 10 minutes. You’ll know they’re done when the cookie tops spring back gently to a light touch. Let them cool on the baking sheet for 3 minutes before transferring them to a wire rack to finish cooling completely. Patience here guarantees the perfect texture!
Step 6: Prepare the Filling
While the cookies cool, whip up the filling. Beat softened cream cheese and powdered sugar on medium-high speed until fluffy and light, taking about 3 to 5 minutes. Then mix in vanilla extract for that full, creamy flavor that makes your whoopie pies irresistible.
Step 7: Assemble Whoopie Pies
Once cookie rounds are cool, spread a generous layer of cream cheese filling onto the flat side of one cookie and sandwich it with another, flat side down. This classic assembly creates the perfect bite of moist cake and luscious filling.
Step 8: Decorate
Roll the edges of the filling in your red, white, and blue sprinkles or scatter them generously on. It’s a festive finishing touch that adds both texture and a patriotic pop, making these whoopie pies absolutely party-ready.
Step 9: Store and Serve
Place your assembled whoopie pies in an airtight container and refrigerate until you’re ready to enjoy them. To bring out their best, let them sit at room temperature for a little while before serving so the filling softens beautifully.
How to Serve Red, White and Blue Whoopie Pies Recipe
Garnishes
These whoopie pies are already stars, but a little extra garnish goes a long way! Try adding fresh berries on the side to echo the red and blue hues, or a light dusting of powdered sugar for a gentle snowy effect. Whipped cream dollops can add an inviting, fluffy contrast to each serving.
Side Dishes
Serve these treats alongside refreshing lemonade, iced tea, or even a sparkling berry-infused water for an elegantly casual spread. For a full patriotic feast, pair them with grilled classics like burgers and corn on the cob—your Red, White and Blue Whoopie Pies Recipe will shine as the grand finale.
Creative Ways to Present
Get playful with your presentation by stacking the whoopie pies on a tiered cake stand or arranging them on a platter shaped like a flag or star. Wrapping individual pies in clear cellophane bags tied with red, white, and blue ribbons makes them perfect edible favors at parties or picnics.
Make Ahead and Storage
Storing Leftovers
If you have leftovers, keep them fresh by placing the whoopie pies in an airtight container and refrigerate. Stored this way, they’ll stay moist and flavorful for up to 3 days, perfect for enjoying the next day or two without losing their charm.
Freezing
You can absolutely freeze these whoopie pies! Arrange them in a single layer on a baking sheet and freeze until firm, then transfer to a freezer-safe container with parchment layers to prevent sticking. They’ll keep well for up to 2 months and thaw beautifully overnight in the fridge.
Reheating
For best taste and texture after freezing, thaw overnight in the refrigerator. Before serving, bring the pies to room temperature for about 30 minutes. Avoid microwaving as it can make the cookies too soft and the filling runny.
FAQs
Can I make these whoopie pies without a stand mixer?
Absolutely! A hand mixer or even a sturdy whisk and some elbow grease will do the trick. Just ensure your butter and cream cheese are very soft for easier mixing and beat the ingredients well to get the right fluffy texture.
What if I don’t have red or blue food coloring?
You can get creative with natural colorings like beet juice for red or blueberry juice for blue, but be aware these may slightly alter the taste and intensity of color. Gel food colors remain the best choice for vibrant hues in this Red, White and Blue Whoopie Pies Recipe.
Can I use a different filling?
Definitely! While the cream cheese filling is classic and delicious, you can swap it for marshmallow fluff, buttercream, or even flavored whipped cream to suit your taste and occasion. Just keep in mind the texture might vary.
How do I know when the cookies are done baking?
The cookies should spring back lightly when pressed gently in the center and have a delicate, cakey feel. Their tops might look set but not browned. Overbaking will dry them out, so keep a close eye during those last few minutes.
Can this recipe be doubled or halved?
Yes! This recipe is very versatile. Just maintain the proportions and the mixing and baking steps remain the same. Adjust the baking time slightly if you make bigger or smaller batches, and enjoy as many or as few as you’d like.
Final Thoughts
There is something truly joyful about making and sharing this Red, White and Blue Whoopie Pies Recipe. It’s easy, colorful, and irresistibly tasty — the kind of dessert that brings smiles and makes lasting memories. Whether for a holiday gathering or a simple treat to brighten your day, these whoopie pies offer a sweet celebration in every bite. I can’t wait for you to try them and see how quickly they become a beloved dessert in your home!
Print
Red, White and Blue Whoopie Pies Recipe
- Prep Time: 20 minutes
- Cook Time: 10 minutes per batch (2 batches total ~20 minutes)
- Total Time: 40 minutes
- Yield: 12 servings (about 24 cookies; 12 whoopie pies)
- Category: Dessert
- Method: Baking
- Cuisine: American
Description
Celebrate any occasion with these festive Red, White, and Blue Whoopie Pies. Soft, colorful cake-like cookies are sandwiched together with a creamy vanilla cream cheese filling and decorated with patriotic sprinkles for a fun, delicious treat that’s perfect for summer gatherings and holidays.
Ingredients
Cookie Dough
- 1 box white cake mix
- 1 small (3.4 oz) box instant vanilla pudding mix
- 8 tablespoons (1/2 cup) unsalted butter, softened
- 2 large eggs, room temperature
- Red food coloring
- Blue food coloring
Filling and Decoration
- 8 ounces cream cheese, softened
- 3 cups powdered sugar
- 4 teaspoons vanilla extract
- Red, white, and blue sprinkles
Instructions
- Preheat Oven and Prepare Baking Sheets: Position a rack in the center of your oven and preheat to 350°F (175°C). Line two baking sheets with parchment paper to prevent sticking and promote even baking.
- Make the Cookie Dough: In the bowl of a stand mixer fitted with the paddle attachment, combine the white cake mix and instant vanilla pudding mix. Add the softened butter and eggs, then beat on medium speed until the mixture is fully combined and forms a thick dough.
- Color the Dough: Divide the dough evenly into two bowls. Add red food coloring to one half and blue food coloring to the other, mixing each until the color is uniform without any streaks.
- Shape the Cookies: Use a tablespoon or small cookie scoop to drop rounds of the colored dough onto the prepared baking sheets, spacing them at least 2 inches apart to allow room for spreading during baking.
- Bake the Cookies: Bake one sheet at a time in the preheated oven for about 10 minutes, or until the tops spring back when gently pressed. Remove from the oven and allow the cookies to cool on the baking sheet for 3 minutes before transferring them to a wire rack to cool completely.
- Prepare the Filling: While the cookies cool, clean the stand mixer bowl and beat the softened cream cheese and powdered sugar together on medium-high speed for 3-5 minutes until light and fluffy. Add the vanilla extract and mix until fully incorporated.
- Assemble Whoopie Pies: Once the cookies have cooled completely, spread a generous layer of the cream cheese filling onto the flat side of one cookie. Top it with another cookie, flat side down, to form a sandwich.
- Decorate: Roll or sprinkle the edges of the filling with red, white, and blue sprinkles for a festive finish. Repeat the assembly and decoration for the remaining cookies and filling.
- Store and Serve: Place the assembled whoopie pies in an airtight container and refrigerate until ready to serve. For the best flavor and texture, allow them to come to room temperature before serving.
Notes
- Make sure to use room temperature eggs and softened butter to achieve a smooth dough consistency.
- Do not overbake the cookies; they should be soft and cake-like.
- You can customize the filling by adding a touch of lemon zest or using flavored cream cheese if desired.
- These whoopie pies can be stored in the refrigerator for up to 3 days.
- Allow assembled pies to warm to room temperature for the best texture and flavor before serving.


