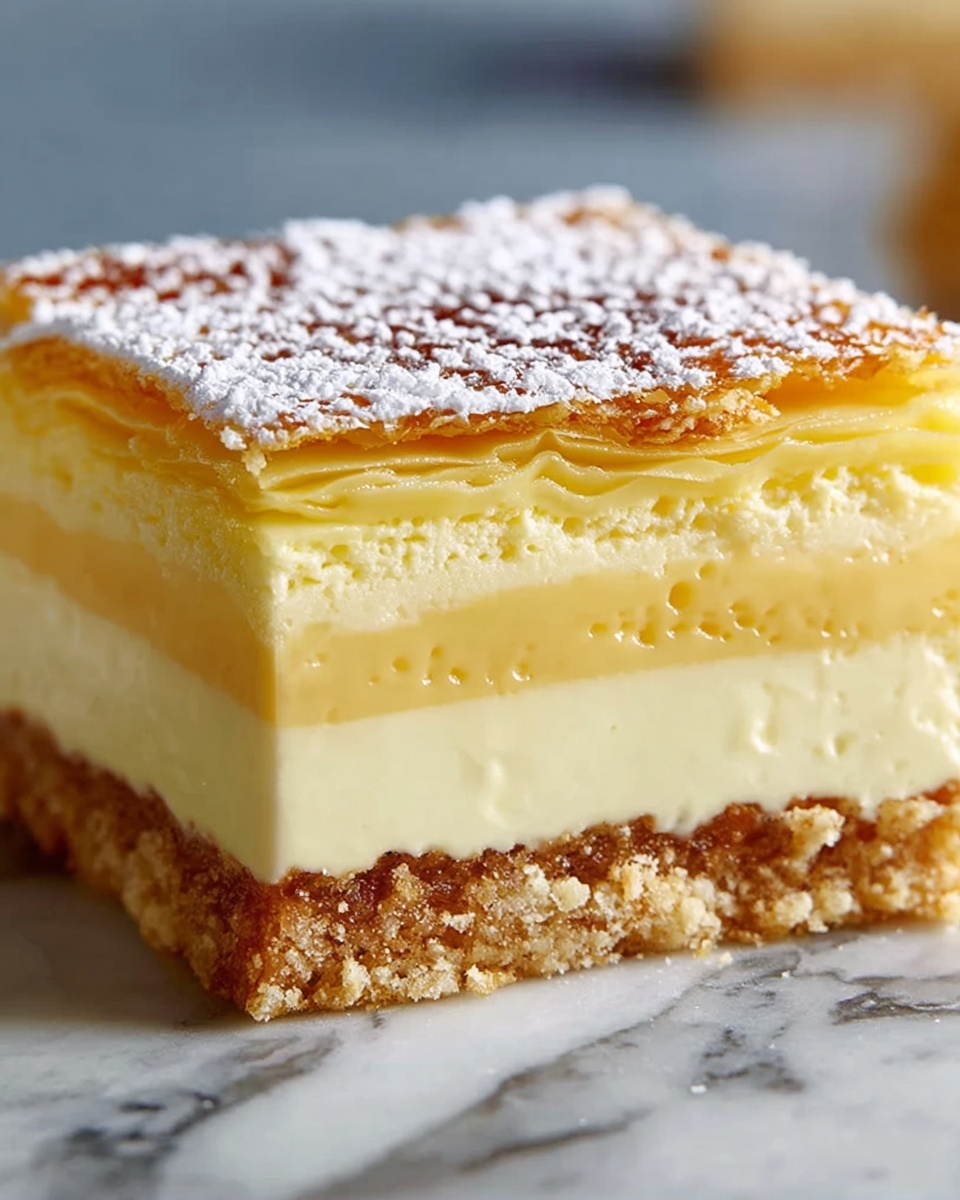
If you’ve been craving a dessert that feels both nostalgic and effortlessly elegant, the No-Bake Custard Slice Recipe is exactly what you need in your life. This layered treat combines crisp biscuits with luxuriously smooth custard and a sweet vanilla icing, all coming together with zero oven time required. It’s simple to prepare yet impressively indulgent, making it perfect for anyone who loves classic custard slices but wants to keep things stress-free in the kitchen. Once chilled, each slice offers a beautiful balance of creamy texture and gentle crunch that will have you reaching for seconds.
Ingredients You’ll Need
These ingredients might seem humble, but each one is essential in building the perfect custard slice. The biscuits create the sturdy, crispy layers, while the custard, made from simple pantry staples, brings that silky, melt-in-your-mouth charm. The icing finishes it all off with a touch of sweetness and a smooth exterior.
- Plain graham crackers or digestive biscuits (or vanilla wafers): Choose your favorite for the base and layers; their crispness is key to texture.
- Milk (4 cups): The heart of the custard, providing creamy richness.
- Sugar (1/2 cup): Sweetens the custard perfectly without overpowering.
- Cornstarch (1/3 cup): Thickens the custard to that signature custardy consistency.
- Vanilla extract (2 tsp + 1/2 tsp for icing): Adds warm, aromatic depth throughout the custard and icing.
- Egg yolks (3): Essential for creaminess and that delicate custard flavor.
- Butter (2 tbsp): Enriches the custard, giving it a smooth, velvety finish.
- Powdered sugar (1 cup): Forms the silky, sweet icing topping.
- Milk (1-2 tbsp for icing): Adjusts the icing to the perfect spreadable texture.
How to Make No-Bake Custard Slice Recipe
Step 1: Prepare Your Pan
Start by lining an 8×8 or 9×9 square pan with parchment paper. This step will ensure that your custard slice lifts out easily after it has set, giving a clean finish and making slicing much simpler.
Step 2: Create the First Biscuit Layer
Arrange a layer of your chosen biscuits evenly across the bottom of the pan. This layer forms the first crunchy foundation for your custard goodness and sets the stage for layering.
Step 3: Mix Custard Base
In a saucepan, whisk together milk, sugar, and cornstarch until everything is smooth. This base mixture is what will transform into that luscious custard after heating, so take a moment to ensure there are no lumps.
Step 4: Heat and Activate the Custard
Place the saucepan on medium heat and stir constantly. Once warm, slowly whisk in the egg yolks, which help thicken and enrich the custard. This step requires gentle care to avoid scrambling the eggs.
Step 5: Thicken the Custard
Continue stirring over medium heat for 5 to 7 minutes until the custard thickens into a rich, pudding-like texture. Patience here pays off with that perfect smoothness and body.
Step 6: Add Butter and Flavor
Remove the custard from the heat, then stir in the butter and vanilla extract until everything is combined. These last ingredients round out the custard with creamy richness and inviting aroma.
Step 7: Build the Layers
Pour half of the warm custard over the first biscuit layer, smoothing it out evenly. Then add a second biscuit layer on top, followed by the rest of the custard. Finish by placing one final biscuit layer on top.
Step 8: Prepare and Spread the Icing
Mix powdered sugar, milk, and vanilla extract to create a smooth icing glaze. Spread this evenly over the top biscuit layer, sealing in the delicious layers beneath with a sweet finishing touch.
Step 9: Chill and Set
Refrigerate the slice for at least 4 hours, though chilling overnight yields the best results. This resting time allows the custard to fully set and the flavors to meld beautifully.
Step 10: Slice and Serve
Once firm and chilled, carefully slice into squares. Serve chilled for the perfect balance of crisp biscuit and creamy custard in every bite.
How to Serve No-Bake Custard Slice Recipe

Garnishes
A simple dusting of cocoa powder or a few fresh berries can brighten the look and add a fresh contrast to the creamy slice. Mint leaves or a light drizzle of caramel sauce also make stunning options.
Side Dishes
This custard slice pairs wonderfully with a cup of strong coffee or a chilled glass of dessert wine. Fresh fruit salad or a scoop of vanilla ice cream can also complement the richness beautifully.
Creative Ways to Present
Try layering individual slices in clear dessert glasses to showcase the biscuit and custard layers or cut the slice into bite-sized squares for fun party bites. Adding edible flowers on top can give it a whimsical, dinner-party-ready appearance.
Make Ahead and Storage
Storing Leftovers
Keep any leftover slices covered tightly in the refrigerator for up to 3 days. The custard remains smooth and fresh, while the biscuits retain their crunch if properly chilled.
Freezing
While this recipe is best enjoyed fresh, you can freeze the assembled slice without icing for up to a month. Thaw overnight in the refrigerator and add fresh icing before serving to maintain the best texture and flavor.
Reheating
Because this is a no-bake custard slice, it’s best served chilled and not reheated. Warming could ruin the texture of the custard and soften the biscuit layers.
FAQs
Can I use other types of biscuits?
Absolutely! While graham crackers, digestive biscuits, or vanilla wafers work best for texture and flavor, feel free to experiment with what you love. Just make sure they’re sturdy enough to hold the custard layers.
Is there a way to make this recipe vegan?
Yes, you can substitute dairy milk for plant-based milk like almond or oat milk and use a vegan butter alternative. For the egg yolks, a cornstarch and turmeric mixture can help thicken, though the texture might be a bit different.
How long should I chill the slice?
Chilling for at least 4 hours is essential to let the custard set firmly. Overnight chilling, however, is recommended for the best sliceability and flavor melding.
Can I add flavor variations?
Definitely! Try adding citrus zest like lemon or orange to the custard, or a pinch of cinnamon or nutmeg for a spiced twist. You can also layer with fresh fruit for extra freshness.
What is the best way to serve the slice?
Serve the No-Bake Custard Slice chilled straight from the fridge. It pairs delightfully with hot beverages or light fruity accompaniments, making it a versatile dessert for many occasions.
Final Thoughts
This No-Bake Custard Slice Recipe is truly a gem to have in your dessert arsenal. It combines simplicity with such a comforting, satisfying flavor that it’s sure to become a favorite for family gatherings and casual treats alike. I can’t wait for you to try making it yourself and enjoy the delightful layers of creamy custard and crisp biscuits—you’re going to love every single bite!
Print
No-Bake Custard Slice Recipe
- Prep Time: 20 minutes
- Cook Time: 10 minutes
- Total Time: 4 hours 30 minutes (including chilling time)
- Yield: 9 to 12 slices
- Category: Dessert
- Method: Stovetop
- Cuisine: International
Description
This No-Bake Custard Slice is a delightful layered dessert featuring crisp graham crackers or digestive biscuits, enveloped in a smooth, homemade vanilla custard. Topped with a simple powdered sugar icing, this treat requires minimal baking skills and no oven time, making it perfect for a quick yet impressive dessert. Its creamy texture combined with crunchy layers creates a nostalgic, crowd-pleasing dessert ideal for any occasion.
Ingredients
Base and Layers
- 2 packs plain graham crackers or digestive biscuits (or vanilla wafers)
Custard Filling
- 4 cups milk
- 1/2 cup sugar
- 1/3 cup cornstarch
- 2 tsp vanilla extract
- 3 egg yolks
- 2 tbsp butter
Icing
- 1 cup powdered sugar
- 1–2 tbsp milk
- 1/2 tsp vanilla extract
Instructions
- Prepare the Pan: Line an 8×8 or 9×9 square pan with parchment paper to ensure easy removal of the custard slice later.
- Layer the Biscuits: Arrange a layer of graham crackers or digestive biscuits evenly to cover the bottom of the prepared pan completely.
- Make the Custard Base: In a medium saucepan, whisk together the milk, sugar, and cornstarch until the mixture is smooth with no lumps.
- Heat and Incorporate Egg Yolks: Place the saucepan over medium heat, stirring constantly to prevent lumps. When the mixture is hot, slowly whisk in the egg yolks carefully to temper them and avoid scrambling.
- Thicken the Custard: Continue stirring continuously until the custard thickens significantly, about 5 to 7 minutes. It should coat the back of a spoon.
- Finalize Custard: Remove the saucepan from heat and stir in butter and vanilla extract until the butter is fully melted and combined, yielding a smooth custard.
- Assemble First Custard Layer: Pour half of the prepared custard evenly over the first biscuit layer in the pan.
- Add Second Biscuit Layer: Carefully place another layer of biscuits over the custard, covering it completely.
- Top with Remaining Custard: Pour the remaining custard over the second biscuit layer, spreading evenly.
- Finish with Final Biscuit Layer: Cover the top with the last layer of biscuits, pressing gently to flatten the layers.
- Prepare the Icing: In a small bowl, mix powdered sugar with 1 to 2 tablespoons of milk and 1/2 teaspoon vanilla extract until smooth and spreadable.
- Ice the Top: Spread the icing evenly over the final biscuit layer to create a sweet finishing glaze.
- Chill: Place the assembled custard slice in the refrigerator for at least 4 hours, preferably overnight, to set and firm up.
- Serve: Once chilled, remove from the pan using the parchment paper, slice into squares and serve cold.
Notes
- Ensure the custard is thickened properly to avoid a runny dessert.
- Use parchment paper for easy removal and cleaner slices.
- Overnight chilling improves texture and flavor melding.
- You may substitute vanilla wafers for a sweeter or vanilla-flavored base instead of plain biscuits.
- Adjust icing milk quantity for desired consistency.


