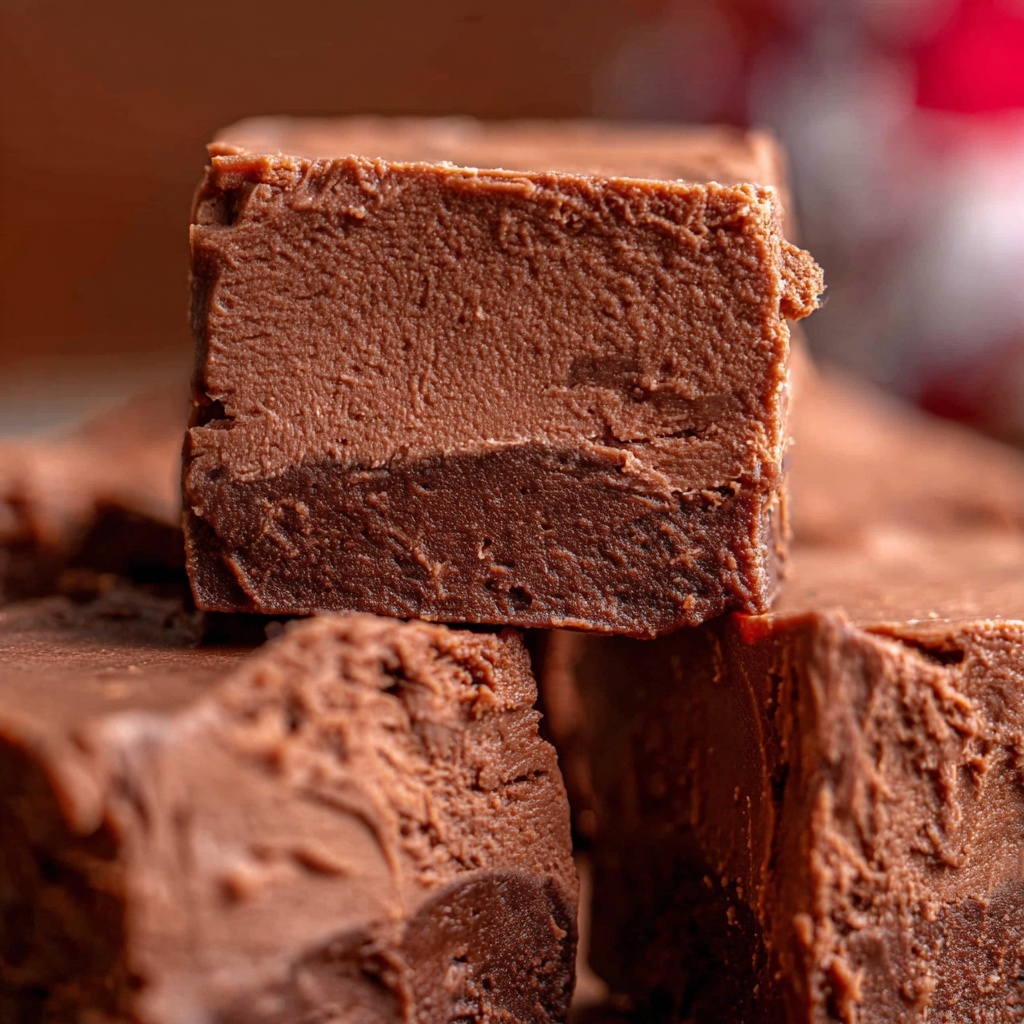
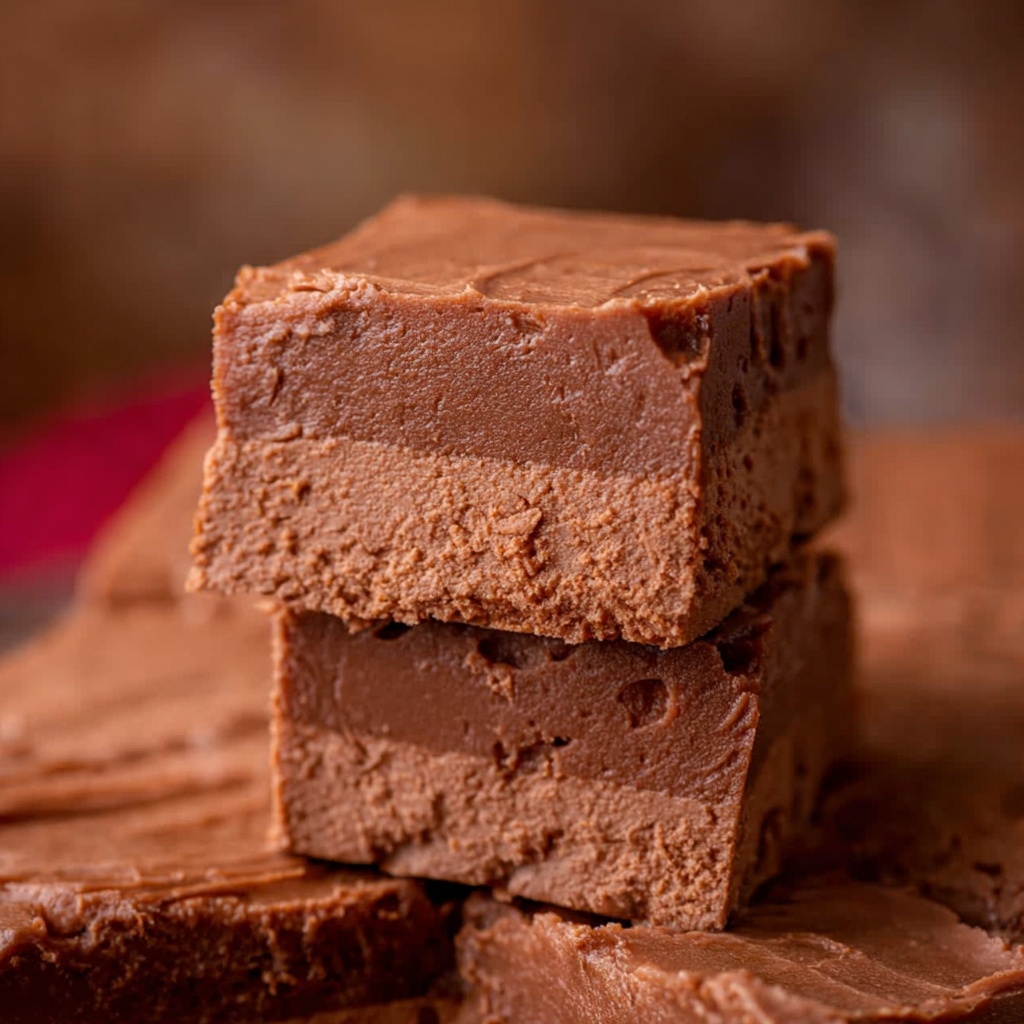
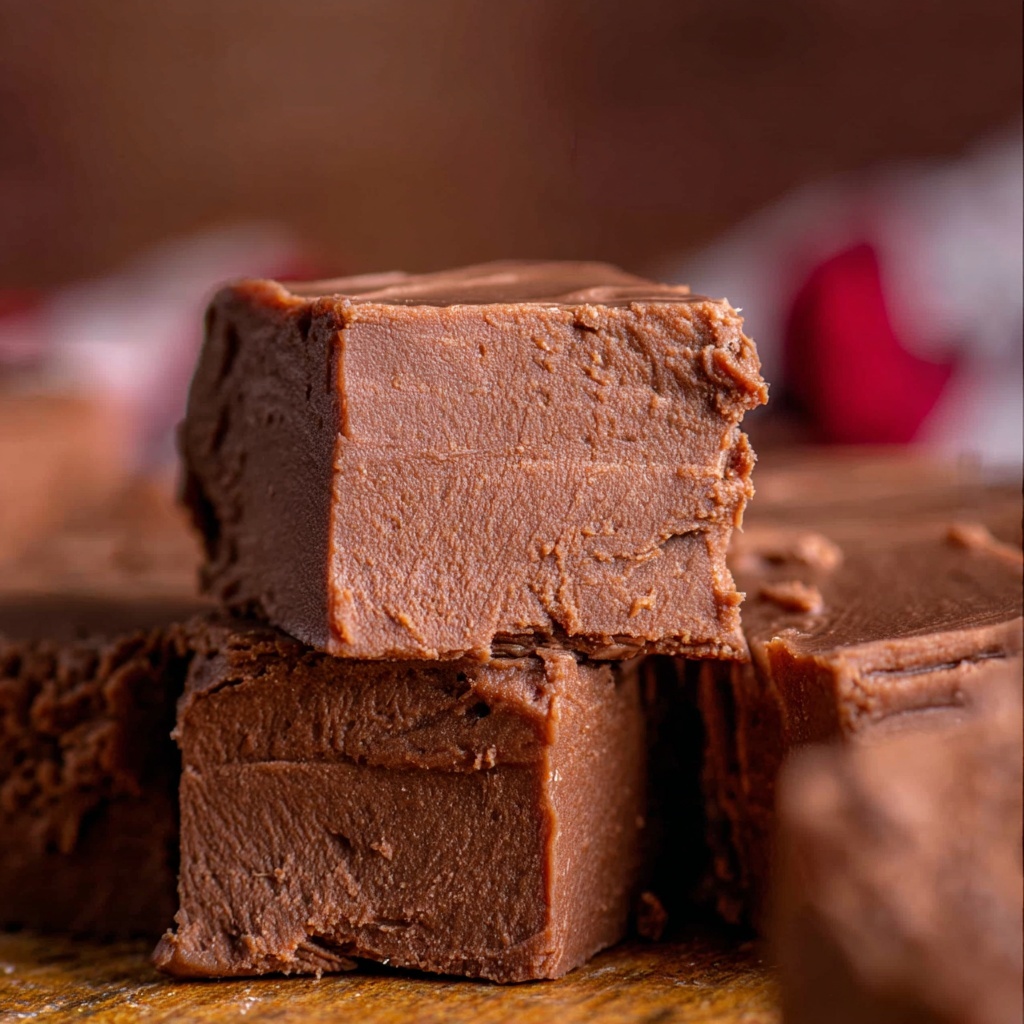
If you have a sweet tooth and a soft spot for nostalgic treats, you are going to absolutely adore Mom’s Marshmallow Fudge Recipe. This classic fudge is creamy, rich, and wonderfully smooth, with the perfect touch of marshmallow fluff that makes it irresistibly light and fluffy. Whether you’re making it for the holidays, a special occasion, or just because, this recipe is a treasured favorite that brings back warm memories and fills every bite with comfort. It’s simple, quick, and uses pantry staples to create a decadent candy that tastes like a little bit of homemade heaven.
Ingredients You’ll Need
What’s amazing about this recipe is that the ingredients are straightforward yet essential, each one building layers of flavor and texture that make the fudge so dreamy. Every item in this list plays a crucial role—from the butter giving it that silky mouthfeel, to the marshmallow cream adding that light, airy swirl.
- Butter (3/4 cup / 1 and 1/2 sticks): Use real butter for the best creamy texture and rich flavor; margarine just won’t do here.
- White granulated sugar (2 & 1/2 cups): The backbone of your sweetness and structure—measure carefully to ensure perfect consistency.
- Full-fat evaporated milk (2/3 cup): Adds creaminess and helps dissolve the sugar properly; do not substitute with sweetened condensed milk.
- Semi-sweet chocolate chips (12 ounces / 2 cups): Choose a high-quality brand for that deep chocolate note that balances the marshmallow’s sweetness.
- Marshmallow cream (7-ounce jar): Also known as marshmallow fluff, this lightens the fudge’s texture and brings that classic marshmallow flavor.
- Vanilla extract (1 teaspoon): Finishes everything off with a warm, inviting aroma and rounds out the sweetness beautifully.
How to Make Mom’s Marshmallow Fudge Recipe
Step 1: Prepare Your Ingredients
Before you even turn on the stove, line everything up like a pro. Measuring out your ingredients ahead of time is key because fudge-making waits for no one. When the sugar mixture boils, you’ll want to be ready to move fast and smooth or risk a grainy mess.
Step 2: Line Your Pan
Grab an 8×8 or 9×9 inch square pan and line it with parchment paper. This simple step makes life easier when you cut and lift out your beautiful fudge squares later.
Step 3: Get Your Mix-Ins Ready
Open that bag of semi-sweet chocolate chips and the jar of marshmallow cream. Removing the foil seal from the marshmallow fluff now saves time and hassle—trust me, you’ll thank yourself once you get going.
Step 4: Melt the Butter
Use a heavy 3-quart saucepan over medium heat and add the butter. Let it melt slowly and use your spoon to coat the sides of the pan with melted butter, which helps prevent sugar crystals from sticking—a little trick that ensures smooth fudge.
Step 5: Add Sugar Carefully
Pour the sugar slowly into the melted butter’s center, trying not to let any crystals cling to the pan’s sides. Then, gently swirl the butter into the sugar with your wooden spoon to moisten it all. This delicate dance is what keeps the fudge silky rather than gritty.
Step 6: Stir in Evaporated Milk
Pour in the evaporated milk and stir everything thoroughly, making sure every dry speck of sugar gets soaked. This is crucial for a flawless finish once it boils.
Step 7: Boil with Attention
Brace yourself for this part. Bring the mixture to a full rolling boil, stirring constantly. Once boiling, set a timer for 5 minutes and turn the heat down to medium so your fudge doesn’t burn on the bottom. Keep stirring the whole time. If you have a candy thermometer, aim for a temperature of about 234-236°F. This perfect boil sets the foundation for a melt-in-your-mouth fudge.
Step 8: Melt the Chocolate Chips
As soon as your timer goes off, remove the pot from heat and dump all the chocolate chips in at once. Stir vigorously until they completely melt and the mixture is perfectly smooth. No lumps allowed if you want that silky consistency!
Step 9: Blend in the Marshmallow Cream
Give your marshmallow cream a quick zap in the microwave—about 10 to 15 seconds—to soften it up, then add it to your chocolate mixture. Beat with your wooden spoon until almost fully blended. The marshmallow brings that iconic fudge softness and sweetness that you just can’t get elsewhere.
Step 10: Add Vanilla Extract
Stir in the vanilla until there are no more streaks. Stop stirring right when it’s fully combined—you want to keep the texture perfectly smooth but not overworked.
Step 11: Pour into Prepared Pan
Immediately pour the liquid fudge into your lined pan, leaving behind any dried fudge bits clinging to the pot edges. Give your pan a gentle shake to help the fudge settle evenly. Don’t fuss with smoothing it out; those natural ripples are part of the charm.
Step 12: Cool and Set
Patience is a virtue here! Let the fudge cool completely to room temperature. This step is the hardest because the aroma alone might tempt you to sneak a bite early.
Step 13: Slice and Enjoy
Once set, cut your velvet-smooth fudge into 7×7 small squares—perfect for sharing or keeping close for yourself since it’s beautifully rich and satisfying.
Step 14: Store Properly
Keep your fudge covered with plastic wrap on the counter, never in the fridge. Trust me, fudge tastes best at room temperature, and if it disappears quickly, that’s a good problem to have.
How to Serve Mom’s Marshmallow Fudge Recipe
Garnishes
A simple dusting of powdered sugar or a sprinkle of crushed nuts can add delightful texture and an extra pop of flavor, but this fudge is so perfect on its own that garnishing is completely optional.
Side Dishes
This fudge pairs wonderfully with a hot cup of coffee or tea, making for a cozy afternoon snack. It’s also a fabulous sweet finish after a hearty holiday meal.
Creative Ways to Present
For parties or gift-giving, cut the fudge into bite-sized pieces and wrap each square in colorful parchment or place them in decorative tins. You can even layer fudge with crushed candy canes or chopped dried fruits to personalize each batch.
Make Ahead and Storage
Storing Leftovers
Keep any leftover fudge stored tightly covered at room temperature. Plastic wrap or an airtight container works best to maintain its soft texture and prevent drying out.
Freezing
If you want to keep your fudge longer, you can freeze it. Wrap it well in plastic wrap and then place it in a freezer-safe bag or container. Thaw at room temperature when ready to enjoy.
Reheating
Fudge generally tastes best at room temperature, so avoid reheating. If it’s too firm, simply leave it out for a bit to soften before serving. This way, you’ll preserve that perfect melt-in-your-mouth texture.
FAQs
Can I use regular milk instead of evaporated milk?
Evaporated milk’s concentrated creaminess is essential for the fudge’s texture and flavor, so regular milk won’t provide the same result. Stick to evaporated milk for the best outcome.
Why shouldn’t I use margarine in this recipe?
Butter delivers rich flavor and a smooth creaminess that margarine cannot replicate. Margarine’s higher water content can affect the fudge’s texture, making it less silky.
What if my fudge turns out grainy?
Graininess usually happens if sugar crystals aren’t fully dissolved or if sugar sticks to the sides of the pot. Make sure to carefully moisten the sugar and avoid letting crystals cling on the pot edges during cooking.
Can I substitute chocolate chips with baking chocolate?
Yes, but be careful with the quantity and stirring. Chocolate chips have stabilizers that help with smooth melting, while baking chocolate may behave differently. If using baking chocolate, chop it finely and watch the melting process closely.
How long does this fudge last at room temperature?
Stored properly, this fudge can last up to two weeks on the counter. Just keep it covered tightly to retain freshness and softness.
Final Thoughts
You absolutely have to give Mom’s Marshmallow Fudge Recipe a try—it’s the kind of treat that instantly becomes a favorite in any household. Easy to whip up and packed with that perfect combination of chocolate and marshmallow goodness, it feels like a warm hug in every bite. So grab your saucepan, gather your ingredients, and get ready to make some unforgettable fudge magic today!
Print
Mom’s Marshmallow Fudge Recipe
- Prep Time: 5 minutes
- Cook Time: 5 minutes
- Total Time: 10 minutes
- Yield: 49 pieces (7×7 grid in an 8×8 inch pan)
- Category: Dessert
- Method: Stovetop
- Cuisine: American
Description
Mom’s Marshmallow Fudge is a rich, creamy homemade fudge with the perfect balance of chocolate and marshmallow flavors. Made with simple ingredients like butter, sugar, evaporated milk, high-quality semi-sweet chocolate chips, and marshmallow cream, this classic treat is quick to prepare and yields 49 small, decadent squares. The fudge is cooked on the stovetop, resulting in a smooth, melt-in-your-mouth texture that is perfect for sharing during the holidays or any special occasion.
Ingredients
Main Ingredients
- 3/4 cup butter (1 and 1/2 sticks; do not use margarine)
- 2 1/2 cups white granulated sugar
- 2/3 cup full-fat evaporated milk (do not use sweetened condensed milk)
- 12-ounce package high quality semi-sweet chocolate chips (approximately 2 cups)
- 7-ounce jar marshmallow cream (also called marshmallow fluff)
- 1 teaspoon vanilla extract
Instructions
- Prepare Ingredients: Measure out all ingredients precisely and have them ready before starting. Fudge-making moves quickly, so preparation is essential.
- Line Pan: Line an 8×8 or 9×9 inch square pan with parchment paper and set it aside.
- Prepare Chocolate and Marshmallow Cream: Open the semi-sweet chocolate chips package. Remove the lid and foil seal from the marshmallow cream jar to get it ready for heating.
- Melt Butter: In a 3-quart heavy saucepan over medium heat, add the butter. Use a spoon to drag the melting butter up the sides of the pan to grease the edges thoroughly.
- Add Sugar: Gradually pour in the granulated sugar into the center of the pan, avoiding sugar crystals on the pan sides. Stir slowly with a wooden spoon to moisten all the sugar without leaving crystals on the sides or spoon to avoid grainy fudge.
- Add Evaporated Milk: Pour in the evaporated milk and stir well to dissolve any remaining dry sugar crystals before the mixture boils.
- Boil Mixture: Bring the mixture to a full rolling boil over medium-high heat, stirring constantly. Once boiling, set a timer for 5 minutes, reduce heat to medium, and continue stirring constantly. Aim for 234-236°F on a candy thermometer. Remove from heat if it reaches this temperature early to prevent dry, crumbly fudge.
- Add Chocolate Chips: Remove the pan from heat and add all the chocolate chips at once. Stir vigorously until the chocolate chips are fully melted and the mixture is smooth.
- Heat Marshmallow Cream: Microwave the marshmallow cream for 10-15 seconds to soften it for easy scooping.
- Add Marshmallow Cream: Add the marshmallow cream to the chocolate mixture and beat with a wooden spoon until nearly blended.
- Add Vanilla: Stir in the vanilla extract until the mixture is smooth and uniform with no marshmallow streaks. Stop stirring as soon as it is combined.
- Pour into Pan: Immediately pour the fudge into the prepared pan, leaving behind any dried or thickened bits on the sides of the pot. Shake the pan gently to level the fudge. Do not smooth the surface; it should have a rippled texture.
- Cool: Allow the fudge to cool to room temperature completely.
- Slice and Serve: Slice the fudge into 7×7 rows, producing about 49 small pieces. The fudge is rich, so small squares are perfect.
- Store: Cover the fudge with plastic wrap and store it at room temperature. Do not refrigerate to maintain the proper texture and flavor.
Notes
- Use high-quality semi-sweet chocolate chips for the best flavor and texture.
- Do not use margarine; real butter is necessary for proper consistency.
- Avoid sugar crystals on the sides of the pan to prevent grainy fudge.
- Watch the boil carefully and use a candy thermometer to avoid overcooking, which causes dry, crumbly fudge.
- Do not refrigerate the finished fudge; it keeps best at room temperature.
- Line the pan with parchment for easy removal of fudge squares.
- Stop stirring as soon as the fudge mixture is smooth after adding vanilla to keep a soft texture.


