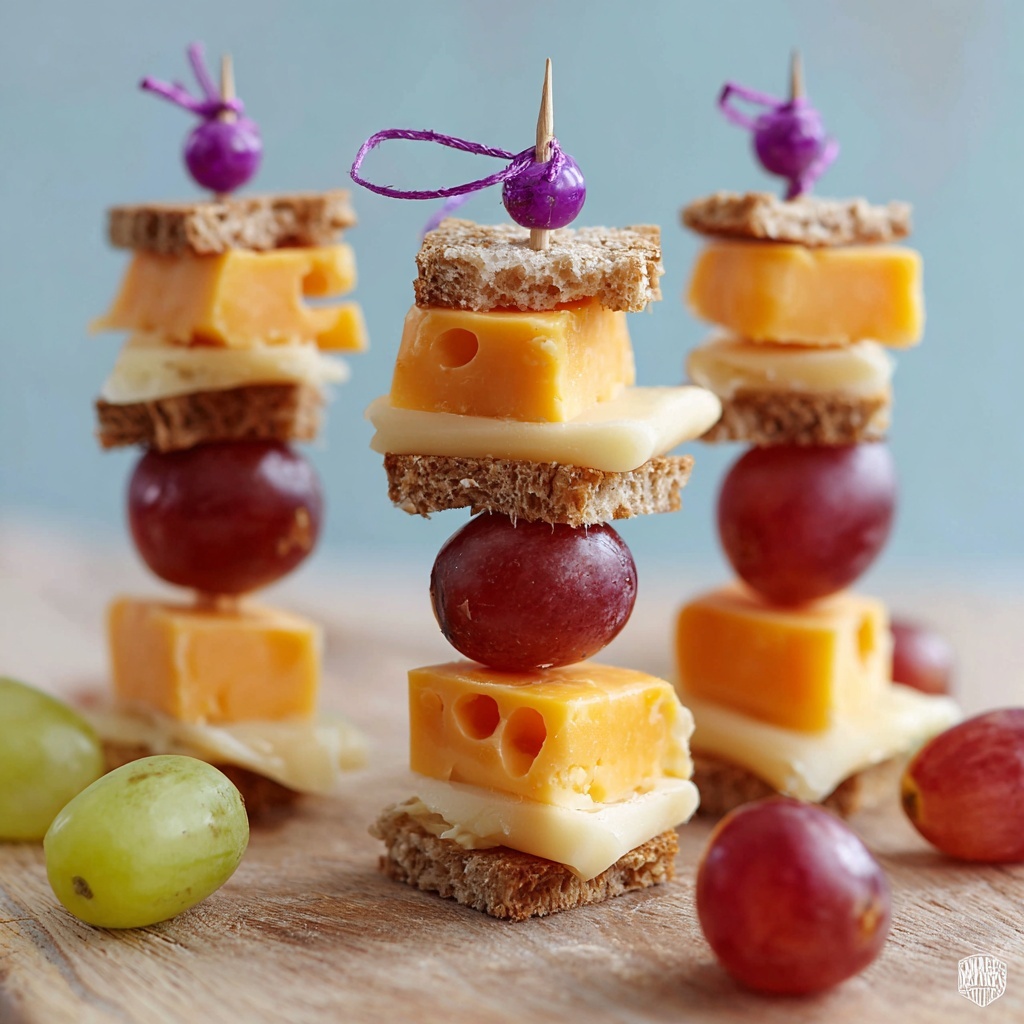
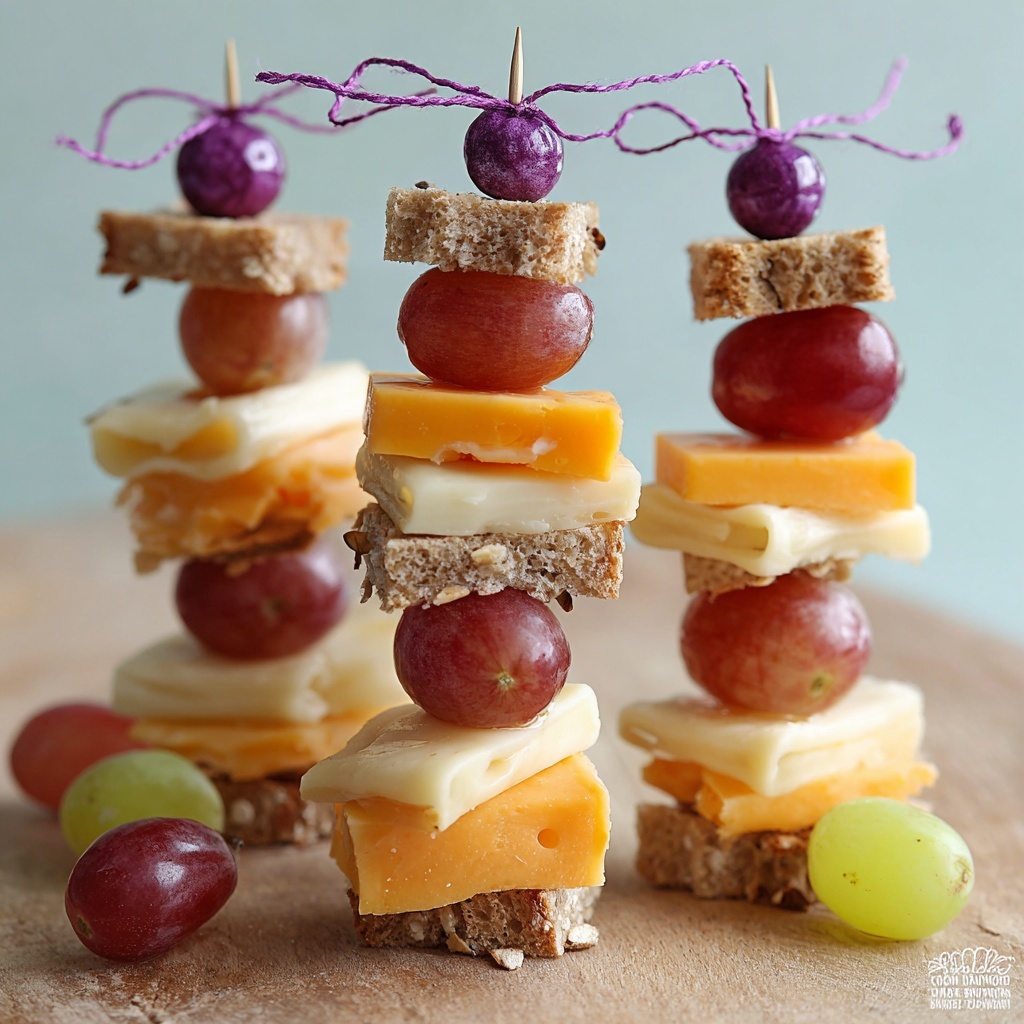
If you are looking for a fun, delicious way to transform lunchtime into a playful and tasty experience, this Lunch Kabob “Necklaces” Recipe is just what you need. These edible necklaces combine wholesome chunks of whole grain bread, savory cheese cubes, tender turkey, and fresh fruit into a delightful, hands-on meal that’s perfect for kids and adults alike. Not only does this dish bring all the flavors you love into a neat, wearable creation, but it also invites creativity and excitement to every bite.
Ingredients You’ll Need
Ingredients You’ll Need
Getting the right ingredients for this dish is easier than you think, and each one plays a crucial role in balancing flavor, texture, and visual appeal. They’re simple, everyday foods that come together to create a playful yet satisfying lunch.
- Whole grain bread cubes: Provides a hearty base with a slight nuttiness and a sturdy texture perfect for threading.
- Cheese cubes (cheddar, mozzarella, or Colby Jack): Adds creamy richness and a delightful melt-in-your-mouth experience.
- Cooked turkey chunks or rolled deli slices: Offers tender protein that complements the other ingredients wonderfully.
- Grapes (red or green): Brings juicy sweetness and color contrasts to keep things visually exciting.
- Optional cherry tomatoes: Add a fresh, tangy burst that livens up every bite.
- Cucumber rounds: Provide a refreshing crunch and a hint of coolness.
- Pretzel bites: Sprinkle in some salty crunch for textural fun.
- Thick food-safe twine or yarn (about 18″ per necklace): Essential for stringing your kabob pieces safely and neatly.
- Tape + blunt plastic needle or skewer: Useful tools that make threading simpler and safer, especially for little hands.
How to Make Lunch Kabob “Necklaces” Recipe
Step 1: Prepare Your Ingredients
Start by cutting the whole grain bread, cheese, turkey, and any veggies or fruit into bite-sized chunks or rounds. This size ensures that the pieces are easy to thread onto your string and charming enough to show off as edible jewelry.
Step 2: Set Up Your Threading Station
Tape one end of the food-safe twine securely to a table’s edge to keep it steady as you thread. If you prefer, slide your twine through a blunt plastic needle or use a skewer to make threading safer and smoother—especially handy for kids getting involved in the kitchen fun.
Step 3: String the Kabob “Necklaces” Together
Now comes the best part! Let your creativity run wild as you string the prepared ingredients onto the twine, mixing and matching colors and flavors like edible beads. Whether it’s alternating bread and cheese or adding fruit bursts after every protein chunk, the possibilities are endless and delicious.
Step 4: Secure and Wear
Once your necklace is filled to your liking, tie off the ends into a snug knot or leave them loose for wearable lunchtime enchantment. These kabob “necklaces” not only make a meal but an interactive fashion statement you can proudly wear before enjoying.
Step 5: Enjoy or Pack for Later
Lunch Kabob “Necklaces” Recipe works perfectly for immediate eating or packing up for mealtime surprises. Just place them in containers and watch lunchtime transform into the highlight of the day, whether at school, work, or family picnics.
How to Serve Lunch Kabob “Necklaces” Recipe
Garnishes
Sprinkle finely chopped herbs like parsley or basil on the platter for a pop of fresh green and an herbal note, or add a petite drizzle of honey mustard on the side for dipping bites that crave an extra zing.
Side Dishes
This recipe shines as a fun centerpiece but pairs exceptionally well with light, crisp sides such as a mixed green salad, crunchy carrot sticks, or a small cup of yogurt for dipping. These additions balance the necklace’s hearty textures.
Creative Ways to Present
For parties or kids’ lunchboxes, arrange the Lunch Kabob “Necklaces” Recipe standing up in tall glasses or wrapped in clear cellophane tied with a charming ribbon. You can also create personalized name tags for each necklace to turn this meal into a delightful event.
Make Ahead and Storage
Storing Leftovers
If you happen to have leftovers, wrap the necklaces carefully in plastic wrap or place them in airtight containers to maintain freshness. Store in the refrigerator and aim to consume within one day for the best taste and texture.
Freezing
Freezing isn’t recommended for Lunch Kabob “Necklaces” Recipe as the fresh ingredients like bread, grapes, and cheese can lose their texture and flavor after thawing, making the experience less enjoyable.
Reheating
This recipe is best enjoyed chilled or at room temperature, so reheating is unnecessary. Simply unwrap and serve fresh for an ideal balance of flavors and textures that warm meals can’t replicate.
FAQs
Can I use different types of bread for these kabob necklaces?
Absolutely! While whole grain bread is nutritious and sturdy, feel free to experiment with sourdough, rye, or even sandwich thins cut into cubes. Just ensure the pieces are firm enough to hold together on the twine.
Is this recipe suitable for kids?
Yes, this Lunch Kabob “Necklaces” Recipe is a fantastic way to get kids involved in healthy eating. Threading the pieces helps develop fine motor skills, and the colorful presentation makes mealtime engaging and fun.
Can I substitute turkey with other proteins?
Definitely! Chicken chunks, ham, or even plant-based deli slices work wonderfully here. Just make sure they’re cooked and cut into manageable pieces for easy threading.
What if my child is allergic to any of the ingredients?
Simply swap out any allergens with safe alternatives. For instance, if dairy is a concern, try cheese substitutes, and replace grapes with apple slices or berries for a safe, tasty variation.
How long do the Lunch Kabob “Necklaces” Recipe stay fresh?
These edible necklaces are best eaten on the day they’re made to enjoy the freshest flavors and textures, but properly stored leftovers can last up to 24 hours in the fridge.
Final Thoughts
The Lunch Kabob “Necklaces” Recipe is not just a meal; it’s a joyful experience that brings food, creativity, and a bit of whimsy to your table. Whether you’re preparing a quick lunch, a fun party snack, or an interactive family activity, these kabob necklaces are sure to brighten everyone’s day. Don’t hesitate to dive in and make your next lunchtime a playful celebration of flavors and fun!
Print
Lunch Kabob “Necklaces” Recipe
- Prep Time: 15 minutes
- Cook Time: 0 minutes
- Total Time: 15 minutes
- Yield: 4 necklaces
- Category: Lunch
- Method: No-Cook
- Cuisine: American
Description
Fun and creative Lunch Kabob “Necklaces” made with bite-sized pieces of whole grain bread, cheese, cooked turkey, grapes, and optional fresh veggies. These edible necklaces are perfect for kids and make lunchtime playful and nutritious. No cooking required; just assemble and enjoy!
Ingredients
Main Ingredients
- Cubes of whole grain bread (enough for 4 necklaces)
- Cheese cubes (cheddar, mozzarella, or Colby Jack), about 1 cup
- Cooked turkey chunks or rolled deli slices, about 1 cup
- Grapes (red or green), about 1 cup
Optional Ingredients
- Cherry tomatoes, halved, about 1/2 cup
- Cucumber rounds, about 1/2 cup
- Pretzel bites, about 1/2 cup
Assembly Materials
- Thick food-safe twine or yarn (about 18 inches per necklace)
- Tape
- Blunt plastic needle or skewer for threading
Instructions
- Prepare Ingredients: Cut all ingredients into bite-sized chunks suitable for easy threading onto the twine or needle.
- Secure Twine: Tape one end of the twine securely to a table or use a blunt plastic needle or skewer to facilitate safe threading while assembling the necklace.
- Thread Ingredients: Let children or participants string the ingredients in fun and creative patterns to make edible jewelry necklaces.
- Finish Assembly: Once the necklace is complete, tie off the ends securely or leave them loose if you intend to wear it as jewelry.
- Serve or Store: Eat the necklaces immediately for fresh taste or pack them into containers for a playful lunchtime surprise later.
Notes
- This is a no-cook recipe ideal for quick and interactive meal prep with kids.
- You can customize the ingredients based on preference or dietary restrictions.
- Use a blunt needle or skewer to make threading safer and easier, especially for children.
- Consume the necklaces soon after assembling to keep bread and fresh ingredients from becoming soggy.
- Ensure the twine or yarn used is food-safe to avoid contamination.


