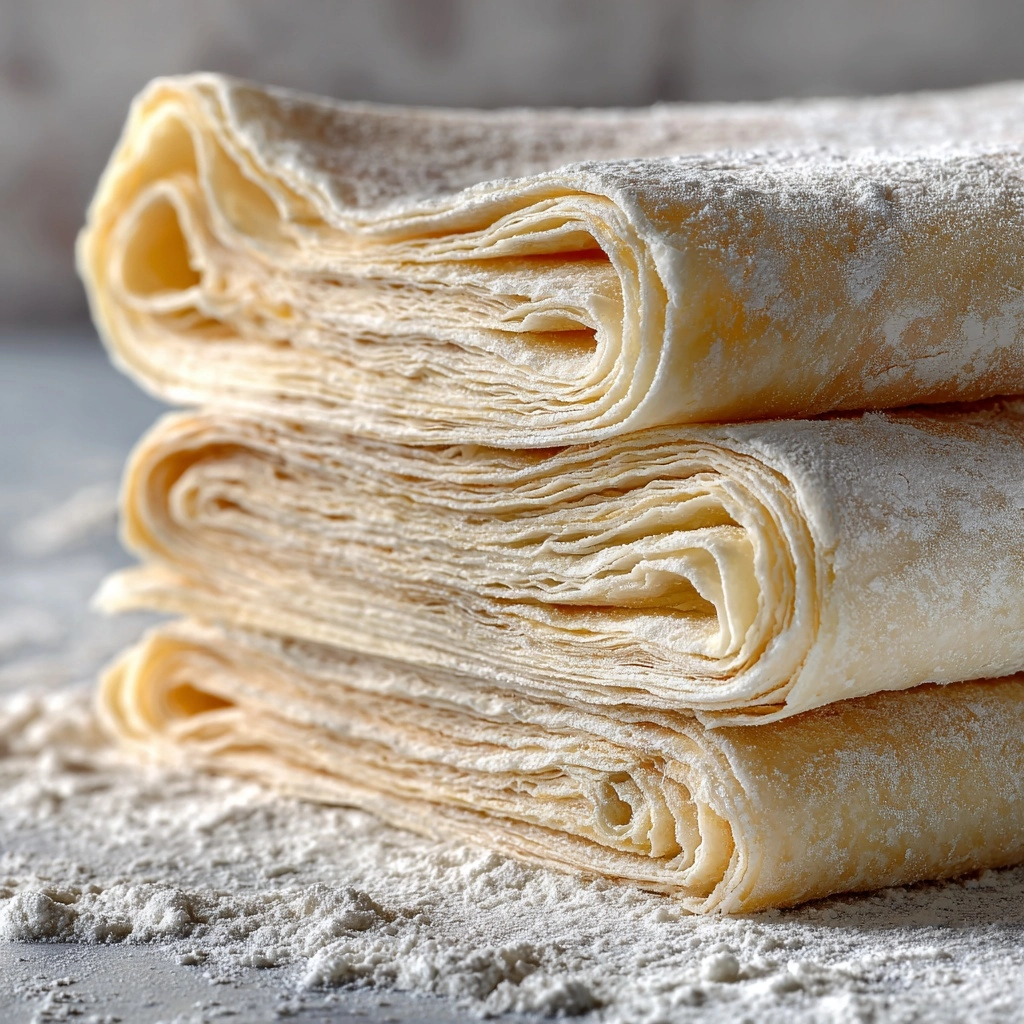
If you’ve ever been intimidated by the idea of making puff pastry from scratch, let me introduce you to your new kitchen best friend: Homemade Rough Puff Pastry Dough. This recipe is my go-to whenever I want a pastry that’s gorgeously flaky and buttery, but don’t have the patience (or upper arm stamina!) for the traditional, time-consuming version. With just a handful of pantry staples, you’ll whip up a dough that brings French bakery style results straight to your oven, perfect for all your favorite tarts, turnovers, and savory pies.

Ingredients You’ll Need
There’s magic in using simple, quality ingredients when crafting Homemade Rough Puff Pastry Dough. Each component brings something essential: crisp layers, tender bite, and golden color. Here’s what you’ll need and why it matters:
- All-purpose flour: The backbone of your dough, flour provides structure while letting those flaky layers develop beautifully.
- Salt: Just a teaspoon will round out the buttery flavor and help enhance every bite.
- Unsalted butter (cold, cubed): This is the star! Keeping it cold ensures those signature flakes and a decadently rich taste.
- Ice water: Cold water keeps the butter from melting and helps your dough come together without overworking it.
- Lemon juice or white vinegar (optional): Just a splash makes the pastry even more tender and easy to handle, especially for beginners.
How to Make Homemade Rough Puff Pastry Dough
Step 1: Mix the Dry Ingredients
Start by grabbing a large mixing bowl and whisking together the flour and salt. This first step evenly distributes the salt, ensuring flavor in every flaky bite. Don’t rush this part—the more uniform the salt, the better the final pastry.
Step 2: Incorporate the Butter
Add your cold cubed butter directly to the bowl. Toss it gently so every piece of butter gets a light dusting of flour. Working quickly (cold is key!), use your hands or a pastry cutter to break down the butter into pea-sized flakes. Make sure to leave some slightly larger chunks—these melt during baking and create those irresistible layers Homemade Rough Puff Pastry Dough is known for.
Step 3: Add the Liquid
In a small bowl or measuring cup, combine your ice water with the optional lemon juice or vinegar. Drizzle this mixture over the flour and butter, stirring gently with a fork. The dough should just start to come together—it will look shaggy and won’t be perfectly smooth, and that’s exactly right.
Step 4: Bring the Dough Together
Turn the dough out onto a lightly floured surface. Give it a gentle knead only as much as needed for it to hold together—over-kneading can build too much gluten and make the pastry tough. Shape it into a rough rectangle, then wrap tightly in plastic and refrigerate for 30 minutes. This first chill helps the butter firm up, setting you up for major flakiness.
Step 5: Roll and Fold for Flaky Layers
After chilling, roll the dough out into a long rectangle. The classic “letter fold” technique is key here: fold the top third down and the bottom third up, like you’re folding a business letter. Rotate the dough 90 degrees and repeat the rolling and folding. Make sure to complete this process four times, chilling again for 20–30 minutes between every two folds if your dough feels soft or sticky. These folds are what create the gorgeous layers that make Homemade Rough Puff Pastry Dough worth every minute!
Step 6: Final Chill
Once you’ve completed the rolling and folding cycles, wrap your dough tightly and let it rest in the fridge for at least one more hour. This last chill lets the gluten relax and the butter firm, ensuring that melt-in-your-mouth texture after baking. Now you’re ready to use it for anything from fruity turnovers to the most elegant quiche.
How to Serve Homemade Rough Puff Pastry Dough

Garnishes
Elevate your pastries with an extra brush of beaten egg before baking for a shiny, golden finish. For a sweet touch, sprinkle turbinado sugar on fruit pastries; for savory dishes, a pinch of flaky sea salt or fresh herbs can make every bite pop.
Side Dishes
Pair pastries made from Homemade Rough Puff Pastry Dough with light, crisp salads for a balanced meal, or serve alongside a warming soup for comfort food bliss. A little fruit compote or tangy chutney can turn a simple snack into a flavor celebration.
Creative Ways to Present
Treat your guests to individual tartlets or twisted pastry sticks for whimsical appetizers. For brunches or tea parties, cut dough into hearts, stars, or other shapes, or use it to top savory pot pies for a rustic but elegant touch.
Make Ahead and Storage
Storing Leftovers
Leftover Homemade Rough Puff Pastry Dough keeps beautifully in the fridge for up to three days. Just make sure it’s tightly wrapped so it doesn’t absorb fridge odors, and let it rest at room temperature for a few minutes before rolling out again.
Freezing
This dough is a freezer’s best friend! Wrap tightly in plastic, then pop it into a resealable bag. Freeze for up to two months—and when you’re ready to bake, thaw overnight in the fridge before using as usual.
Reheating
If you’ve baked pastries and have leftovers, reheat them in a 350°F (175°C) oven for 5 to 8 minutes. This brings back the crispiness and revives those flaky layers—much tastier than microwaving.
FAQs
Can I use a food processor to make this dough?
Absolutely! Just pulse the flour, salt, and butter together, then add the water mixture and pulse until the dough starts to clump. Be sure not to over-process—the magic is in the visible bits of butter that give Homemade Rough Puff Pastry Dough its signature layers.
Do I really need to chill the dough between folds?
Yes, chilling after every two folds is key to keeping the butter cold and achieving gorgeous layers. If your kitchen is cool and you’re working quickly, you can sometimes skip a chill, but I highly recommend it for the most reliable flakiness.
What if my dough feels too crumbly?
If your dough isn’t coming together, drizzle in a teaspoon or two of cold water until it holds together when pressed. But don’t overdo it—a slightly shaggy texture means you’re on the right track for great Homemade Rough Puff Pastry Dough.
Can I make this dough ahead?
Yes! The beauty of rough puff is that it loves the fridge or freezer. Make your dough up to three days in advance and keep it chilled, or freeze it for up to two months. Thaw before using, and you’re ready for instant pastry magic any time.
What are some creative uses for this dough?
The possibilities are endless—tarts, turnovers, bites for appetizers, vol-au-vents filled with mushrooms, or even savory galettes. Homemade Rough Puff Pastry Dough brings a gourmet touch to both sweet and savory creations.
Final Thoughts
I can’t recommend Homemade Rough Puff Pastry Dough enough—once you try this easy, rewarding recipe, you’ll never look at store-bought pastry the same way again. It’s a joy to make and a true treat to eat, so gather your ingredients and let the baking fun begin!
Print
Homemade Rough Puff Pastry Dough Recipe
- Prep Time: 25 minutes
- Cook Time: 0 minutes
- Total Time: 1 hour 55 minutes (including chilling and folding time)
- Yield: 1 sheet of dough (enough for 1 large tart or 8–10 pastries)
- Category: Baking
- Method: Rolling and Folding
- Cuisine: French
- Diet: Vegetarian
Description
Learn how to make homemade rough puff pastry dough from scratch with this easy recipe. This flaky and buttery dough is perfect for tarts, turnovers, and savory pies.
Ingredients
Dough:
- 2 1/2 cups (315g) all-purpose flour
- 1 teaspoon salt
- 1 cup (226g) unsalted butter (cold and cut into small cubes)
- 2/3 cup (160ml) ice water
- 1 teaspoon lemon juice or white vinegar (optional, helps tenderize dough)
Instructions
- Prepare the Dough: In a large mixing bowl, whisk together the flour and salt. Add the cold butter cubes and toss to coat in flour. Use your hands or a pastry cutter to flatten and break the butter into small flakes, about the size of peas, keeping some larger chunks for flakiness.
- Combine Wet Ingredients: Stir the lemon juice into the ice water, then gradually add it to the flour mixture, stirring with a fork until the dough starts to come together.
- Knead and Shape: Gently knead in the bowl or on a lightly floured surface just until a shaggy dough forms. Shape into a rectangle, wrap in plastic, and chill for 30 minutes.
- Roll and Fold: On a floured surface, roll the dough into a long rectangle (about 8×20 inches). Fold the top third down and the bottom third up, like a letter. Rotate 90 degrees, roll out again, and repeat the fold. Repeat this rolling and folding process 4 times, chilling for 20–30 minutes between every 2 turns if the dough becomes too soft.
- Chill and Rest: After the final fold, wrap and chill for at least 1 hour before using.
Notes
- Make sure to keep the butter cold throughout the process to achieve flaky layers.
- You can freeze the dough for up to 2 months.
- Ideal for tarts, turnovers, or savory pies.
Nutrition
- Serving Size: 1/10 of dough
- Calories: 230
- Sugar: 0g
- Sodium: 120mg
- Fat: 17g
- Saturated Fat: 11g
- Unsaturated Fat: 5g
- Trans Fat: 0.5g
- Carbohydrates: 17g
- Fiber: 1g
- Protein: 2g
- Cholesterol: 45mg


