
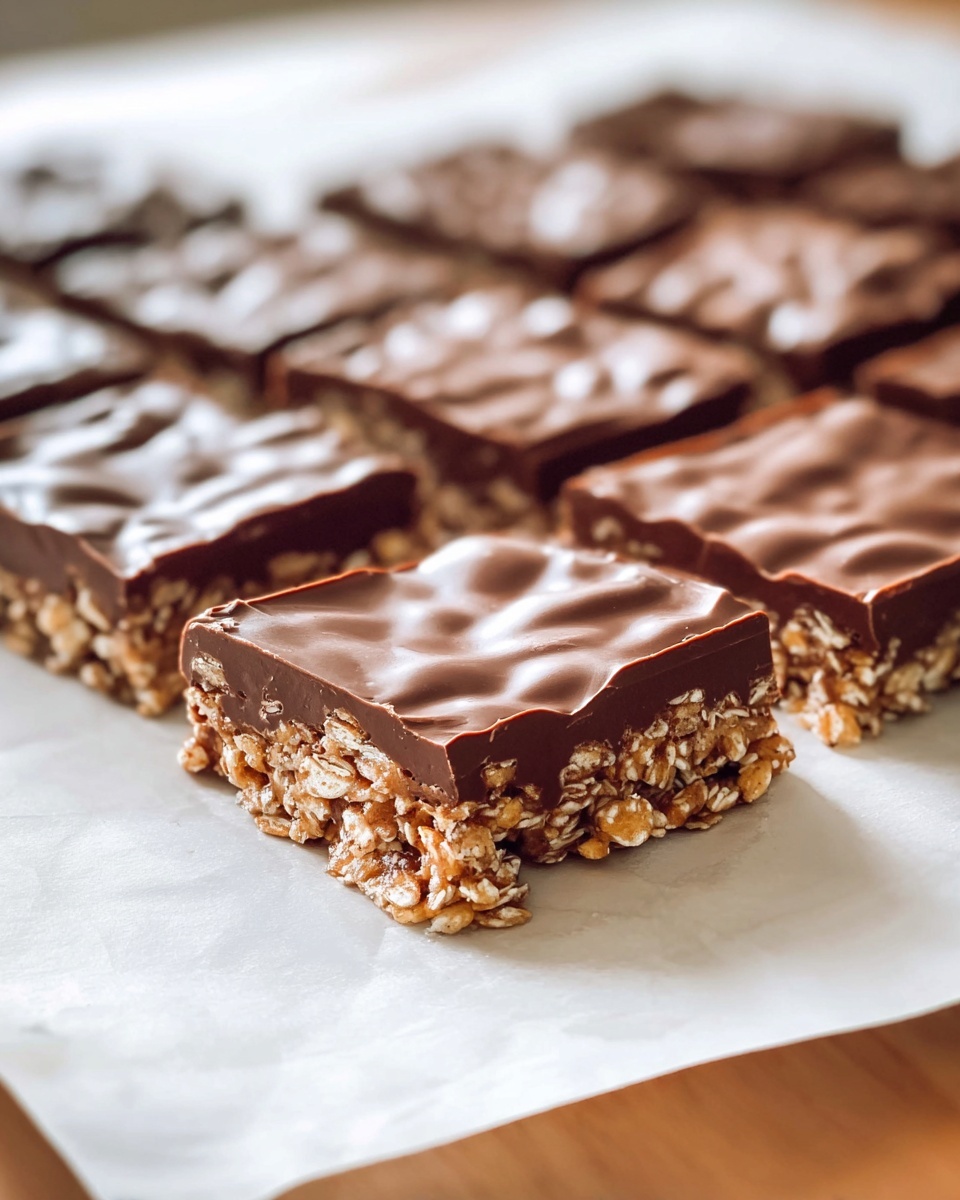
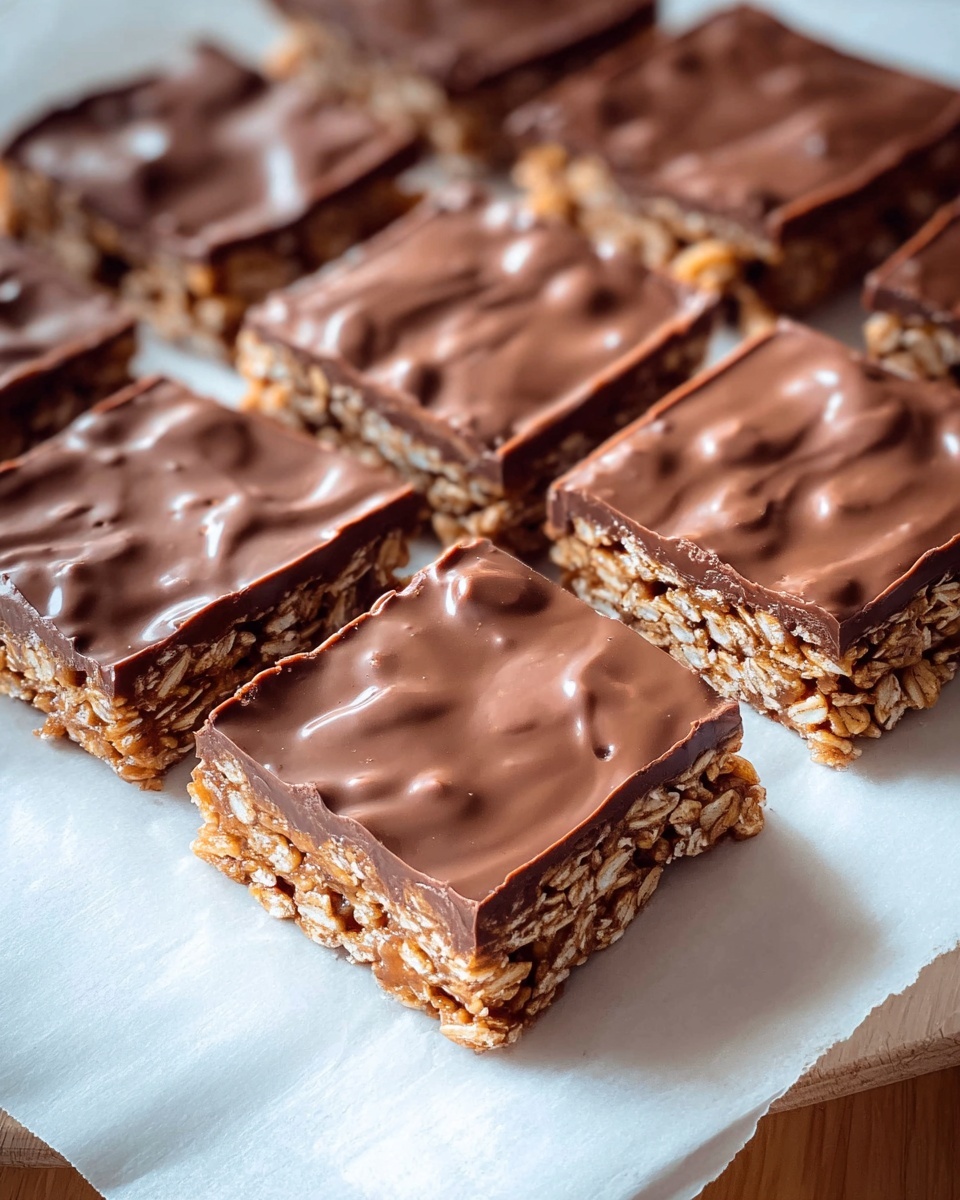
If you’ve ever craved a snack that’s both delightfully crispy and decadently chocolatey, you’re in for a treat with this Homemade Crunch Bars Recipe. Combining the nostalgic crunch of rice cereal with melty chocolate, buttery richness, and gooey marshmallows, these bars are pure comfort in every bite. They’re incredibly simple to whip up, yet make an impressive snack or dessert that will have everyone asking for more. Whether it’s a quick afternoon pick-me-up or a sweet ending to your day, this recipe is sure to become a beloved favorite in your kitchen.
Ingredients You’ll Need
To make these Homemade Crunch Bars, you’ll only need a handful of straightforward ingredients, each playing a key role in creating the perfect balance of flavor and texture. These staples are easy to find and come together quickly, making the recipe both approachable and rewarding.
- Semi-sweet chocolate chips: Provide rich, smooth chocolate flavor and help bind the bars together.
- Unsalted butter: Adds a creamy richness and helps melt the chocolate to a perfect consistency.
- Crisp rice cereal: Delivers the iconic crunch and lightness to every bite.
- Mini marshmallows: Melt into gooey pockets of sweetness, making the bars irresistibly chewy.
- Vanilla extract: Enhances the overall flavor, adding a subtle warmth and depth.
How to Make Homemade Crunch Bars Recipe
Step 1: Melt the Chocolate and Butter
Start by gently melting your semi-sweet chocolate chips and unsalted butter in a saucepan over low heat. Stir frequently to prevent scorching and ensure everything blends into a silky, smooth mixture. This step is crucial because the creamy chocolate base brings the bars to life and binds all the ingredients together beautifully.
Step 2: Incorporate Marshmallows and Vanilla
Once your chocolate and butter mixture is perfectly melted, remove the saucepan from heat. Stir in the mini marshmallows and a splash of vanilla extract until everything is evenly combined. The marshmallows will begin to soften and meld with the chocolate, creating that dreamy, sticky texture that makes these bars unforgettable.
Step 3: Fold in the Rice Cereal
Now it’s time to add your crisp rice cereal. Gently fold it into the chocolate and marshmallow blend, making sure each piece is fully coated without smashing the cereal. This careful mixing step preserves the delightful crunch that defines this homemade treat.
Step 4: Press the Mixture into a Pan
Line an 8 by 8-inch baking dish with parchment paper, letting the edges hang over for easy removal later. Pour in the cereal mixture and press it firmly and evenly into the pan. Firm packing ensures the bars will hold their shape when sliced and gives you that satisfying snap when you bite into one.
Step 5: Chill until Set
Pop your pan into the refrigerator and let it chill for at least 30 minutes. This helps the chocolate to solidify and the bars to set perfectly, making them easier to cut and handle without losing any of their crisp charm.
Step 6: Cut and Enjoy
Once set, use the parchment overhang to lift the entire block out of the pan. Slice into 12 generous bars and get ready to indulge. These Homemade Crunch Bars are best enjoyed fresh, offering a delightful marriage of textures and flavors in every bite.
How to Serve Homemade Crunch Bars Recipe
Garnishes
Although these bars are incredible as-is, you can jazz them up with a sprinkling of sea salt on top before chilling to create a sweet-salty contrast that’s addictive. Shaved chocolate or a drizzle of caramel also adds an elegant touch for special occasions.
Side Dishes
Pair these Homemade Crunch Bars with cold milk or a frothy hot chocolate for an ultra-cozy treat. They also complement fresh berries or a scoop of creamy vanilla ice cream when served as a dessert, balancing crunch with softness and freshness.
Creative Ways to Present
For a fun party presentation, cut your bars into bite-sized squares and arrange them on a decorative platter with colorful paper liners. You can also wrap individual bars in wax paper tied with a ribbon for delightful homemade gifts that friends and family will adore.
Make Ahead and Storage
Storing Leftovers
Keep any leftover Homemade Crunch Bars in an airtight container at room temperature for up to three days. This storage method preserves their crunch and chew without the bars getting sticky or stale.
Freezing
If you want to enjoy these bars over a longer stretch, wrap individual bars tightly in plastic wrap and place them in a freezer-safe container or bag. Frozen bars maintain freshness for up to 2 months. Thaw them at room temperature before serving for best texture.
Reheating
These bars are best enjoyed without reheating to keep their characteristic crunch and gooey pockets intact. However, if you prefer them warmed, a quick 10-second zap in the microwave can soften the chocolate just slightly without making them too melty.
FAQs
Can I use other types of chocolate in this Homemade Crunch Bars Recipe?
Absolutely! Feel free to experiment with milk chocolate or dark chocolate chips depending on your sweetness preference. Just remember that darker chocolate will create a richer, less sweet bar.
What can I substitute for mini marshmallows?
If mini marshmallows are hard to find, you can use regular marshmallows torn into smaller pieces. Alternatively, marshmallow fluff can work, though the texture will be a little different.
How do I make these gluten-free?
Simply use a certified gluten-free crisp rice cereal to ensure your bars are safe for gluten-sensitive diets without compromising on that perfect crunch.
Can I add nuts or other mix-ins?
Yes! Chopped almonds, peanuts, or even dried fruit can be folded in with the cereal for extra texture and flavor. Just keep in mind that added ingredients might change the overall bar consistency slightly.
How long do these bars stay fresh?
Stored properly in an airtight container, these homemade candies stay fresh and crunchy for about three days at room temperature, making them a great option for quick snacks or parties.
Final Thoughts
I hope this Homemade Crunch Bars Recipe inspires you to create a sweet treat that’s both simple to make and endlessly satisfying. There is something so comforting about biting into a bar that balances crispy, gooey, and chocolatey all at once. Give it a try, share with your loved ones, and watch these bars disappear faster than you can say “delicious!” Happy snacking!
Print
Homemade Crunch Bars Recipe
- Prep Time: 10 minutes
- Cook Time: 5 minutes
- Total Time: 45 minutes
- Yield: 12 bars
- Category: Dessert
- Method: No-Cook
- Cuisine: American
Description
Homemade Crunch Bars are a delightful no-bake treat combining smooth melted chocolate and butter, sweet mini marshmallows, and crunchy crisp rice cereal. Perfect for a quick snack or dessert, these bars are easy to prepare and set in the refrigerator without any baking required.
Ingredients
Chocolate Mixture
- 1 cup semi-sweet chocolate chips
- 1/4 cup unsalted butter
- 1 tsp vanilla extract
Mix-ins
- 3 cups crisp rice cereal
- 2 cups mini marshmallows
Instructions
- Melt chocolate and butter: In a saucepan over low heat, melt the semi-sweet chocolate chips and unsalted butter together until the mixture is smooth, stirring frequently to avoid burning.
- Add marshmallows and vanilla: Remove the saucepan from the heat and fold in the mini marshmallows and vanilla extract, mixing until fully combined.
- Incorporate rice cereal: Gently mix in the crisp rice cereal, being careful not to crush the cereal pieces, until all are thoroughly coated with the chocolate-marshmallow mixture.
- Prepare pan and press mixture: Line an 8×8-inch baking dish with parchment paper. Pour the mixture into the dish and press down firmly to pack it evenly.
- Chill to set: Refrigerate the pan for at least 30 minutes, allowing the bars to firm up completely.
- Slice and serve: Lift the set mixture out of the pan using the parchment overhang, slice into 12 bars, and enjoy your homemade crunchy treat!
Notes
- Use parchment paper for easy removal and clean edges.
- Press firmly when packing the mixture to ensure bars hold together well.
- Store bars in an airtight container in the refrigerator to maintain freshness.
- For variation, consider adding chopped nuts or dried fruit for extra texture.
- Do not overheat the chocolate and butter mixture to prevent burning.


