
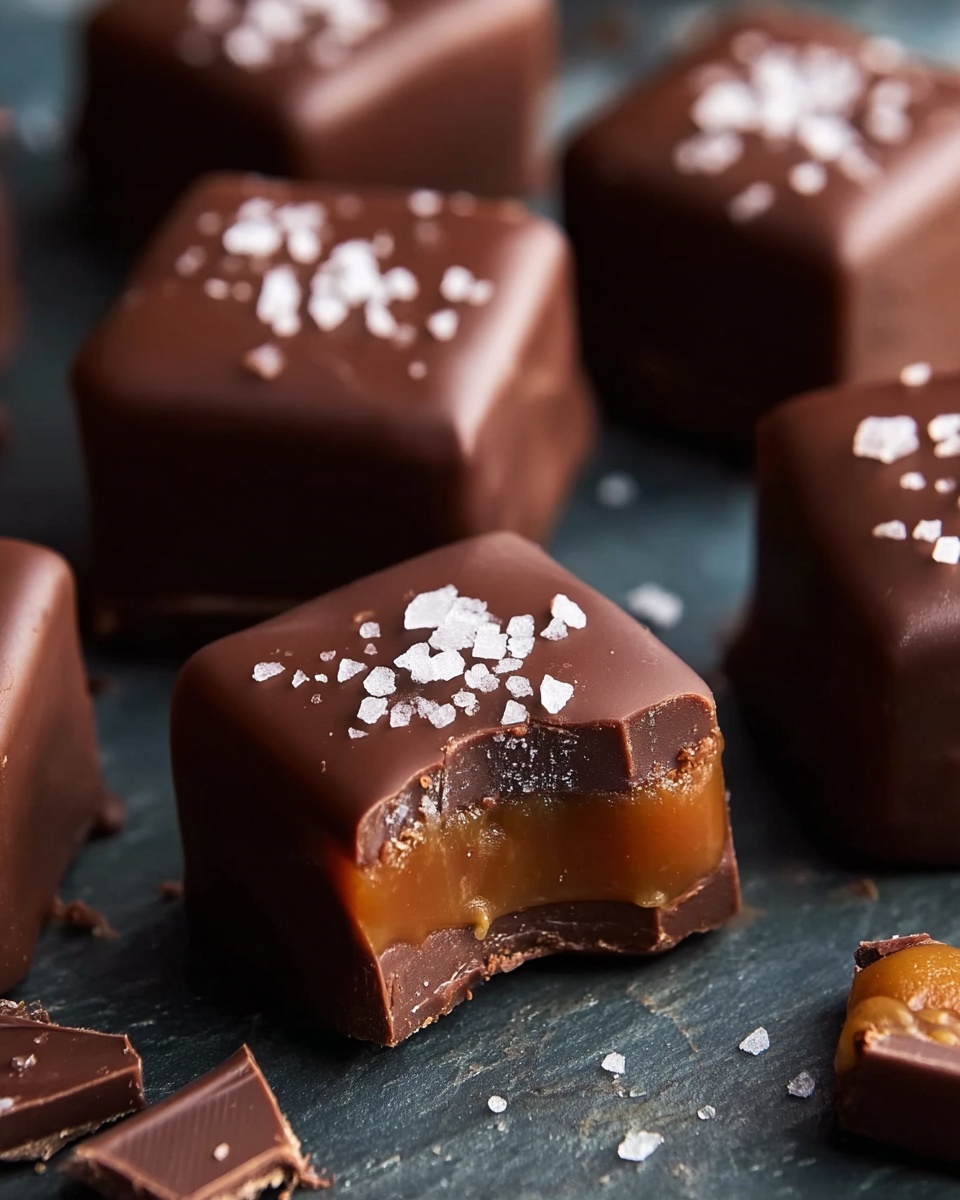
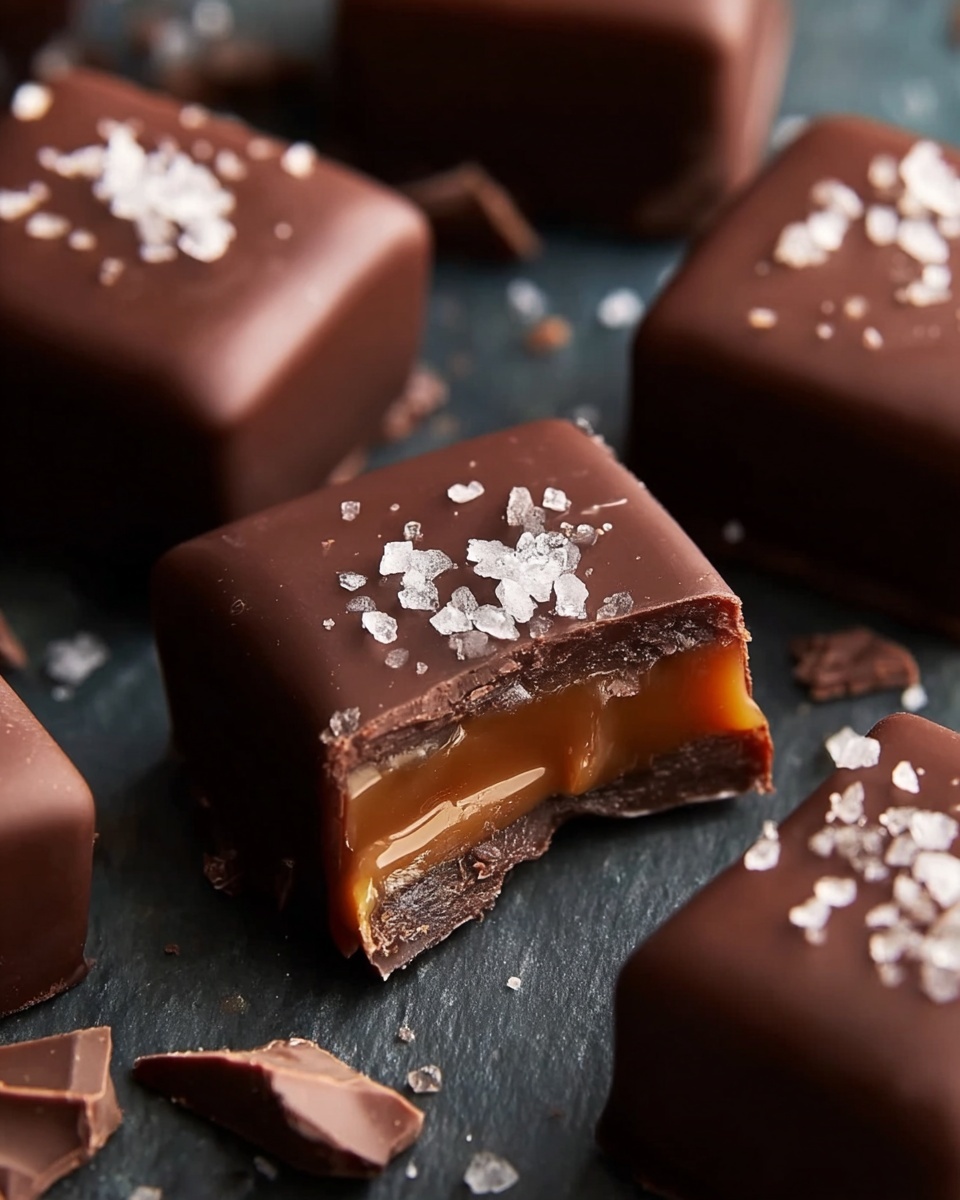
There is something truly magical about the rich, buttery delight of caramel combined with the silky smoothness of chocolate, which is why I am absolutely thrilled to share this Homemade Chocolate Caramels Recipe with you. These luscious treats capture the perfect balance of creamy, sweet, and slightly salty flavors all wrapped up in bite-sized pieces of pure happiness. Whether you’re gifting them, sharing at a party, or indulging in an afternoon pick-me-up, these chocolates are guaranteed to become a fast favorite. Trust me, once you make this Homemade Chocolate Caramels Recipe, store-bought candies will simply never satisfy the same way again.
Ingredients You’ll Need
The magic behind this Homemade Chocolate Caramels Recipe lies in a handful of simple, quality ingredients that come together to create something greater than the sum of their parts. Each component plays a vital role in building the smooth texture, rich flavor, and that irresistible chewiness you want in the perfect caramel.
- 1 cup heavy cream: Provides luscious creaminess that softens the caramel.
- 1/2 cup unsalted butter: Adds richness and helps create a smooth, melt-in-your-mouth texture.
- 1/4 teaspoon salt: Balances the sweetness and enhances all the flavors.
- 1 1/2 cups granulated sugar: The essential sweet backbone of the caramel.
- 1/4 cup light corn syrup: Prevents crystallization and ensures a silky smooth finish.
- 1/4 cup water: Helps dissolve the sugar and aids even cooking.
- 6 ounces semisweet or bittersweet chocolate: Finely chopped to melt perfectly and give a rich cocoa depth.
- 1 teaspoon vanilla extract: Adds warm complexity and aroma to the caramels.
How to Make Homemade Chocolate Caramels Recipe
Step 1: Prepare Your Pan
Start by lining an 8×8-inch baking dish with parchment paper, making sure there’s an overhang on two sides. This will make removing the caramel slab so much easier when it’s time to cut and wrap your goodies. A well-prepared pan sets you up for caramel success.
Step 2: Warm the Cream Mixture
In a small saucepan over medium heat, gently combine the heavy cream, unsalted butter, and salt. Warm this mixture until the butter is fully melted and the mixture is warm but not boiling. This step ensures your caramel stays silky and prevents any unexpected lumps later on.
Step 3: Make the Sugar Syrup
Using a large, heavy-bottomed saucepan, mix together the granulated sugar, light corn syrup, and water. Begin heating over medium-high heat, stirring gently just to combine—now’s the moment to step back as you bring this to a boil. Don’t stir once boiling starts. You want to let the syrup cook until it reaches a lovely light golden color and hits 320°F on your candy thermometer—this stage is the heart of that irresistible caramel flavor.
Step 4: Combine Cream and Sugar Syrup
Carefully pour the warm cream and butter mixture into the hot sugar syrup—it will bubble vigorously, so be cautious. Stir constantly to blend everything smoothly. This moment transforms raw ingredients into magic, giving you that creamy caramel texture you crave.
Step 5: Cook to Firm Ball Stage
Continue cooking the combined mixture, stirring frequently, until your thermometer reads 245°F (the firm ball stage). This ensures the caramel will set perfectly—soft but not too sticky—and have that signature chewiness.
Step 6: Melt in Chocolate and Vanilla
Remove the pot from heat and immediately stir in the finely chopped chocolate and vanilla extract. The chocolate melts into silky ribbons that enrich the caramel, making every bite decadent and deeply chocolatey.
Step 7: Set and Cool
Pour the caramel into your prepared baking dish, spreading it evenly. Allow it to cool at room temperature for at least four hours or until completely set. Patience here pays off with the perfect consistency that doesn’t stick to your teeth yet melts in your mouth.
Step 8: Cut and Wrap
Once firm, use the parchment overhang to lift the entire caramel slab from the dish. Cut into 1-inch squares and wrap each piece in wax paper to keep them fresh and portable.
How to Serve Homemade Chocolate Caramels Recipe
Garnishes
Sprinkling a pinch of flaky sea salt on top before the caramel fully sets adds an exciting sweet-salty twist that brings out the chocolate’s depth and caramel’s richness. You can also dust with cocoa powder or drizzle with extra melted chocolate for an elegant finish.
Side Dishes
These caramels make a wonderful companion to a warm cup of coffee or rich hot chocolate. They also pair beautifully with vanilla ice cream or a scoop of creamy gelato to elevate a dessert spread with homespun charm and a hint of indulgence.
Creative Ways to Present
For gifting or parties, arrange your Wrapped Homemade Chocolate Caramels Recipe pieces in decorative boxes or glass jars tied with a festive ribbon. You can also layer them with crushed nuts or sprinkle with chopped toasted almonds inside the box for texture contrast.
Make Ahead and Storage
Storing Leftovers
Store your homemade caramels wrapped individually in an airtight container at room temperature. They will stay fresh and chewy for up to two weeks, making them a perfect treat to enjoy over multiple days without losing their charm.
Freezing
If you want to keep your caramels longer, freezing is a great option. Place wrapped pieces in a sealed freezer bag or container, and they’ll maintain their texture and flavor for up to two months. Just thaw at room temperature before serving to enjoy their classic softness.
Reheating
Generally, reheating isn’t necessary since these caramels are best enjoyed at room temperature, but if you prefer a gooey softness, warm a piece briefly in your hands or microwave for 5 to 7 seconds. Be careful not to overheat, so they don’t become too sticky.
FAQs
Can I use milk chocolate instead of semisweet or bittersweet?
Absolutely! Using milk chocolate will make your caramels sweeter and creamier, so it’s a great option if you prefer a milder chocolate flavor. Just keep an eye on the sweetness balance as milk chocolate tends to be sweeter than dark varieties.
What if I don’t have a candy thermometer?
While a candy thermometer is the best tool for precise results, you can test by dropping a small amount of the hot syrup into cold water and checking for the firm ball stage by rolling it between your fingers. It should form a soft, pliable ball that holds its shape.
Why is corn syrup important in this recipe?
Corn syrup prevents sugar crystallization and keeps your caramel smooth and chewy. Without it, your caramel might turn grainy or crystallize, which changes the texture and mouthfeel significantly.
Can I make these caramels vegan or dairy-free?
For a vegan version, substitute the butter and heavy cream with plant-based alternatives like coconut cream and vegan butter. Keep in mind the texture and flavor might vary slightly but they will still be delicious.
How do I achieve softer caramels?
If you prefer a softer bite, cook the caramel mixture to 240°F instead of 245°F. This lower temperature yields a tender and more pliable texture that melts beautifully with every chew.
Final Thoughts
I hope you feel inspired to whip up this incredible Homemade Chocolate Caramels Recipe soon. It’s one of those special treats that feels like a hug in candy form—rich, comforting, and utterly addictive. Whether you’re a seasoned caramel lover or just starting to explore, these chocolates deliver that perfect balance of sweetness and depth with every bite. Enjoy the process, savor the results, and don’t be surprised if these become your new go-to homemade indulgence!
Print
Homemade Chocolate Caramels Recipe
- Prep Time: 10 minutes
- Cook Time: 30 minutes
- Total Time: 4 hours 40 minutes
- Yield: 64 caramels (1-inch pieces)
- Category: Candy
- Method: Stovetop
- Cuisine: American
- Diet: Vegetarian
Description
Delight in the rich, buttery goodness of Homemade Chocolate Caramels with this easy-to-follow recipe. These soft, chewy candies combine creamy caramel with smooth chocolate, perfect for gifting or indulging your sweet tooth.
Ingredients
Caramel Base
- 1 cup heavy cream
- 1/2 cup unsalted butter, cut into pieces
- 1/4 teaspoon salt
- 1 1/2 cups granulated sugar
- 1/4 cup light corn syrup
- 1/4 cup water
Chocolate Mixture
- 6 ounces semisweet or bittersweet chocolate, finely chopped
- 1 teaspoon vanilla extract
Instructions
- Prepare the Pan: Line an 8×8-inch baking dish with parchment paper, ensuring an overhang on two sides to help remove the caramel slab easily once set.
- Heat Cream Mixture: In a small saucepan over medium heat, combine heavy cream, butter, and salt. Warm until the butter is fully melted and the mixture is hot but not boiling. Remove from heat and set aside.
- Cook Sugar Syrup: In a large heavy-bottomed saucepan, place the granulated sugar, light corn syrup, and water. Stir gently to combine, then bring the mixture to a boil over medium-high heat without stirring further. Monitor the syrup as it cooks until it turns a light golden color and reaches 320°F on a candy thermometer.
- Combine Cream and Sugar Syrup: Carefully pour the warm cream mixture into the hot sugar syrup; expect vigorous bubbling. Stir constantly to blend these components together.
- Cook to Firm Ball Stage: Continue cooking the combined mixture, stirring frequently, until the temperature reaches 245°F (firm ball stage), indicating the proper caramel consistency.
- Add Chocolate and Vanilla: Remove the saucepan from heat. Immediately stir in the finely chopped chocolate and vanilla extract until the mixture is smooth and fully combined.
- Set and Cool: Pour the caramel mixture into the prepared baking dish, spreading it evenly. Allow it to cool at room temperature for at least 4 hours or until completely set.
- Cut and Store: Once firm, lift the caramel slab out using the parchment paper overhang. Cut into 1-inch squares. Wrap each piece in wax paper and store in an airtight container at room temperature for up to 2 weeks.
Notes
- For softer caramels, cook the mixture to 240°F instead of 245°F.
- Sprinkle flaky sea salt on top before setting for a delightful sweet-salty flavor contrast.
- Store wrapped caramels in an airtight container at room temperature for up to 2 weeks.
