
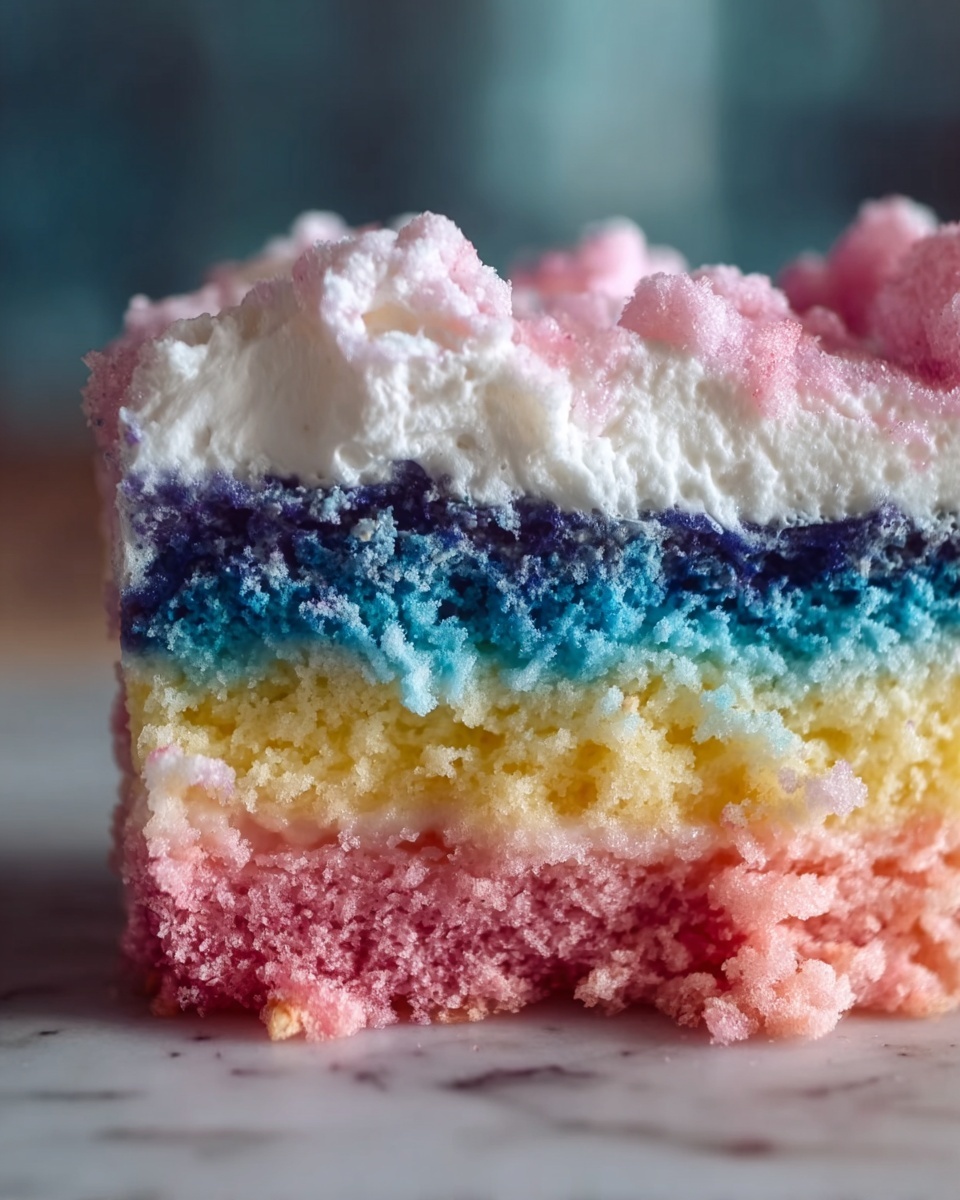
If you’re looking to sprinkle a little magic on your dessert table, this Cotton Candy Poke Cake Recipe delivers pure joy with every bite. Imagine a light and fluffy white cake, beautifully soaked with sweet cotton candy-flavored gelatin that seeps into every nook, then topped with a whimsical swirl of pink and blue whipped cream. It’s colorful, playful, and downright irresistible—a perfect treat to brighten any celebration or just add a sprinkle of fun to your day.
Ingredients You’ll Need
Don’t let the dreamy appearance fool you—this Cotton Candy Poke Cake Recipe is made from simple, easy-to-find ingredients that each play a vital role in crafting its tender texture and nostalgic flavor. From the fluffy white cake to the vibrant swirls of whipped topping, each element shines on its own and works harmoniously together.
- White cake mix: The base that provides the perfect soft crumb and neutral flavor to showcase the cotton candy notes.
- Cotton candy-flavored gelatin (3 oz packet): This is the secret star that infuses the cake with that fun, sweet cotton candy essence and beautiful pastel hues.
- Boiling water: Essential for dissolving the gelatin completely and ensuring it soaks deep into the cake.
- Cold water: Used to balance the gelatin mixture for perfect setting and flavor.
- Whipped topping (8 oz, thawed): Adds a light, creamy finish—especially when tinted with pink and blue colors for that playful twist.
- Pink and blue food coloring (optional): Enhances the visual appeal with delightful pastel swirls reminiscent of cotton candy cones.
- Cotton candy for garnish (optional): A fun finishing touch that brings the theme full circle just before serving.
How to Make Cotton Candy Poke Cake Recipe
Step 1: Prepare and Bake the Cake
Start by preheating your oven to 350°F and lightly greasing a 9×13-inch baking dish. Mix the white cake according to the package instructions—using egg whites, water, and oil helps keep it moist and tender. Pour the batter into your dish and bake until it’s golden and springs back to the touch. Once out of the oven, let it cool for about 15 minutes; this wait is crucial to keep the cake sturdy when you start poking holes.
Step 2: Poke Holes into the Cake
Using the handle of a wooden spoon, gently poke holes evenly across the surface, spacing them about every inch. This step turns your cake into a sponge-like canvas, ready to absorb all the luscious cotton candy gelatin flavor.
Step 3: Prepare and Pour the Gelatin
In a mixing bowl, dissolve the cotton candy-flavored gelatin in one cup of boiling water, stirring continuously until completely clear and smooth. Add half a cup of cold water to temper the mixture, then pour it slowly and evenly over the cake, making sure it seeps into every hole. Refrigerate the cake for at least two hours to let the gelatin fully set and decorate your creation later.
Step 4: Create the Whipped Topping Swirl
Once chilled, divide the thawed whipped topping into two bowls. Tint one with pink food coloring and the other with blue. Gently swirl these two colors together to create a marbled, cotton candy-inspired topping, then spread it evenly across the cake’s surface.
Step 5: Garnish and Serve
For the grand finale, if you want to add an extra wow factor, garnish the cake with soft, fluffy cotton candy just before serving. This ties all the flavors and visuals together for a truly unforgettable dessert experience.
How to Serve Cotton Candy Poke Cake Recipe
Garnishes
Garnishing with fresh, light cotton candy is not just charming but also adds a whimsical touch that melts on your tongue. For an extra pop of fun, consider colorful sprinkles or edible glitter that catch the light and elevate the fun factor.
Side Dishes
This cake pairs beautifully with classic vanilla ice cream or a scoop of fruity sorbet. A light berry compote or fresh fruit salad on the side can also add a refreshing contrast to the creamy sweetness of the cake.
Creative Ways to Present
For parties, serve the cake in individual clear cups layered with a bit of crumbled cake and whipped topping, topped with a tuft of cotton candy. Or go bold and pipe the whipped topping with pastel rosettes to mimic fluffy clouds—either way, your guests will be enchanted.
Make Ahead and Storage
Storing Leftovers
Keep any leftover Cotton Candy Poke Cake Recipe tightly covered in the refrigerator for up to 3 days. The gelatin maintains moisture well, but the whipped topping is best fresh and protected from fridge odors.
Freezing
This cake is not a great freezer candidate because the gelatin and whipped topping textures can change upon thawing. It’s recommended to enjoy it fresh for the best flavor and appearance.
Reheating
Reheating is not necessary for this dessert. It’s best served chilled to appreciate the refreshing sweetness of the cotton candy gelatin and the cool, airy whipped topping.
FAQs
Can I use a different flavor of gelatin instead of cotton candy?
Absolutely! While cotton candy gelatin is ideal, raspberry or bubblegum flavors make delightful alternatives that keep the fun, fruity essence alive.
What if I can’t find cotton candy gelatin?
Try specialty grocery stores, seasonal markets, or online retailers. If all else fails, substitute with another flavored gelatin you enjoy—it just won’t have the exact cotton candy flavor but will still work wonderfully.
Is this cake suitable for kids?
Definitely! Kids love the vibrant colors and cotton candy theme, making this poke cake a showstopper for birthday parties and family gatherings.
Can I make this cake gluten-free?
Yes, just substitute the white cake mix with a gluten-free white cake mix and ensure your gelatin and toppings are gluten-free. The rest of the process remains the same.
How long should I poke holes in the cake before adding the gelatin?
Wait until the cake cools for about 15 minutes before poking holes. Poking holes too early while the cake is hot may cause it to break apart, and the gelatin might not absorb correctly.
Final Thoughts
There is something simply magical about the Cotton Candy Poke Cake Recipe—it brightens up any occasion with its pastel colors and melt-in-your-mouth sweetness. If you want a dessert that’s as fun to make as it is to eat, this cake should be your next baking adventure. Once you try it, I promise you’ll want to make it again and again, sharing that cotton candy charm with everyone you love.
Print
Cotton Candy Poke Cake Recipe
- Prep Time: 20 minutes
- Cook Time: 30 minutes
- Total Time: 2 hours 50 minutes
- Yield: 12 servings
- Category: Dessert
- Method: Baking
- Cuisine: American
- Diet: Vegetarian
Description
This delightful Cotton Candy Poke Cake combines the classic moistness of a white cake with the whimsical sweetness of cotton candy-flavored gelatin. Perfect for parties and celebrations, this colorful dessert features a vibrant whipped topping swirl and an optional cotton candy garnish that makes every slice a fun and festive treat.
Ingredients
Cake:
- 1 box white cake mix (plus ingredients required on the box such as egg whites, water, and oil)
Gelatin Soak:
- 1 packet cotton candy-flavored gelatin (3 oz)
- 1 cup boiling water
- ½ cup cold water
Topping:
- 1 tub whipped topping (8 oz, thawed)
- Pink food coloring (optional)
- Blue food coloring (optional)
- Cotton candy for garnish (optional)
Instructions
- Preheat and Prepare Cake: Preheat your oven to 350°F and lightly grease a 9×13-inch baking dish to prevent sticking.
- Mix and Bake Cake: Prepare the white cake according to the package instructions using the recommended ingredients (egg whites, water, oil). Pour batter into the prepared pan and bake as directed, about 30 minutes.
- Cool Cake and Poke Holes: Allow the cake to cool in the pan for about 15 minutes. Using the handle of a wooden spoon, poke holes all over the cake surface spaced about 1 inch apart. This will help the gelatin soak into the cake.
- Dissolve Gelatin: In a bowl, dissolve the cotton candy-flavored gelatin into 1 cup of boiling water, stirring until fully dissolved. Add ½ cup cold water and mix thoroughly.
- Pour Gelatin Over Cake: Evenly pour the gelatin mixture over the cake, allowing it to soak deep into the holes for maximum flavor and moistness.
- Chill the Cake: Refrigerate the cake for at least 2 hours to ensure the gelatin fully sets and infuses into the cake.
- Prepare Whipped Topping: Once the cake is chilled, divide the whipped topping into two bowls. Add pink food coloring to one bowl and blue food coloring to the other. Gently swirl the two colors together without fully mixing for a fun visual effect.
- Frost Cake: Spread the swirled whipped topping evenly over the chilled cake, covering it completely.
- Garnish and Serve: Just before serving, optionally garnish the cake with cotton candy for an extra whimsical touch. Slice and enjoy!
Notes
- Cotton candy-flavored gelatin is often seasonal; raspberry or bubblegum gelatin are good substitutes if unavailable.
- Add colorful sprinkles under or on top of the whipped topping for extra flair.
- Garnish with cotton candy only immediately before serving to avoid it melting or becoming sticky.


