If you are on the hunt for a fun, festive, and utterly delicious treat that will wow everyone at your Halloween party, the Chocolate Monster Halloween Cookies Recipe is exactly what you need. These rich, chocolatey sandwich cookies combine a deep cocoa cookie base with a luscious vanilla cream filling, all dressed up with colorful purple and orange hues plus monster-themed decorations. The result is a spooky, sweet delight that’s as fun to make as it is to eat, bringing a perfect blend of texture and flavor that screams Halloween joy in every bite.
Ingredients You’ll Need
This recipe uses simple, pantry-friendly ingredients that come together to create something truly magical. Each component is thoughtfully chosen to balance flavor, texture, and that irresistible chocolate punch that makes the Chocolate Monster Halloween Cookies Recipe so special.
- 260 g (2 cups) all-purpose flour: The foundation that gives structure and a tender crumb to your cookies.
- 60 g (½ cup) Dutch-processed cocoa powder: Adds deep chocolate flavor and a dark, rich color perfect for Halloween.
- ½ tsp baking powder: Gives the cookies a slight lift for a soft, yet firm texture.
- ¾ cup (150 g) white sugar: Sweetens the cookies while helping them crisp beautifully on the edges.
- 113 g (½ cup) unsalted butter, cold and cut into cubes: Provides flakiness and richness to the cookie dough.
- 1 large egg, cold: Binds everything together, adding moisture and a lovely chew.
- 1 tsp vanilla extract: Enhances the chocolate flavor with warm, sweet notes.
- 1 tbsp cold milk: Helps bring the dough together just right without making it soggy.
- 1½ cups (195 g) powdered sugar: Essential for the smooth and creamy filling.
- 80 g (⅔ stick) unsalted butter, softened: Gives the frosting its rich, velvety texture.
- 2 tsp heavy cream: Adds creaminess and helps the frosting whip up light and fluffy.
- 1 tsp vanilla extract: Infuses the frosting with a sweet and comforting aroma.
- Pinch of salt: Balances sweetness and enhances all the flavors in the filling.
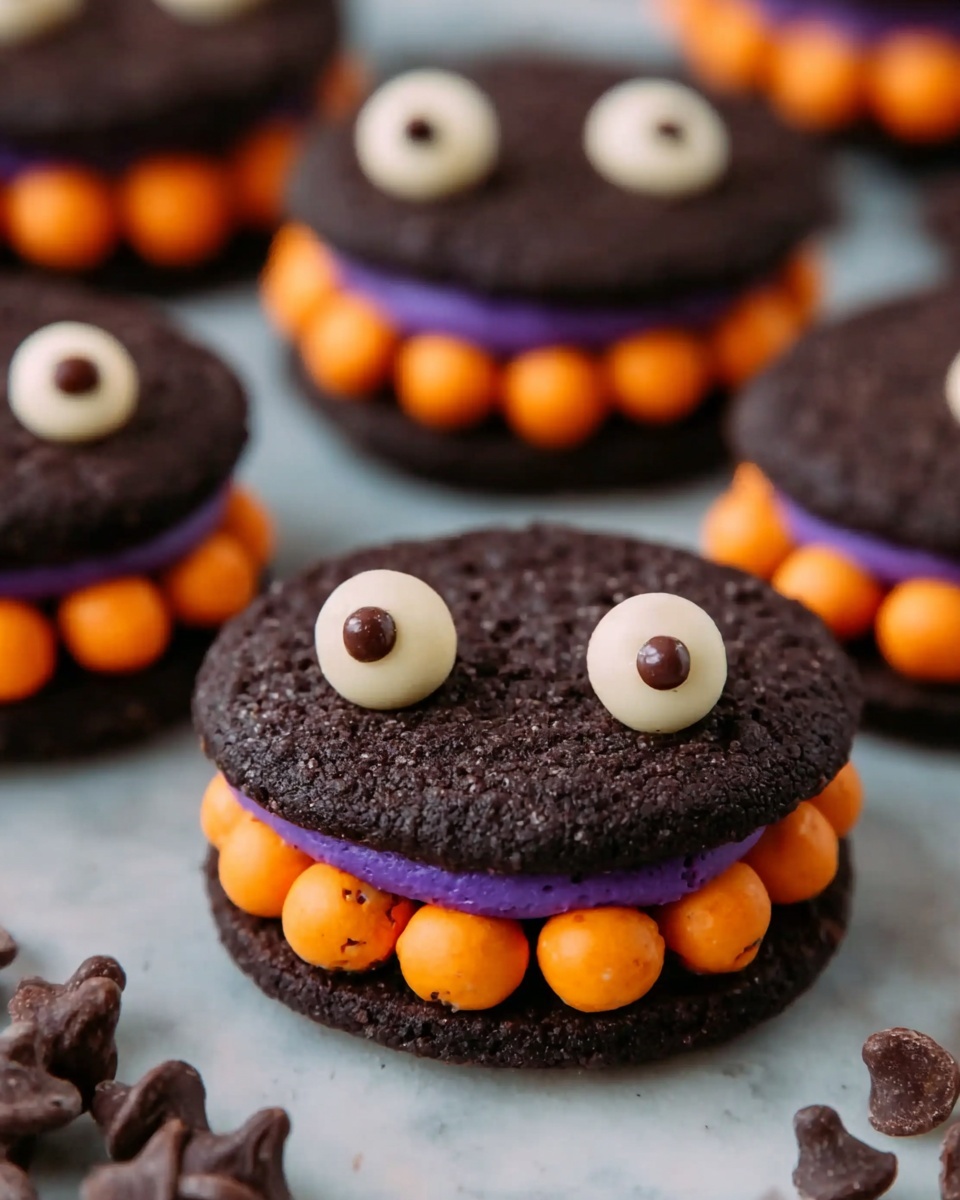
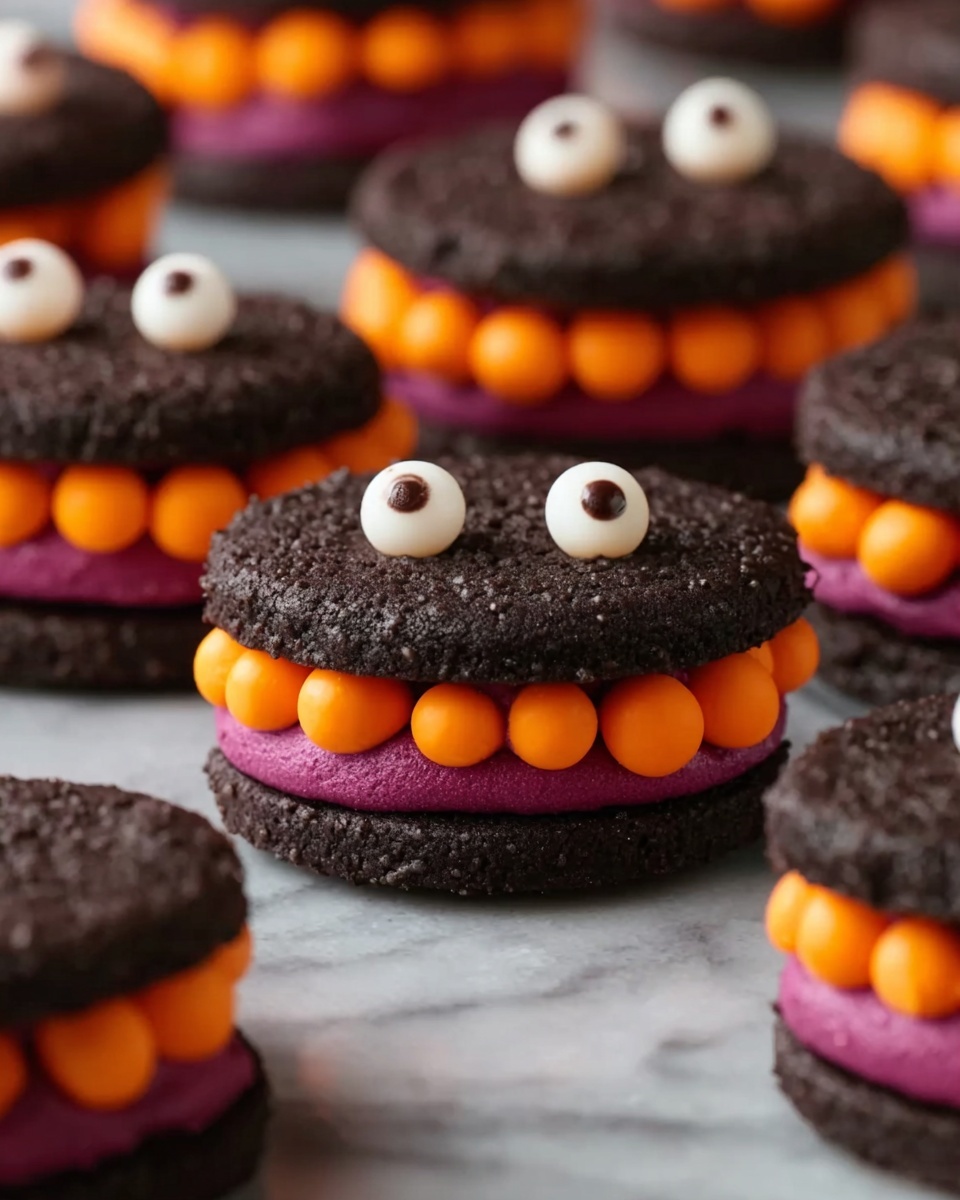
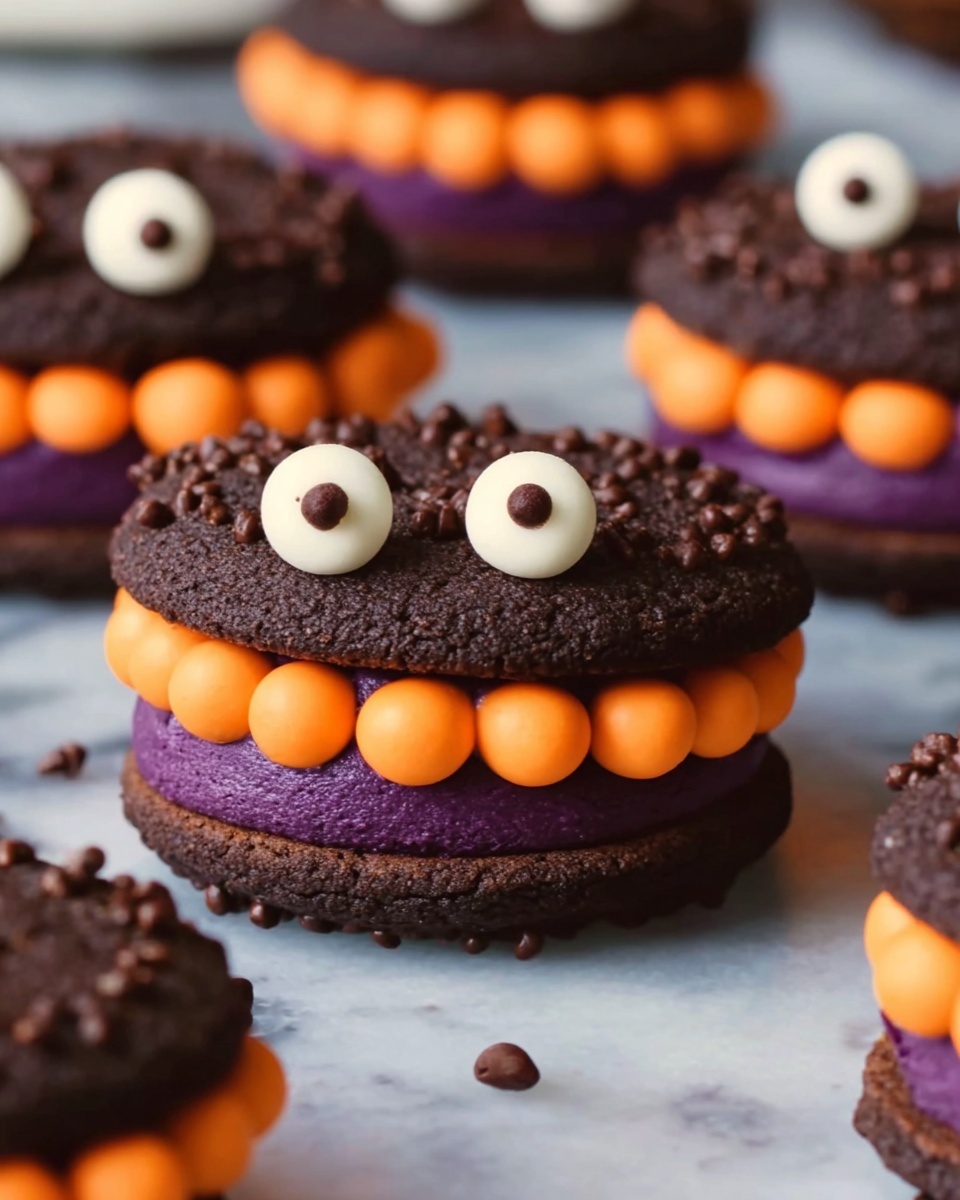
- Purple and orange food coloring: Brings spooky, festive colors to your filling, making the cookies Halloween-ready.
- Sprinkles and candy monster eyes for decoration: Adds fun and personality, transforming each cookie into a playful monster treat.
How to Make Chocolate Monster Halloween Cookies Recipe
Step 1: Prepare the Cookie Dough
Start by whisking together the all-purpose flour, Dutch-processed cocoa powder, and baking powder in a bowl until evenly combined. This dry mix forms the chocolatey backbone of your cookies. In a separate bowl, cream the cold, cubed butter with sugar until you achieve a crumbly texture; the cold butter ensures your cookies keep their shape without spreading too much while baking. Next, beat in the cold egg, vanilla extract, and cold milk until the dough comes together. Chill the dough for about 30 minutes, as this helps the flour hydrate and makes rolling out the dough much easier, so your cookies turn out perfectly thick and tender.
Step 2: Shape and Bake the Cookies
On a lightly floured surface, roll out the chilled dough to about ¼ inch thick. Use a round cookie cutter to punch out even circles, then place them on a parchment-lined baking sheet, spaced about two inches apart. Pop the tray into a preheated oven at 350°F (175°C) and bake for 10 to 12 minutes — just until the cookies are firm to the touch but not hard. Let them cool completely on a wire rack before moving on to the filling. This step is crucial because warm cookies can cause the frosting to melt or slide off.
Step 3: Make the Colorful Fillings
In a mixing bowl, whip together the softened butter and powdered sugar until smooth and creamy. Add heavy cream, vanilla extract, and a pinch of salt, then beat again until fluffy and light. Now comes the fun part: separate the frosting into two bowls and tint one with purple food coloring and the other with orange. These vibrant colors bring your Chocolate Monster Halloween Cookies Recipe irresistibly to life, adding both visual appeal and that playful Halloween spirit.
Step 4: Assemble the Sandwich Cookies
Spread or pipe an even layer of your colored frosting onto the underside of one cookie, then gently press a second cookie on top to create a sandwich. You can alternate colors or stick to your favorite, making the cookies as unique as the monsters they represent. To finish, decorate with sprinkles and edible candy monster eyes to give each cookie that extra spooky personality — this is where your imagination can run wild! Let them set for a bit so the filling firms up just right before serving.
How to Serve Chocolate Monster Halloween Cookies Recipe
Garnishes
Adding sprinkles and candy monster eyes to your cookies is not just fun, it creates an interactive eating experience that’s perfect for Halloween. You can also dust a little cocoa powder or edible glitter on top to give them a mysterious shimmer. These simple garnishes instantly turn ordinary cookies into eye-catching treats that steal the spotlight at any gathering.
Side Dishes
Pair these chocolate monster delights with a cold glass of milk or a steaming cup of spiced pumpkin latte for a cozy contrast. For parties, consider serving alongside a platter of autumn fruits like sliced apples and pears, or even some salted caramel popcorn to balance the sweetness with a savory crunch.
Creative Ways to Present
Presentation is everything, especially on Halloween night. Arrange your cookies on black or orange plates to make the colors pop, or stack them in a whimsical “monster tower” centerpiece. Place them inside clear cellophane bags tied with festive ribbons for easy party favors that guests will adore. You could even create place settings with a cookie for each guest, making your Halloween celebration feel personalized and extra special.
Make Ahead and Storage
Storing Leftovers
Once assembled, store your Chocolate Monster Halloween Cookies Recipe in an airtight container at room temperature for up to 3 days. Keeping them sealed maintains the cookie’s crispness and the creamy filling’s freshness, so every bite stays just as delightful as the first.
Freezing
If you want to prepare these spooktacular cookies ahead of time, freeze the assembled sandwich cookies in a single layer on a baking sheet, then transfer them to a freezer-safe container or bag. They keep well for up to 2 months. Just thaw them in the fridge overnight before serving to preserve their perfect texture and flavor.
Reheating
These cookies are best enjoyed at room temperature, so no need to heat them up. If you prefer a slightly warm cookie, let it sit at room temp for a few minutes after taking it out of the fridge or freezer. Avoid microwaving as the filling could melt or separate.
FAQs
Can I use natural cocoa powder instead of Dutch-processed?
Natural cocoa powder can be used, but it has a more acidic taste and may slightly alter the flavor and color of your cookies. Dutch-processed cocoa provides a smoother, richer chocolate flavor that’s ideal for this recipe.
What if I don’t have candy monster eyes?
No worries! You can substitute with small chocolate chips, colored icing dots, or even create faces using edible markers. The fun is in your creativity, so make your monsters your own!
Can I make these cookies gluten-free?
Yes, by swapping all-purpose flour with a gluten-free baking blend of similar weight, you can make these cookies gluten-free. Just watch the dough’s texture, adjusting with a bit more milk if needed, since gluten-free flours behave differently.
How long does the frosting take to set?
The frosting should firm up within 30 minutes to an hour at room temperature, depending on humidity. You can speed up the process by placing the cookies in the fridge for about 15–20 minutes before serving.
Is it better to use cold or softened butter for the dough?
Cold butter is key to achieving the right cookie texture and shape—it prevents excessive spreading during baking. For the frosting, however, softened butter ensures a smooth and creamy consistency.
Final Thoughts
The Chocolate Monster Halloween Cookies Recipe is a festive crowd-pleaser that brings chocolate goodness and playful Halloween spirit to every bite. Whether you’re baking with kids or hosting a spooky celebration, these cookies add an unforgettable touch of fun and flavor. Give this recipe a try, and watch your friends and family smile with every monster-themed nibble!
Print
Chocolate Monster Halloween Cookies Recipe
- Prep Time: 30 minutes
- Cook Time: 12 minutes
- Total Time: 42 minutes
- Yield: 24 cookies (12 sandwich cookies)
- Category: Dessert
- Method: Baking
- Cuisine: American
Description
These Chocolate Monster Halloween Cookies are a fun and festive treat perfect for the spooky season. Featuring rich, cocoa-flavored sandwich cookies with a creamy vanilla filling, they are decorated with colorful sprinkles and candy monster eyes to delight both kids and adults. Perfect for Halloween parties or as a seasonal dessert, these cookies are easy to make and sure to impress with their playful appearance and delicious taste.
Ingredients
Cookie Dough
- 260 g (2 cups) all-purpose flour
- 60 g (½ cup) Dutch-processed cocoa powder
- ½ tsp baking powder
- ¾ cup (150 g) white sugar
- 113 g (½ cup) unsalted butter, cold and cut into cubes
- 1 large egg, cold
- 1 tsp vanilla extract
- 1 tbsp cold milk
Filling
- 1½ cups (195 g) powdered sugar
- 80 g (⅔ stick) unsalted butter, softened
- 2 tsp heavy cream
- 1 tsp vanilla extract
- Pinch of salt
Decoration
- Purple and orange food coloring
- Sprinkles
- Candy monster eyes
Instructions
- Prepare the Cookie Dough: In a large mixing bowl, whisk together the all-purpose flour, Dutch-processed cocoa powder, and baking powder. Using a pastry cutter or your fingers, cut the cold cubed unsalted butter into the dry ingredients until the mixture resembles coarse crumbs. In a separate small bowl, beat the cold egg with vanilla extract and cold milk. Gradually add the wet ingredients to the dry mixture, stirring until a cohesive dough forms. Wrap the dough in plastic wrap and refrigerate for at least 30 minutes to chill.
- Shape and Bake the Cookies: Preheat the oven to 350°F (175°C). Roll out the chilled dough on a lightly floured surface to about ¼-inch thickness. Using a cookie cutter, cut the dough into desired shapes and place them on a parchment-lined baking sheet, spacing them about 1 inch apart. Bake the cookies for 10-12 minutes until they are set but still soft in the center. Remove from the oven and allow the cookies to cool completely on a wire rack before assembling.
- Prepare the Filling: In a mixing bowl, beat the softened unsalted butter until creamy. Gradually add the powdered sugar and continue to beat until smooth and fluffy. Mix in the heavy cream, vanilla extract, and a pinch of salt until the filling is light and spreadable. Separate the filling into two portions and tint one portion purple and the other orange using food coloring, mixing well to achieve vibrant colors.
- Assemble the Sandwich Cookies: Spread or pipe a generous amount of colored filling onto the bottom side of one cookie, then gently press a second cookie on top to form a sandwich. Alternate the colors of filling as desired to create a festive look. Repeat with all cookies.
- Decorate the Cookies: Use sprinkles and candy monster eyes to decorate the tops of the sandwich cookies, creating playful and spooky monster faces. Allow the filling to set slightly before serving to ensure the decorations stay in place.
Notes
- Chilling the dough before baking helps to prevent spreading and keeps the cookies thick and soft.
- Use Dutch-processed cocoa powder for a richer chocolate flavor and darker color.
- The filling can be made ahead and stored in the refrigerator; bring to room temperature and re-whip before use.
- If you prefer, substitute the heavy cream with milk or half-and-half for a lighter filling.
- Store the assembled cookies in an airtight container at room temperature for up to 3 days or refrigerate for up to a week.


