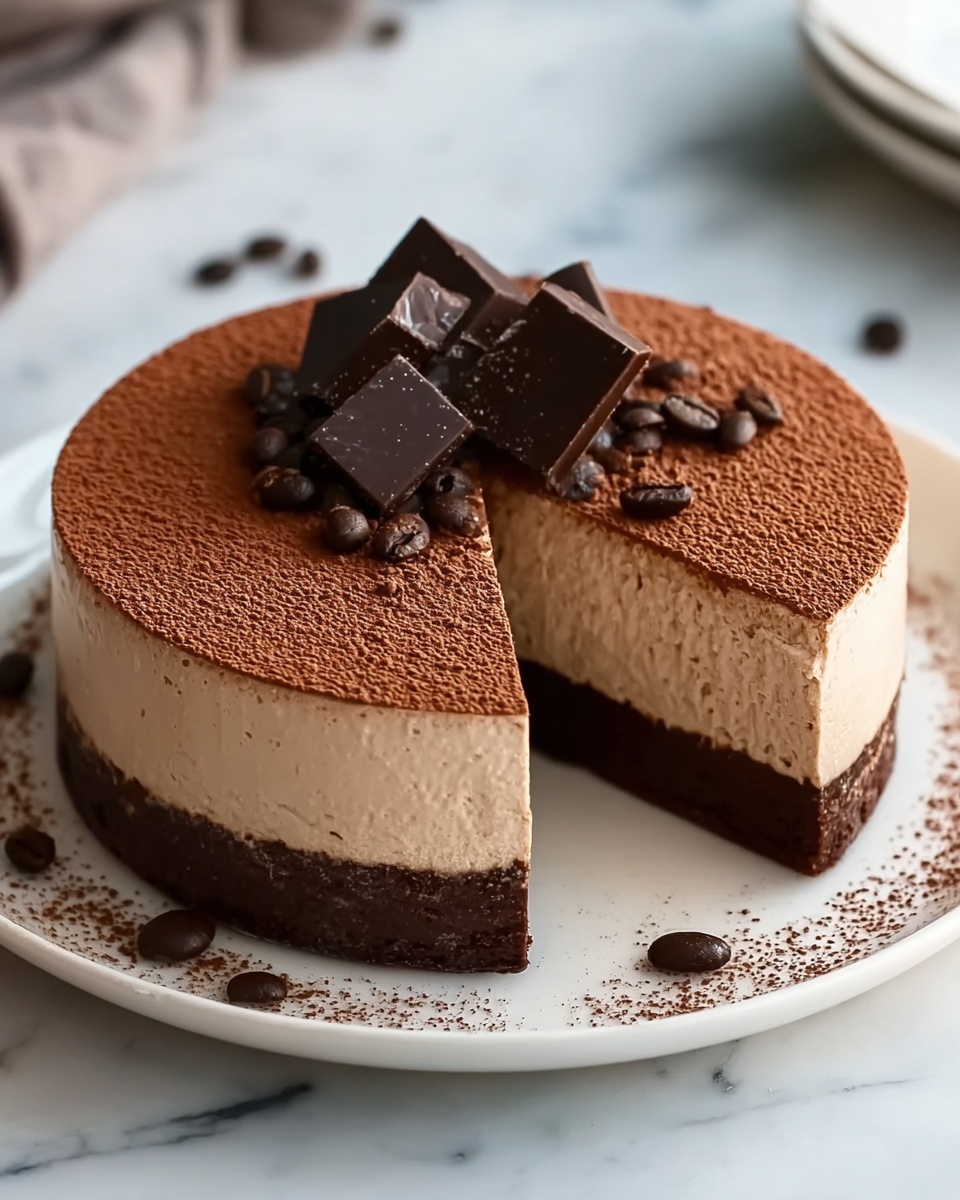
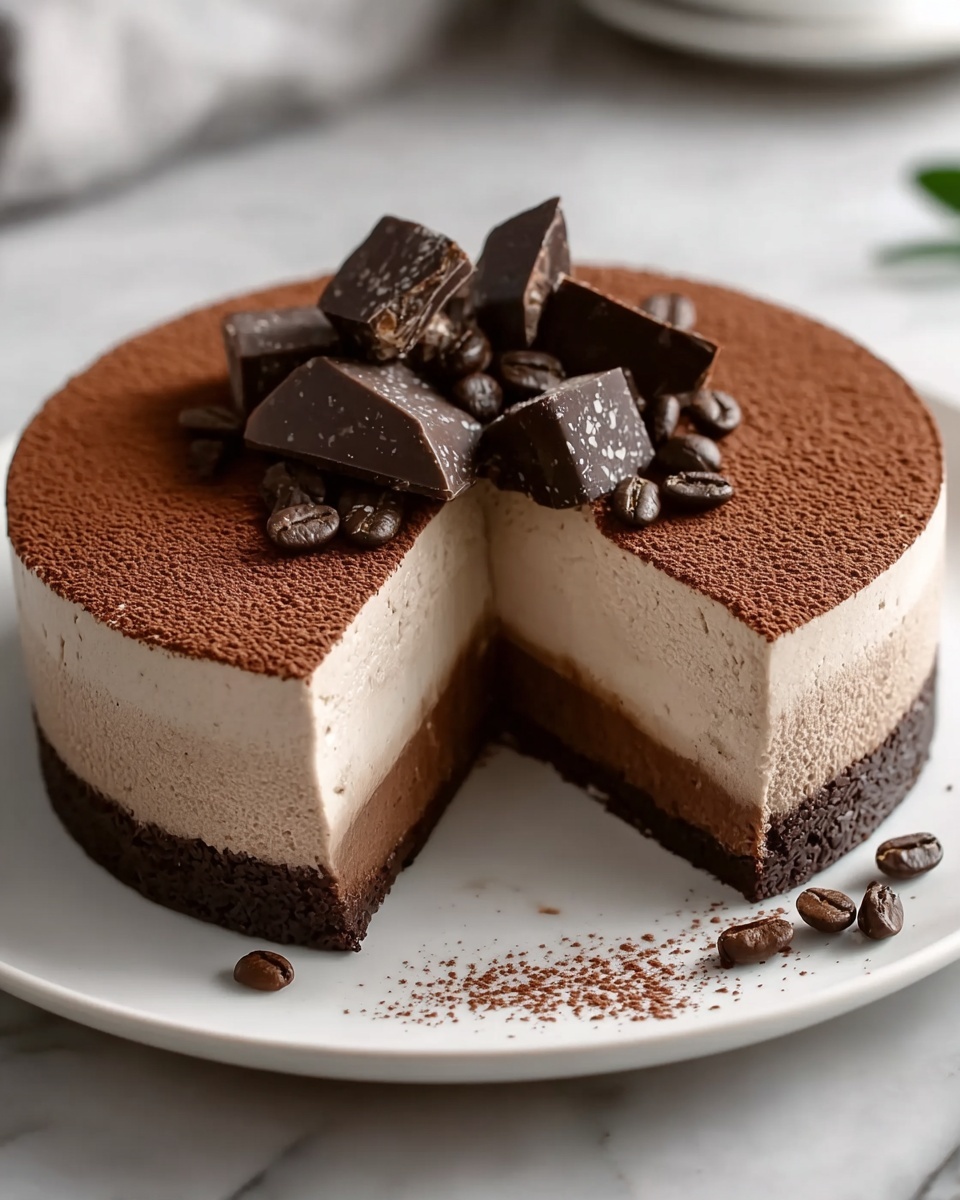
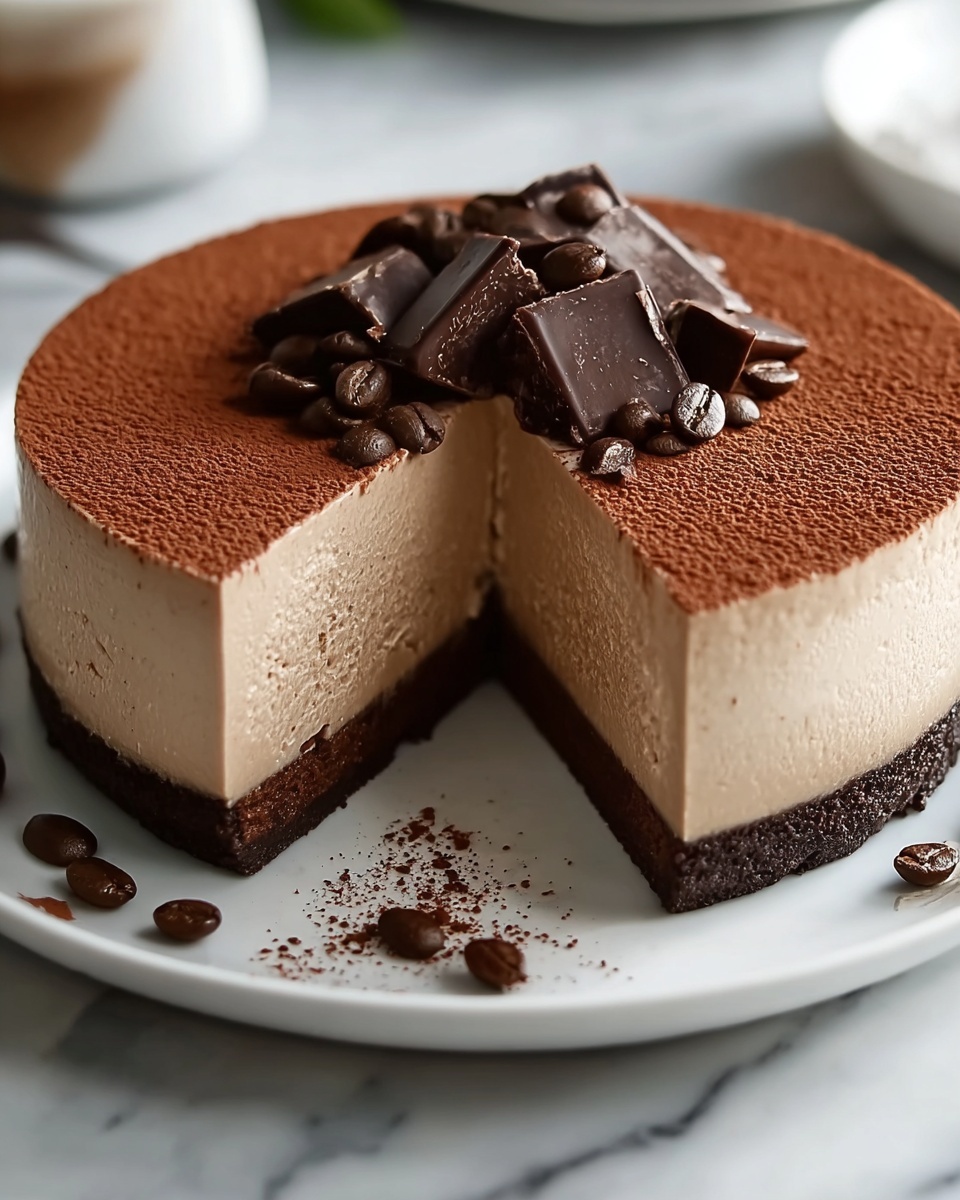
If you have ever dreamed of the perfect indulgent dessert that brings a rich, velvety texture with a jolt of bold flavor, this Chocolate Espresso Cheesecake Recipe is your new best friend. Imagine the deep intensity of dark chocolate melting into the smooth cream cheese, all energized by an espresso kick that makes each bite irresistible. This cheesecake isn’t just a treat; it’s an experience that will have you smiling after every forkful, perfect for sharing or savoring all to yourself.
Ingredients You’ll Need
Gathering the right ingredients is the foundation to crafting a spectacular cheesecake. Each item here plays a starring role—bringing texture, depth, or creaminess that come together into pure magic.
- Dark chocolate (200 grams, 70% cocoa solids): Provides a rich, bittersweet backbone with luscious melted goodness.
- Espresso (60 milliliters, cooled): Adds a robust coffee flavor that brightens and intensifies the chocolate.
- Digestive biscuits or plain Graham crackers (200 grams): Forms the crunchy, buttery base that supports the creamy layers.
- Melted butter (100 grams): Binds the biscuit crumbs and gives the crust a golden richness.
- Cream (250 milliliters, 1 cup): Whipped to airy perfection for a lightness that balances the dense filling.
- Cream cheese (400 grams): The star of the filling, delivering that silky, tangy creaminess you expect in every cheesecake.
- Castor sugar (200 grams): Sweetens the filling without overpowering the chocolate and espresso notes.
- Additional cream to serve: Adds an extra touch of indulgence and smoothness on the plate.
How to Make Chocolate Espresso Cheesecake Recipe
Step 1: Melt the Dark Chocolate
Begin by melting the dark chocolate carefully using a double boiler or microwave in short bursts to avoid burning. Once melted, set it aside to cool so it doesn’t scramble the eggs or cream cheese when mixed later. This step guarantees a perfectly smooth, glossy chocolate infusion throughout the cheesecake.
Step 2: Prepare and Cool the Espresso
Brew a fresh espresso shot and allow it to cool completely. The cold espresso blends seamlessly into the mixture, providing that signature coffee flavor without making the batter warm or watery.
Step 3: Prepare the Cake Tin
Line a 22-23 centimeter springform tin with baking paper. This step is a game-changer when it comes to removing your cheesecake smoothly from the pan once it’s set, preserving the beauty of your creation.
Step 4: Whip the Cream
Use a stand mixer with the whisk attachment to whip the cream until soft peaks form. This whipped cream introduces an airy texture that will lighten the dense chocolate and cream cheese blend, making the final cheesecake irresistible.
Step 5: Make the Biscuit Base
Process the biscuits into fine crumbs, then mix with the melted butter. Press this mixture firmly into the bottom of your lined tin, creating the crunchy, buttery crust that provides a perfect contrast to the creamy filling. Smooth it evenly with the back of a spoon for a clean finish.
Step 6: Beat Sugar and Cream Cheese
In a clean bowl, beat together the castor sugar and cream cheese until smooth and the sugar has dissolved completely. This ensures the filling is free of graininess and velvety in texture.
Step 7: Add Chocolate and Espresso
Slowly add the cooled melted chocolate and espresso to the cream cheese mixture, whipping to combine everything into one luscious, rich batter. This is the moment where the magic intensifies as flavors meld beautifully.
Step 8: Fold in the Whipped Cream
Gently fold the whipped cream into the chocolate mixture using a spatula. Folding rather than mixing preserves the airy creaminess, making every slice light despite its decadence.
Step 9: Assemble the Cheesecake
Pour the chocolate espresso filling over the biscuit base in the springform tin. Use a spatula to smooth the surface so it looks glossy and inviting.
Step 10: Chill Until Set
Refrigerate the cheesecake for several hours or overnight until completely set. This chilling stage is crucial to achieving the perfect sliceable texture without cracking or crumbling.
Step 11: Decorate and Serve
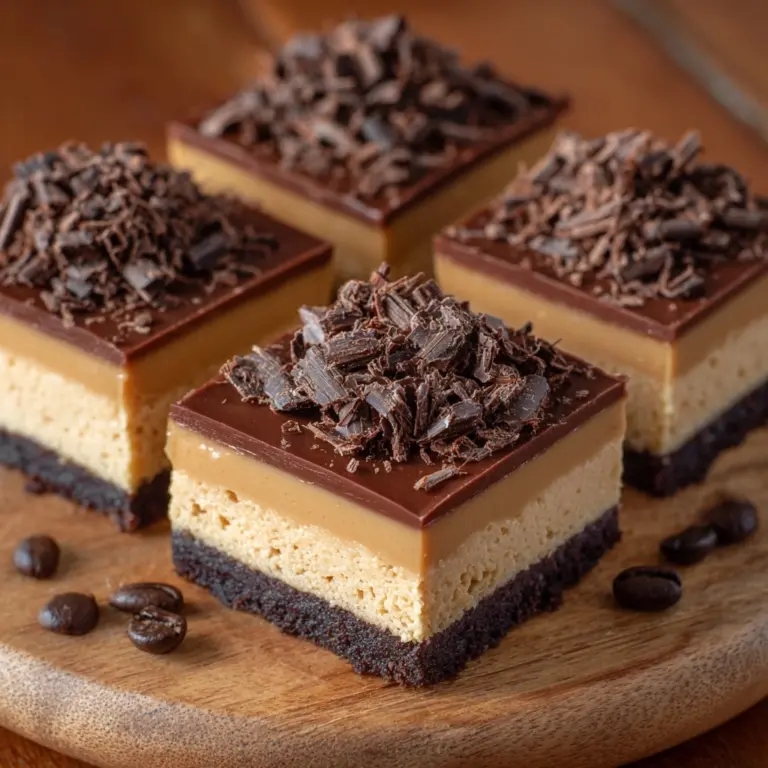
Just before serving, grate additional dark chocolate over the top and accompany with dollops of fresh whipped cream. These finishing touches not only look stunning but complement the intense flavor.
How to Serve Chocolate Espresso Cheesecake Recipe
Garnishes
For garnishes, a sprinkle of grated dark chocolate or cocoa powder is elegant and enhances the deep chocolate notes. You can also add a few coffee beans or a dusting of cinnamon for extra aroma and flair.
Side Dishes
This cheesecake pairs wonderfully with fresh berries like raspberries or strawberries, which bring a refreshing brightness to every bite. A scoop of vanilla bean ice cream or a drizzle of caramel sauce also makes a perfect side treat.
Creative Ways to Present
Try serving the cheesecake in individual jars or cups for a playful presentation at dinner parties. You could also layer the crushed biscuit base and filling in clear glasses to create a cheesecake parfait with espresso and chocolate surprises visible in every layer.
Make Ahead and Storage
Storing Leftovers
Store any leftover cheesecake in an airtight container in the refrigerator for up to 4 days. Keeping it covered prevents the cheesecake from absorbing other fridge odors while preserving its creamy texture.
Freezing
This Chocolate Espresso Cheesecake Recipe freezes beautifully. Wrap the whole cheesecake tightly in plastic wrap and aluminum foil, or freeze individual slices in airtight containers for up to 2 months. Thaw overnight in the fridge before serving.
Reheating
Since this is a no-bake cheesecake, it’s best served chilled. Avoid reheating to preserve the texture and flavor. If desired, bringing it to room temperature for 15-20 minutes before serving can soften the cheesecake slightly for an even creamier mouthfeel.
FAQs
Can I use regular coffee instead of espresso?
Absolutely! While espresso packs a stronger punch, a concentrated strong brewed coffee can work in a pinch. Just ensure it’s cooled to maintain the texture of the cheesecake.
Do I have to use dark chocolate with 70% cocoa solids?
Dark chocolate with high cocoa content offers a bittersweet balance that complements espresso perfectly. You can use a slightly milder dark chocolate if preferred, but avoid milk chocolate as it may make the cheesecake too sweet.
Is this recipe suitable for beginners?
Definitely! The step-by-step process is straightforward, and the ingredients are simple, making this Chocolate Espresso Cheesecake Recipe an excellent choice for anyone wanting to impress without stress.
Can I make this cheesecake dairy-free?
You could experiment by substituting dairy-free cream cheese and cream alternatives, but keep in mind that the traditional creamy texture might change. Using coconut cream and vegan cream cheese are potential swaps.
How long does the cheesecake need to chill?
For the best texture, chilling the cheesecake for at least 4 hours or overnight is recommended. This allows all the flavors to meld and the cheesecake to set firmly for clean slicing.
Final Thoughts
This Chocolate Espresso Cheesecake Recipe is a fantastic way to elevate dessert time into a truly memorable occasion. It combines classic cheesecake comfort with the sophisticated kick of espresso and dark chocolate, making it a guaranteed crowd-pleaser. If you’re looking to wow your friends or indulge yourself, this recipe will not disappoint—give it a go and watch as it quickly becomes a beloved favorite in your dessert repertoire.
Print
Chocolate Espresso Cheesecake Recipe
- Prep Time: 20 minutes
- Cook Time: 0 minutes
- Total Time: 4 hours 20 minutes (including chilling time)
- Yield: 8-10 servings
- Category: Dessert
- Method: No-Cook
- Cuisine: Western
Description
This decadent Chocolate Espresso Cheesecake combines the rich flavors of dark chocolate and bold espresso with a creamy, smooth texture. Featuring a crunchy biscuit base and a luscious chocolate espresso filling, it’s an indulgent no-bake dessert perfect for coffee and chocolate lovers alike.
Ingredients
Base
- 200 grams digestive biscuits or plain Graham crackers
- 100 grams melted butter
Filling
- 200 grams dark chocolate with 70% cocoa solids (plus extra for decorating)
- 60 milliliters espresso, allowed to cool
- 250 milliliters (1 cup) cream
- 400 grams cream cheese
- 200 grams castor sugar
To Serve
- Additional cream to serve
Instructions
- Melt Chocolate: Melt the dark chocolate gently using a double boiler or microwave, then set it aside to cool.
- Prepare Espresso: Brew the espresso and allow it to cool completely before using.
- Prepare Tin: Line a 22-23 centimeter springform cake tin with baking paper to prevent sticking.
- Whip Cream: Whip the cream to soft peaks using a stand mixer fitted with the whisk attachment, then transfer it to another bowl and set aside.
- Make Biscuit Base: Grind the digestive biscuits or Graham crackers in a food processor, mix the crumbs with melted butter, and press the mixture evenly into the base of the lined tin using the back of a spoon.
- Mix Cream Cheese and Sugar: In a bowl, beat the cream cheese and castor sugar together until the sugar crystals have completely dissolved.
- Add Chocolate and Espresso: Stir the cooled melted chocolate and espresso into the cream cheese mixture and whip until well combined and smooth.
- Fold in Whipped Cream: Gently fold the whipped cream into the chocolate mixture to maintain the airy texture.
- Assemble Cheesecake: Pour the filling over the biscuit base and smooth the top with a spatula.
- Chill: Refrigerate the cheesecake until fully set, ideally for several hours or overnight.
- Decorate and Serve: Top with grated dark chocolate and serve with additional whipped cream for an elegant finish.
Notes
- Use high-quality dark chocolate with 70% cocoa solids for the best flavor and texture.
- Ensure the espresso is fully cooled before adding to the mixture to prevent curdling.
- Press the biscuit base firmly to create a solid foundation for the cheesecake.
- The cheesecake needs to chill for at least 4 hours or overnight for optimal setting.
- Extra whipped cream served alongside enhances the richness of each slice.

