
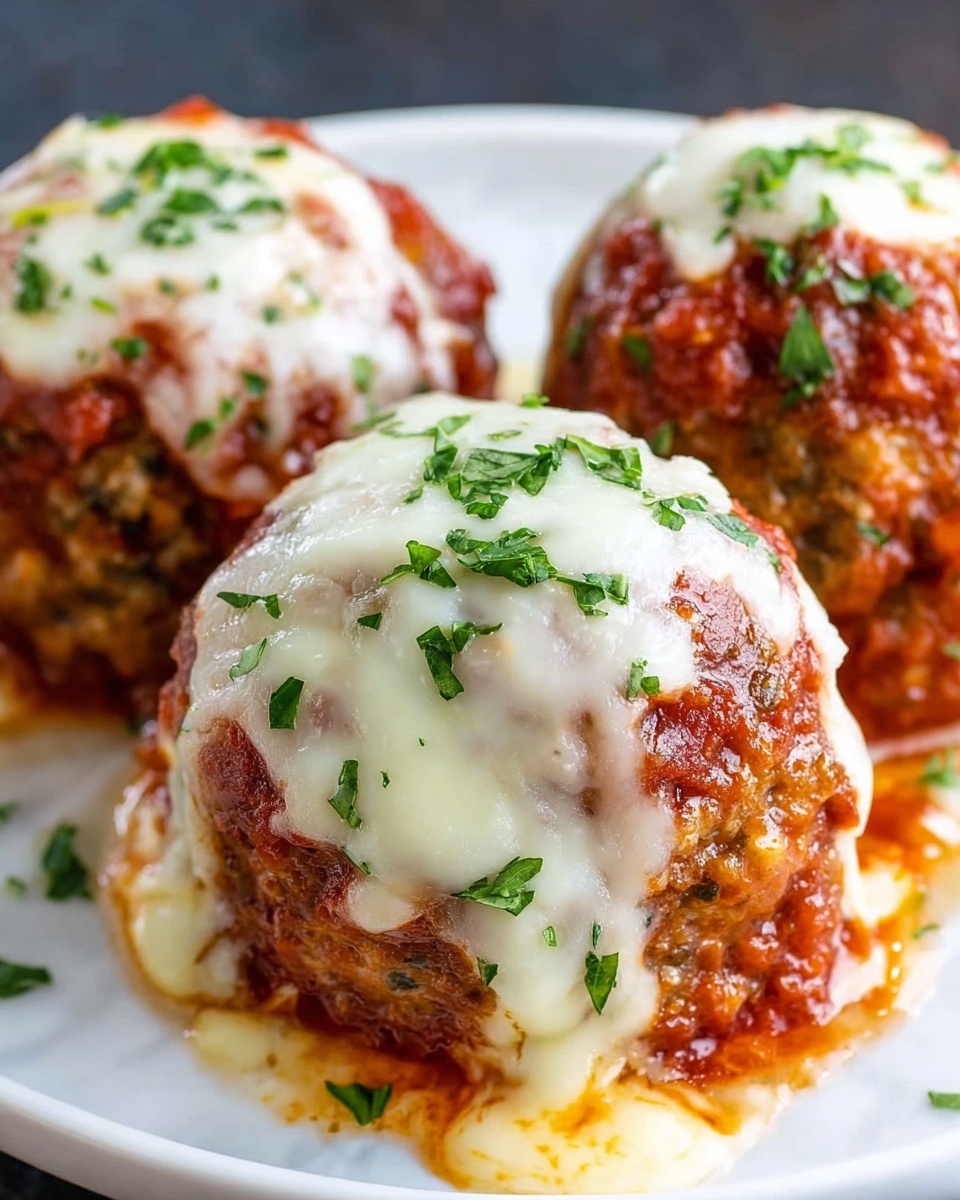
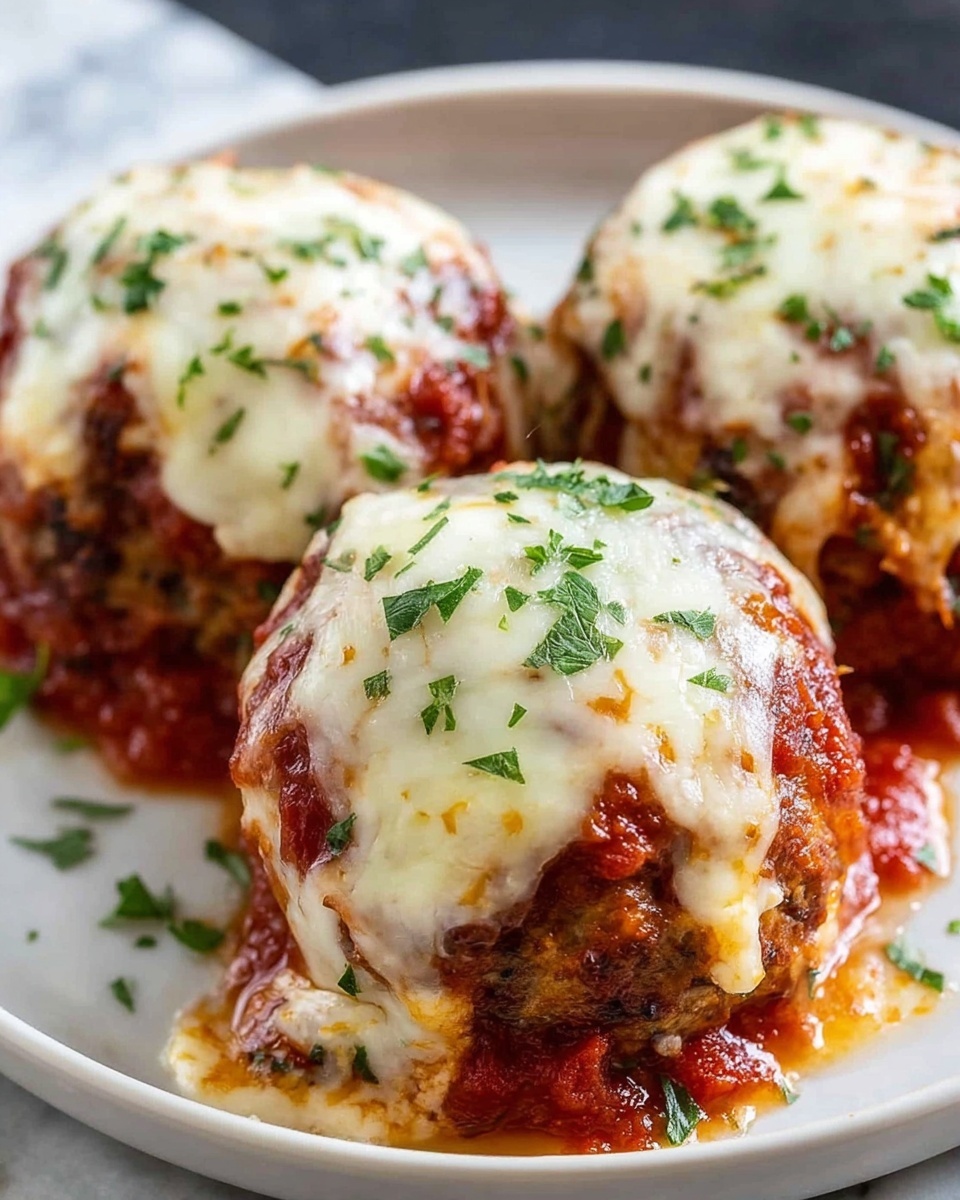
If you’re craving comfort food with a fun twist, the Chicken Parm Mini Meatloaf Muffins Recipe is about to become your new favorite. These bite-sized delights combine the nostalgic flavors of chicken parmesan with the ease and convenience of mini meatloafs, baked to golden perfection. Imagine tender, juicy meat wrapped in savory seasonings, topped with melted cheese and a crispy breadcrumb crust—each muffin bursts with flavor and makes for an irresistible family-friendly meal or party snack. Once you try this recipe, you’ll wonder why mini meatloafs weren’t always served this way!
Ingredients You’ll Need
The magic behind any great dish lies in its ingredients, and this recipe shines because it uses simple, pantry-friendly staples that come together to create an unforgettable flavor and texture profile. Each component plays a crucial role: the cheese adds richness, the breadcrumbs bring crunch, and the seasonings deliver that classic chicken parmesan vibe.
- Ground chicken: The lean protein base gives these meatloaf muffins a tender, juicy texture without heaviness.
- Italian breadcrumbs: These help bind the meat mixture while adding subtle herbaceous notes.
- Parmesan cheese: Adds salty, nutty flavor essential to the classic chicken parm taste.
- Shredded mozzarella cheese: Provides melty, gooey goodness that makes each muffin incredibly satisfying.
- Egg: Acts as a perfect binder, keeping everything together while lending moisture.
- Minced garlic and onion: These aromatics deepen the flavor profile with comforting warmth.
- Marinara sauce: Brings that signature tang and herbaceous tomato goodness that defines chicken parmesan.
- Fresh basil and oregano: Fresh herbs elevate the dish beyond basic comfort food, brightening every bite.
- Salt and pepper: Essential seasonings that balance and bring out all the other flavors.
How to Make Chicken Parm Mini Meatloaf Muffins Recipe
Step 1: Preheat and Prepare
Start by preheating your oven to 375°F (190°C) and greasing a standard muffin tin generously. This ensures your Chicken Parm Mini Meatloaf Muffins will slide out smoothly once they’re baked to perfection. Remember, patience is key here—let the oven reach the right temperature before putting your muffins in.
Step 2: Mix the Meatloaf Base
In a large bowl, combine the ground chicken, Italian breadcrumbs, grated Parmesan, minced garlic, onion, egg, and fresh herbs. Season well with salt and pepper. Use your hands or a sturdy spoon to mix everything just until combined—overmixing can lead to dense meatloaf muffins. This step is where the flavors meld, so make sure everything is evenly incorporated for that classic chicken parm taste.
Step 3: Shape and Layer
Divide the meat mixture evenly among the muffin cups, pressing down lightly to form compact little muffins. Next comes the fun part: topping each muffin with a spoonful of marinara sauce, then a generous sprinkle of shredded mozzarella. This layering mimics the classic chicken parm top and guarantees gooey, cheesy perfection in every bite.
Step 4: Bake to Golden Goodness
Place your muffin tin on the middle rack and bake for about 25 to 30 minutes. You want the meatloafs to be fully cooked through and the cheese melted and bubbling, with the edges turning slightly crispy and golden. Keep an eye on them in the last few minutes to avoid browning too much. The aroma filling your kitchen at this point is sheer comfort food magic.
Step 5: Cool and Release
Once baked, allow the muffins to cool in the tin for about 5 minutes before carefully removing them with a spatula or butter knife. This gives them time to set, so they hold their shape but remain juicy. Now you’re ready to dive into these irresistible Chicken Parm Mini Meatloaf Muffins!
How to Serve Chicken Parm Mini Meatloaf Muffins Recipe
Garnishes
A sprinkle of fresh chopped parsley or extra grated Parmesan right before serving adds a burst of color and an extra layer of flavor. You can also drizzle a little extra marinara sauce on top, or even a light drizzle of balsamic glaze for a touch of sweetness that perfectly balances the savory notes.
Side Dishes
Pair these mini meatloaf muffins with a crisp green salad tossed in a tangy vinaigrette to cut through the richness, or serve alongside garlic roasted vegetables for a hearty, well-rounded meal. Creamy mashed potatoes or buttery polenta make for comforting companions that complement the chicken parm flavors brilliantly.
Creative Ways to Present
For a party or gathering, arrange the Chicken Parm Mini Meatloaf Muffins on a platter with toothpicks for easy grabbing. You might even try stuffing them with a small cube of mozzarella inside before baking for a cheesy surprise, or serve them halved inside slider buns with a smear of marinara for delicious mini sandwiches that will wow your guests.
Make Ahead and Storage
Storing Leftovers
Leftover Chicken Parm Mini Meatloaf Muffins can be stored in an airtight container in the refrigerator for up to 3 days. Keeping them chilled helps preserve their juicy texture and rich flavors, making them perfect for quick lunches or dinner reboots.
Freezing
These mini meatloaf muffins freeze beautifully. After baking and cooling completely, individually wrap each muffin in plastic wrap and place them in a freezer-safe bag or container. They’ll keep well for up to 2 months, allowing you to enjoy homemade comfort food anytime with minimal effort.
Reheating
For the best results, reheat frozen or refrigerated muffins in a preheated oven at 350°F (175°C) until warmed through and the cheese is melty again, about 10-15 minutes. You can also microwave them in short bursts, but watch closely to avoid drying them out—adding a small splash of water to the container can help maintain moisture.
FAQs
Can I make these muffins gluten-free?
Absolutely! Simply swap out the Italian breadcrumbs for a gluten-free alternative and ensure your marinara sauce is gluten-free as well. This way, you can enjoy the same delicious Chicken Parm Mini Meatloaf Muffins Recipe without worry.
Can I use ground turkey instead of chicken?
Yes, ground turkey works well as a substitute if you prefer a different protein. The flavors will remain similar, though turkey tends to be leaner, so adding a bit of olive oil or a splash of broth can help maintain moisture.
How do I know when the muffins are fully cooked?
The internal temperature should reach 165°F (74°C) for ground chicken. Using an instant-read thermometer is the safest way to ensure they’re cooked through but still juicy.
Can I prepare these ahead of time and bake them later?
You can assemble the muffins and refrigerate them, covered tightly, for up to 24 hours before baking. Just add a few extra minutes to the baking time if baking straight from the fridge.
What can I use if I don’t have fresh herbs?
Dried basil and oregano are fine substitutes—use about one-third of the quantity of fresh herbs since dried herbs are more concentrated. They’ll still add wonderful flavor to your Chicken Parm Mini Meatloaf Muffins Recipe.
Final Thoughts
There’s something truly special about the Chicken Parm Mini Meatloaf Muffins Recipe—they bring together comfort food nostalgia and bite-sized convenience into one irresistible package. Whether you’re cooking for a weeknight dinner, meal prepping, or impressing guests, these muffins deliver on flavor and fun without fuss. I can’t wait for you to make them, share them, and fall in love with every cheesy, savory, tender bite.
Print
Chicken Parm Mini Meatloaf Muffins Recipe
- Prep Time: 20 minutes
- Cook Time: 30 minutes
- Total Time: 50 minutes
- Yield: 8 servings
- Category: Baking
- Method: Baking
- Cuisine: American
- Diet: Vegetarian
Description
A comforting and delicious baked macaroni and cheese casserole loaded with tender broccoli and sharp cheddar cheese, topped with seasoned panko breadcrumbs for a crispy finish. Perfect as a hearty side dish or vegetarian main for 8 servings.
Ingredients
Pasta and Vegetables
- 2 cups medium shell pasta, cooked 2 minutes less than al dente
- 2 cups diced fresh broccoli
Sauce
- 4 tablespoons salted butter
- 1/4 cup all-purpose flour
- 3 cups whole milk
- 1/2 teaspoon kosher salt
- 1/4 teaspoon ground black pepper
- 1/4 teaspoon garlic powder
- 1 pinch ground nutmeg
- 3 cups shredded sharp cheddar cheese, divided
Topping
- 1/3 cup seasoned panko bread crumbs
Instructions
- Preheat oven and blanch broccoli: Preheat your oven to 350°F (175°C). Bring a pot of water to a boil and blanch the diced broccoli for 2 minutes to soften slightly. Immediately transfer the broccoli to an ice bath to stop the cooking process, then drain thoroughly.
- Make cheese sauce: In a pot over medium heat, melt the salted butter. Sprinkle in the flour and whisk continuously until a smooth roux forms, cooking it for about 2 minutes to remove the raw flour taste. Gradually pour in the whole milk while whisking constantly to avoid lumps. Add kosher salt, black pepper, garlic powder, and a pinch of nutmeg. Continue to cook, whisking frequently, for 5 to 7 minutes until the sauce thickens.
- Combine ingredients: Remove the cheese sauce from heat and stir in 2 cups of the shredded sharp cheddar cheese. Mix until the cheese has fully melted and the sauce is smooth. Add the cooked pasta and blanched broccoli to the sauce and stir until everything is evenly combined.
- Bake: Transfer the mixture into an 11×7 inch baking dish. Sprinkle the remaining 1 cup of cheddar cheese evenly on top, then add the seasoned panko bread crumbs. Bake uncovered in the preheated oven for 20 minutes, or until the topping is golden brown and the casserole is bubbly.
- Serve: Remove from the oven and let the casserole cool slightly to set. Serve warm for a comforting side or main dish.
Notes
- Cook pasta slightly less than al dente to prevent mushiness after baking.
- Blanching broccoli preserves its vibrant color and crisp texture in the casserole.
- Use sharp cheddar for a robust, tangy cheese flavor; mild cheddar can be substituted for a milder taste.
- Seasoned panko adds a delicious crunchy texture on top, but plain panko or breadcrumbs can be used if preferred.
- Make ahead: Prepare through step 3 and refrigerate; bake when ready, adding a few extra minutes to the baking time if chilled.


