
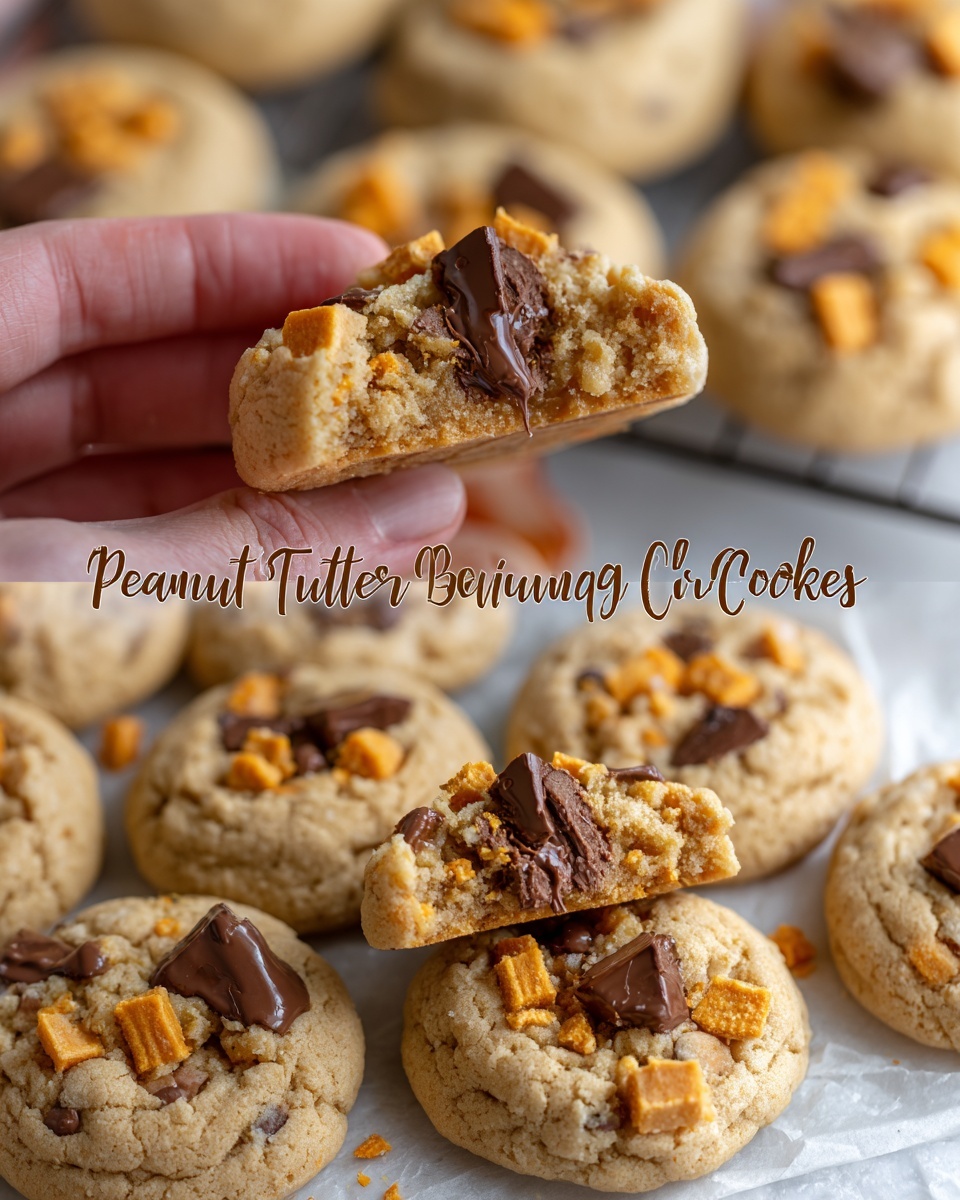
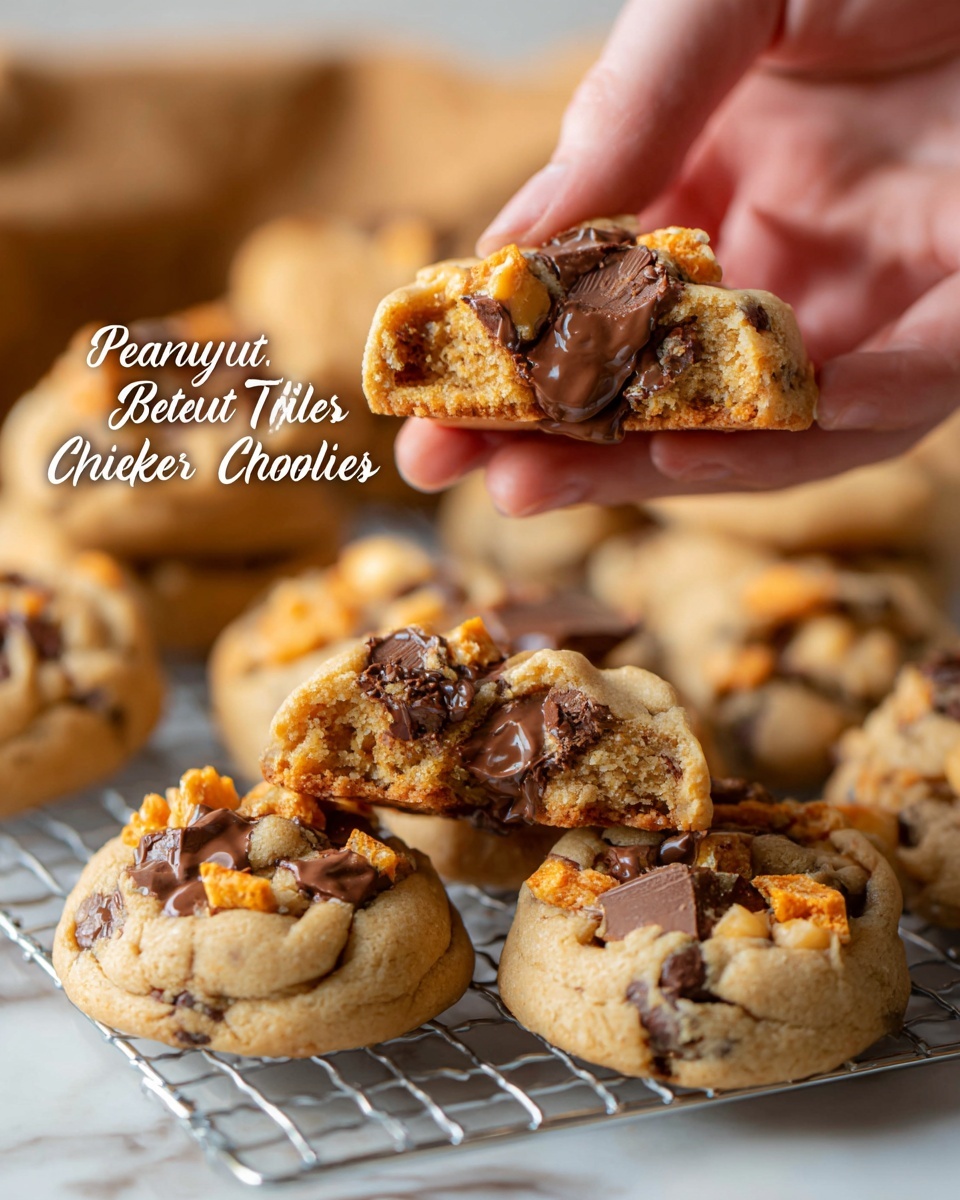
If you adore the perfect balance of salty, sweet, and satisfyingly crunchy, then you are going to fall head over heels for this Thick and Chewy Peanut Butter Butterfinger Cookies Recipe. These cookies bring together rich peanut butter with the irresistible crispy crunch of Butterfinger candy bars to create a treat that’s genuinely addictive. With a chewy texture that’s thick and comforting, every bite feels like a nostalgic hug—only better because it’s all your favorite flavors rolled into one. Whether you’re baking for a party or simply craving something sweet and fulfilling, these cookies will become your new go-to recipe in no time.
Ingredients You’ll Need
What’s great about this Thick and Chewy Peanut Butter Butterfinger Cookies Recipe is how straightforward and delightful the ingredients list is. Each component plays a special role, lending creaminess, sweetness, or that perfect chewy texture that makes the cookies unforgettable.
- 3/4 cup butter, softened: Butter provides richness and helps deliver that luscious, smooth cookie base.
- 1/2 cup granulated sugar: Adds the essential sweetness with a slight crispness.
- 1/2 cup brown sugar, packed: Brings moisture and a hint of caramel flavor, keeping cookies delightfully chewy.
- 1 cup peanut butter: The star of the show, creamy peanut butter infuses every bite with a nutty depth.
- 1 large egg: Acts as a binder to hold these tasty morsels together.
- 1 & 1/2 teaspoons vanilla: Enhances and rounds out all the flavors beautifully.
- 1 & 1/2 cups all-purpose flour: The sturdy foundation for structure with just the right tenderness.
- 1/2 teaspoon baking soda: Helps the cookies rise softly and aids in texture.
- 1/2 teaspoon baking powder: Offers additional lift without over-expansion.
- 1/4 teaspoon kosher salt: Balances the sweetness and highlights the peanut butter’s richness.
- 16 ounces Butterfinger, chopped: This candy adds that iconic crispity-crunch and peanut buttery bite that makes these cookies unforgettable.
How to Make Thick and Chewy Peanut Butter Butterfinger Cookies Recipe
Step 1: Cream the Butter and Sugars
Kick off this delightful baking journey by beating the softened butter until it’s as smooth and creamy as a dream. Then, gradually add both granulated and brown sugars, beating them in until the mixture is fluffy and light. This step is what begins to build the tender, chewy foundation.
Step 2: Add Peanut Butter and Flavorings
Next up, blend in the creamy peanut butter—it truly is the hero here. Follow it with the egg and vanilla to weave everything together and amplify the flavor complexity of these cookies.
Step 3: Combine the Dry Ingredients
Spoon and level your all-purpose flour for accuracy, then add it to the mixture but hold off on mixing just yet. Toss in the baking soda, baking powder, and salt on top of the flour. Using a teaspoon, gently stir these dry ingredients together to avoid any lumps and distribute the leavening agents evenly.
Step 4: Mix the Dough Gently
Turn your mixer on low and combine the dry ingredients with the wet until the dough just begins to come together. Remember, over-mixing leads to tough cookies, so stop once some flour patches remain and scrape the bowl thoroughly.
Step 5: Fold in the Chopped Butterfinger
This is where the magic really happens. Toss in the chopped Butterfinger candy to add incredible crunch and bursts of peanut buttery crispness throughout the dough. Whether you use Butterfinger Bits or chop regular candy bars coarsely, this will turn your cookies into treasure chests of flavor.
Step 6: Chill the Dough
Pop your dough into the fridge for anywhere from 15 minutes to 24 hours. Chilling firms up the dough, making it easier to shape and ensuring that your cookies keep their thick and chewy texture when baked.
Step 7: Bake the Cookies
Heat your oven to 350 degrees F and line those baking sheets with parchment or silicone mats. Shape your chilled dough into generous 2-inch balls, give them space on the tray, and bake for about 10 minutes. They’ll look puffy and perfectly baked when the edges are set but the centers still soft.
Step 8: The Finishing Touch
Pro tip: If your cookies haven’t spread enough, gently press down on their tops after pulling them from the oven to get the ideal shape. Sprinkle any extra Butterfinger crumbles on top to amp up the crunch and presentation. Let the cookies cool on the pan for five minutes before moving them to a rack. The final texture is thick, chewy, and absolutely heavenly.
How to Serve Thick and Chewy Peanut Butter Butterfinger Cookies Recipe
Garnishes
While the cookies are stunning on their own, a few extra touches can elevate them. Consider sprinkling a pinch of flaky sea salt atop warm cookies to balance the sweetness or drizzle them with melted peanut butter or chocolate for a luscious finish.
Side Dishes
Pair these cookies with a tall glass of cold milk for a classic combo that never fails. For a grown-up twist, a cup of rich coffee or espresso works beautifully, cutting through the peanut butter richness and Butterfinger sweetness.
Creative Ways to Present
Want to impress guests? Arrange the cookies on a platter with miniature bowls of peanut butter dip or chopped nuts. Another fun idea is sandwiching two cookies together with a scoop of vanilla or chocolate ice cream for a decadent dessert treat that’s sure to wow anyone lucky enough to dig in.
Make Ahead and Storage
Storing Leftovers
These cookies hold up wonderfully for up to three days when stored in an airtight container at room temperature. Keep them comfortably soft and chewy by layering parchment paper between cookies if stacking.
Freezing
If you want to savor these indulgent cookies even later, freeze dough balls in a ziplock bag for up to three months. You can bake the frozen dough straight from the freezer, adding a minute or two to the bake time, and remember to press them lightly after baking to get that perfect spread.
Reheating
Reheat cookies gently in a microwave for about 10 seconds to bring back a soft texture without making the Butterfinger pieces too melty. This brings out that perfect chewy-buttery flavor we all crave.
FAQs
Can I use natural peanut butter for this recipe?
It’s best to stick with regular creamy peanut butter rather than natural varieties. Natural peanut butter usually has more oil separation which can affect the cookie texture and consistency, making them less chewy.
What if I can’t find Butterfinger Bits?
No worries! Simply chop regular Butterfinger candy bars into coarse chunks. Aim for a variety of sizes to get that perfect texture balance. Two 8-ounce bars typically make up the right amount.
How do I know when the cookies are perfectly baked?
Watch for cookies that are puffy with set edges and a matte center that isn’t shiny. They will still be soft but not doughy. If they look under-spread, gently flatten them after baking for the best results.
Can I make these cookies vegan or gluten-free?
This recipe relies on butter, egg, and all-purpose flour, so adjustments would be needed. Vegan substitutes and gluten-free flour blends can work but may alter texture and taste, so some experimentation might be necessary.
Why do you recommend chilling the dough?
Chilling solidifies the fats, which leads to thicker cookies that don’t spread too much in the oven. It also helps the flavors meld beautifully and makes the dough easier to handle.
Final Thoughts
If you want a cookie that feels indulgent, nostalgic, and just a little bit special, this Thick and Chewy Peanut Butter Butterfinger Cookies Recipe is pure magic. It’s a delicious way to bring peanut butter and buttery candy crunch together into a soft, chewy package that everyone will adore. Trust me, once you try these, they’ll quickly become one of your favorite baked treats to make and share. So grab your ingredients and get baking—your cookie jar will thank you!
Print
Thick and Chewy Peanut Butter Butterfinger Cookies Recipe
- Prep Time: 15 minutes
- Cook Time: 10 minutes
- Total Time: 25 minutes (excluding chilling time)
- Yield: 25 cookies
- Category: Dessert, Snack
- Method: Baking
- Cuisine: American
Description
These Thick and Chewy Peanut Butter Butterfinger Cookies combine the classic creamy peanut butter flavor with crunchy Butterfinger candy pieces, creating a perfectly chewy cookie with delightful texture. Soft and rich, these cookies are easy to make and great for peanut butter lovers who enjoy a sweet, crispy candy twist in every bite.
Ingredients
Cookie Dough
- 3/4 cup butter, softened (1 and 1/2 sticks)
- 1/2 cup granulated sugar
- 1/2 cup packed brown sugar
- 1 cup peanut butter (not natural peanut butter)
- 1 large egg
- 1 and 1/2 teaspoons vanilla extract
- 1 and 1/2 cups all-purpose flour, spooned and leveled
- 1/2 teaspoon baking soda
- 1/2 teaspoon baking powder
- 1/4 teaspoon kosher salt
Candy Mix-In
- 16 ounces Butterfinger candy bars, chopped (about 2 regular size bars or 2 bags of Butterfinger Bits if available)
Instructions
- Beat Butter: In a large bowl or stand mixer, beat 3/4 cup softened butter until smooth and creamy, scraping down the sides as needed.
- Add Sugars: Add 1/2 cup granulated sugar and 1/2 cup packed brown sugar. Beat for about 2 minutes until fluffy and no butter chunks remain.
- Mix Peanut Butter: Add 1 cup peanut butter and mix until incorporated.
- Add Egg and Vanilla: Add 1 large egg and 1 and 1/2 teaspoons vanilla extract. Beat until well combined, occasionally scraping the bowl sides.
- Prepare Dry Ingredients: In a separate bowl or on top of the flour in the mixing bowl, combine 1 and 1/2 cups all-purpose flour (spooned and leveled), 1/2 teaspoon baking soda, 1/2 teaspoon baking powder, and 1/4 teaspoon kosher salt. Break up any clumps with a teaspoon.
- Combine Dry with Wet: Turn mixer on low and add dry mixture to the wet ingredients. Mix just until dough barely comes together; some flour may be visible. Scrape sides and bottom of the bowl. Avoid overmixing to keep cookies tender.
- Fold in Butterfinger: Add 16 ounces chopped Butterfinger candy and gently mix until just incorporated.
- Chill Dough: Cover bowl and chill dough for 15 minutes to 1 hour (or up to 24 hours) to firm up.
- Preheat Oven: Preheat oven to 350°F (175°C). Line two baking sheets with parchment paper or silicone mats.
- Shape Cookies: Using a scoop or spoon, form 2-inch dough balls. Lightly overpacked scoops are fine.
- Arrange on Sheets: Place dough balls at least 1-2 inches apart on prepared baking sheets. About 12 cookies fit per half-sheet (12×18 inches).
- Bake Cookies: Bake for approximately 10 minutes until edges are set and the center is no longer shiny.
- Flatten if Needed: If cookies have not spread enough, gently press down on the tops with a spatula after removing from oven or 2 minutes before done baking. Optionally, sprinkle with extra Butterfinger crumbles while warm.
- Cool: Let cookies cool on the baking sheet for at least 5 minutes before transferring to a wire rack to cool completely.
- Storage and Serving: Cookies taste best as they approach room temperature rather than warm. Store leftovers in an airtight container for up to 3 days.
- Freezing Option: Cookie dough balls freeze well. Freeze on a baking sheet then transfer to a ziplock for up to 3 months. Bake from frozen, adding 1-2 minutes to baking time and press down with spatula after baking to help spread.
Notes
- Use regular peanut butter (not natural) for better texture and flavor balance.
- If Butterfinger Bits are unavailable, chop 2 regular size Butterfinger candy bars totaling 16 ounces.
- Chilling the dough is important to prevent spreading and to develop flavors.
- Pressing cookies flat after baking helps achieve the perfect chewy texture.
- Cookies are better after cooling to room temperature as warm Butterfinger candy can feel too soft.
- Dough can be made ahead and frozen for convenient future baking.

