
If you adore the tangy crunch of dill pickles paired with creamy, cheesy goodness, then you are going to fall head over heels for this Creamy Dill Pickle Cheese Ball Recipe. It’s the perfect party appetizer that effortlessly combines sharp cheddar, fresh dill, and a hint of garlic into a luscious cheese ball that’s bursting with flavor. Whether you’re hosting a casual get-together or simply craving a savory snack, this recipe delivers that nostalgic comfort with a fresh, vibrant twist that will keep everyone coming back for more.
Ingredients You’ll Need
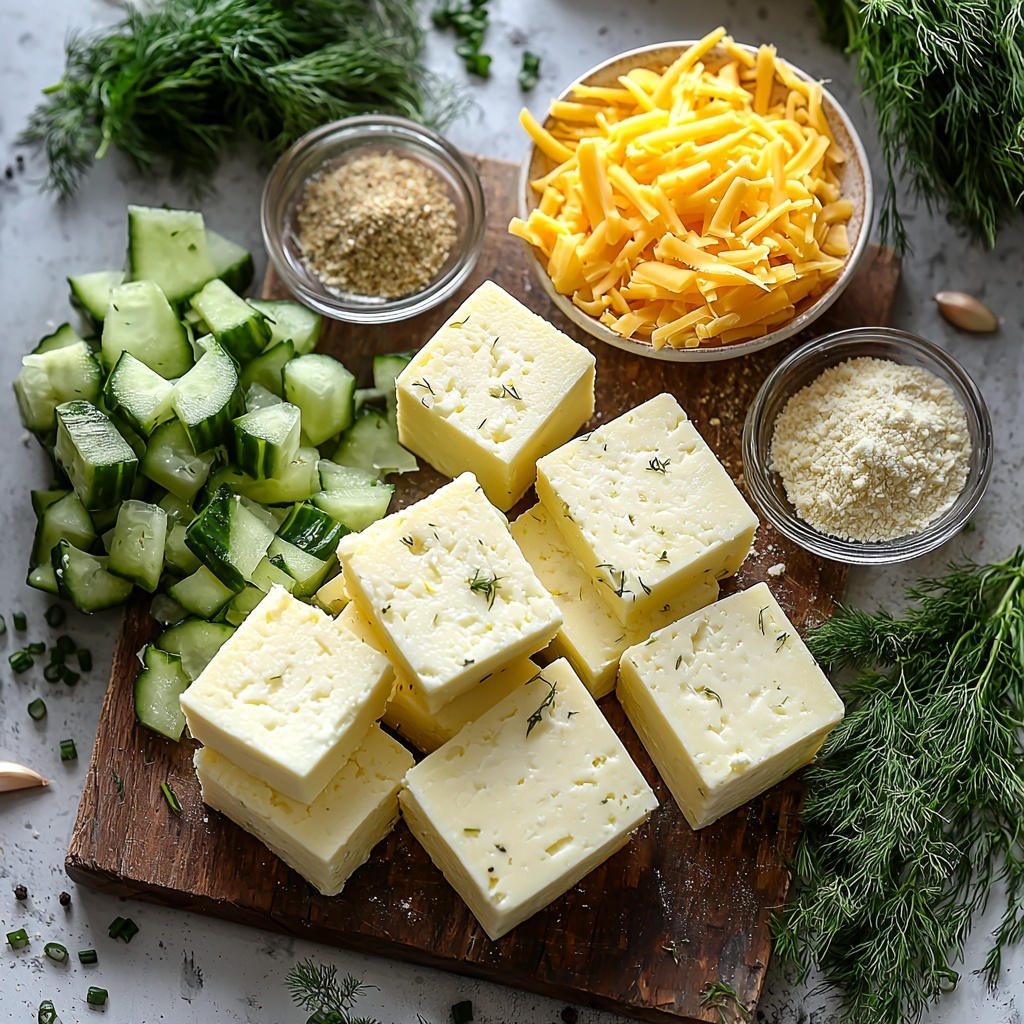
Getting this Creamy Dill Pickle Cheese Ball Recipe just right comes down to a handful of simple but essential ingredients. Each one has been thoughtfully chosen to add depth, tang, texture, and a pop of green that makes the dish as visually appealing as it is delicious.
- Cream cheese (2 blocks, 8 oz each): The velvety base that provides the smooth and spreadable texture crucial for any great cheese ball.
- Shredded cheddar cheese (1 cup): Adds sharpness and a rich melt-in-your-mouth cheesiness that contrasts perfectly with the pickles.
- Chopped dill pickles (3/4 cup plus extra for coating): Brings that iconic tangy crunch that makes this recipe stand out.
- Fresh dill (2 tablespoons plus extra for coating): Elevates the flavor with bright, herbaceous notes that complement the pickles beautifully.
- Garlic powder (1/2 teaspoon): Adds a subtle, savory background flavor.
- Onion powder (1/2 teaspoon): Enhances the overall depth and rounds out the seasoning.
- Pickle juice (1 tablespoon): A clever addition that intensifies the pickle flavor and adds a touch of acidity.
How to Make Creamy Dill Pickle Cheese Ball Recipe
Step 1: Soften the Cream Cheese
Start by letting the cream cheese sit at room temperature for about 15–20 minutes until soft. This step is crucial because it makes mixing so much easier and ensures your cheese ball will have a luxuriously smooth texture without any lumps.
Step 2: Mix the Base Ingredients
In a large bowl, combine the softened cream cheese, shredded cheddar cheese, garlic powder, onion powder, and pickle juice. Stir this mixture until it becomes smooth and creamy. This base forms the foundation for all the delicious flavors to meld together.
Step 3: Fold in Pickles and Dill
Gently fold in the chopped dill pickles and fresh dill to your creamy base. Make sure everything is evenly distributed so that every bite has that perfect balance of creamy, tangy, and herbal notes.
Step 4: Shape and Chill the Cheese Ball
Scoop the cheese mixture onto a piece of plastic wrap and carefully shape it into a tight ball. Wrap it up and refrigerate for at least one hour. This chilling step helps the flavors meld and firms up the cheese ball for easier coating and serving.
Step 5: Prepare the Coating Mixture
While your cheese ball chills, mix together the extra chopped pickles and additional fresh dill in a shallow dish. This coating adds a fresh burst of flavor and a delightful crunchy texture contrast to the creamy center.
Step 6: Coat the Cheese Ball
Once chilled, unwrap the cheese ball and roll it in the pickle and dill mixture, pressing gently to ensure the coating sticks well. This final step not only enhances the presentation but also amps up the intense dill pickle experience.
Step 7: Serve or Store
You can serve your Creamy Dill Pickle Cheese Ball Recipe immediately with your favorite crackers or fresh vegetables, or keep it refrigerated until you’re ready to impress your guests. It’s just as delightful the next day!
How to Serve Creamy Dill Pickle Cheese Ball Recipe
Garnishes
For a final flourish, consider adding a sprinkle of extra fresh dill or finely chopped chives on top of your cheese ball. These fresh herbs add a lovely aroma and a pop of green that makes your appetizer irresistible at first glance.
Side Dishes
The Creamy Dill Pickle Cheese Ball Recipe pairs wonderfully with a variety of crackers, from buttery water crackers to sturdy wheat crisps. Vegetables like crunchy celery sticks, colorful bell pepper slices, and crisp cucumber rounds provide a refreshing, lighter contrast that balances the richness beautifully.
Creative Ways to Present
Get creative and serve the cheese ball on a rustic wooden board surrounded by an assortment of pickles, olives, and nuts. For an unexpected twist, hollow out a round loaf of bread and place the cheese ball inside, allowing guests to scoop out the creamy dip with torn-off bread chunks. Presentation like this takes your appetizer table to the next level.
Make Ahead and Storage
Storing Leftovers
If you happen to have leftovers, keep your cheese ball wrapped tightly in plastic wrap or an airtight container in the refrigerator. It will stay fresh and flavorful for up to 4 days, making it a fantastic snack for several days after your event.
Freezing
While freezing isn’t ideal for this Creamy Dill Pickle Cheese Ball Recipe due to the texture of cream cheese and pickles, you can freeze the base mixture without the coating for up to one month. Be sure to thaw it overnight in the fridge and re-coat just before serving for the best results.
Reheating
This cheese ball is best served chilled and does not require reheating. Warming it might cause the delightful creamy texture to become runny. Just take it out of the fridge a few minutes before serving to soften slightly for easy spreading.
FAQs
Can I use a different type of cheese instead of cheddar?
Absolutely! While cheddar provides a classic sharpness, feel free to experiment with pepper jack for some heat, gouda for smokiness, or even mozzarella for a milder flavor. Just remember to shred it for easy mixing.
How long can I make this cheese ball ahead of time?
You can prepare the cheese ball up to 24 hours ahead. In fact, letting it chill overnight allows the flavors to meld beautifully, making each bite even more delicious.
Can I make this recipe dairy-free?
This recipe relies heavily on cream cheese and cheddar for its signature texture and flavor, so dairy-free versions might be tricky. However, using dairy-free cream cheese alternatives and vegan cheddar-style shreds could work if you don’t mind some variation in taste and consistency.
What pickles work best for this recipe?
Dill pickles that are firm and well-drained work best to maintain the crunchy texture. Avoid sweet pickles or bread-and-butter varieties, as they’ll change the signature tangy dill flavor you want here.
Can I add other mix-ins to the cheese ball?
Definitely! Chopped nuts like pecans or walnuts add a lovely crunch, while cooked and crumbled bacon introduces smoky richness. Just be mindful not to overpower the dill pickle flavor that makes this recipe special.
Final Thoughts
This Creamy Dill Pickle Cheese Ball Recipe is one of those dishes that turns simple ingredients into something truly memorable. It’s creamy, tangy, and bursting with fresh flavors, perfect for any occasion that deserves a little appetizer magic. So grab your cream cheese, dill, and pickles, and give this recipe a try — your taste buds will thank you!
Print
Creamy Dill Pickle Cheese Ball Recipe
- Prep Time: 1h 15m
- Cook Time: 0m
- Total Time: 1h 15m
- Yield: 1 cheese ball (serves 8–10)
- Category: Appetizer
- Method: No-Cook
- Cuisine: American
Description
This Creamy Dill Pickle Cheese Ball is a tangy and flavorful appetizer perfect for parties and gatherings. It combines softened cream cheese, sharp cheddar, chopped dill pickles, and fresh dill, seasoned with garlic and onion powder, then coated with extra pickles and dill for an appetizing crunch. Serve chilled with your favorite crackers or fresh vegetables for a delicious, easy-to-make snack that guests will love.
Ingredients
Cheese Ball Base
- 2 (8 oz) blocks cream cheese, softened
- 1 cup shredded cheddar cheese (sharp or medium)
- 3/4 cup chopped dill pickles (well-drained)
- 2 tablespoons chopped fresh dill
- 1/2 teaspoon garlic powder
- 1/2 teaspoon onion powder
- 1 tablespoon pickle juice
Coating
- 1/4 cup additional chopped pickles (for coating)
- 2 tablespoons additional chopped dill (for coating)
Instructions
- Soften Cream Cheese: Let the cream cheese sit at room temperature for 15–20 minutes to soften, making it easier to mix into a smooth base.
- Mix Base Ingredients: In a large mixing bowl, combine the softened cream cheese, shredded cheddar cheese, garlic powder, onion powder, and pickle juice. Mix thoroughly until the mixture is smooth and well blended.
- Add Pickles and Dill: Gently fold in the chopped dill pickles and fresh dill, ensuring they are evenly distributed throughout the cheese mixture for balanced flavor and texture.
- Form Cheese Ball: Scoop the mixture out onto a piece of plastic wrap. Using the wrap, shape the mixture into a round ball, then wrap it tightly. Chill the cheese ball in the refrigerator for at least 1 hour to firm up and meld the flavors.
- Prepare Coating: In a shallow dish, combine the additional chopped pickles and chopped dill. This mixture will provide a flavorful and textured coating for the cheese ball.
- Coat the Cheese Ball: Remove the cheese ball from the plastic wrap and roll it gently in the pickle and dill mixture, pressing lightly so the coating adheres evenly around the cheese ball.
- Serve or Store: Serve the cheese ball immediately with crackers or fresh vegetables, or refrigerate it until ready to serve. This appetizer stays fresh for several days when properly covered and chilled.
Notes
- Ensure the cream cheese is fully softened for easier mixing and smoother texture.
- Drain pickles well before chopping to avoid excess moisture in the cheese ball.
- Customize the cheese choice by using pepper jack or gouda for different flavor profiles.
- Allowing the cheese ball to chill overnight intensifies the flavors.
- Serve with a variety of crackers, sliced baguette, or raw veggies for dipping.
