
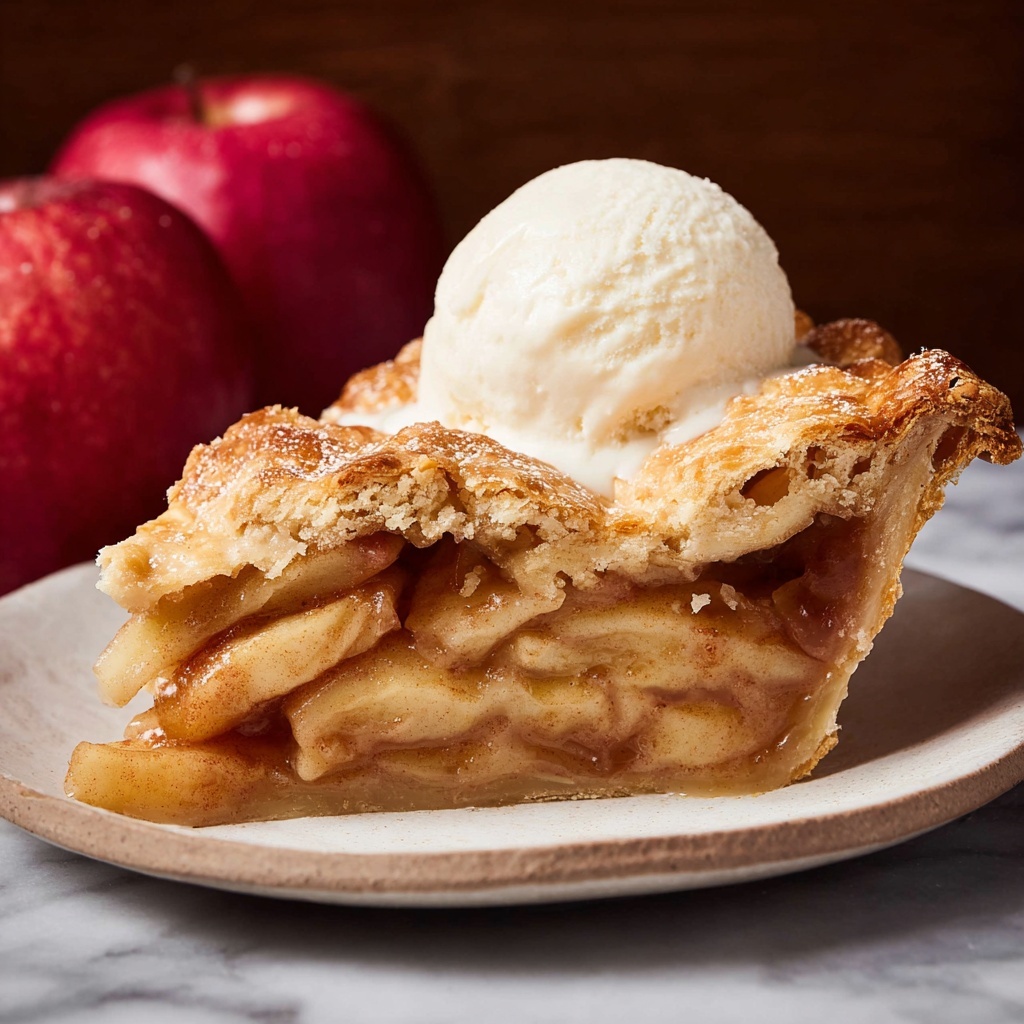
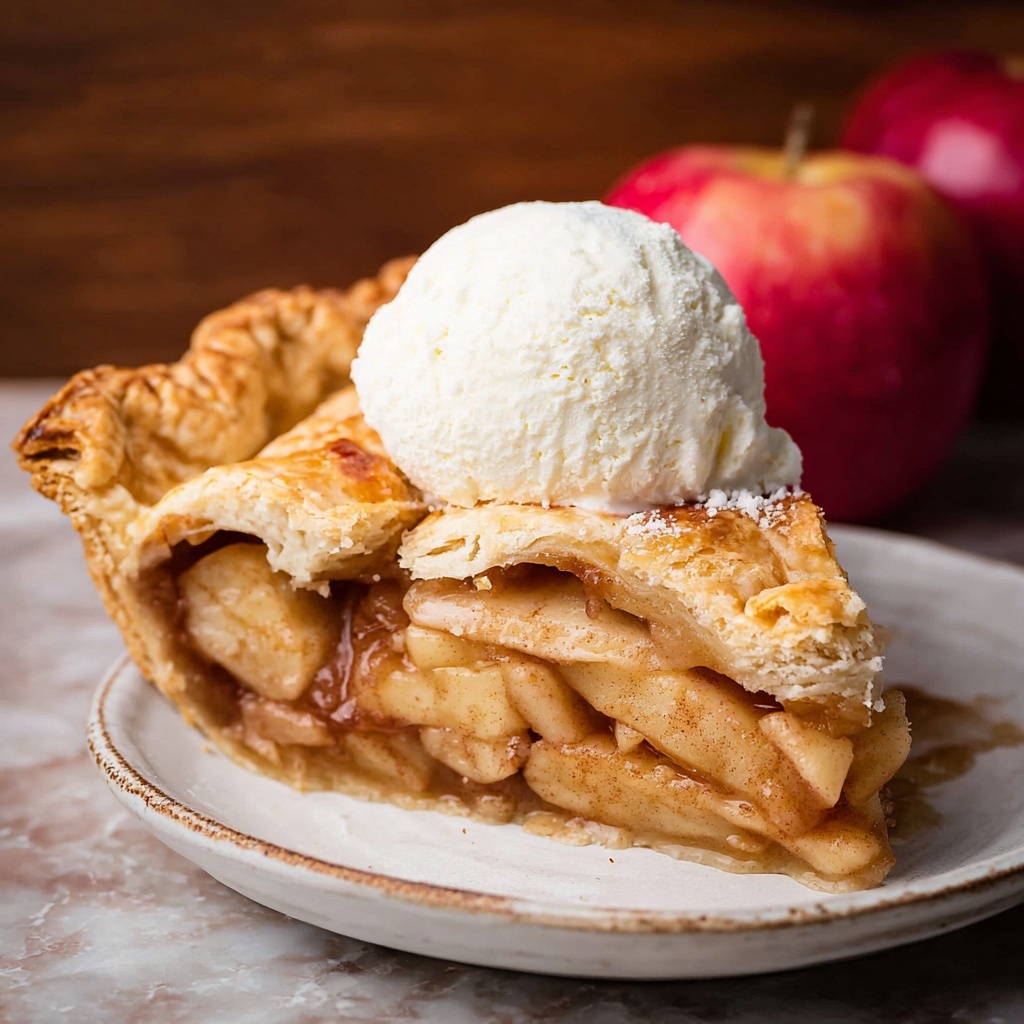
If there’s one dessert that feels like the warmest hug from your childhood, it’s this Classic Apple Pie Recipe. With its flaky, buttery crust and tender, spiced apple filling, every bite offers pure comfort and nostalgia. This recipe blends simple pantry staples into a masterpiece that’s perfect for any occasion, from holiday festivities to a cozy weekend treat. Once you make it, you’ll understand why this apple pie is a timeless favorite in so many families.
Ingredients You’ll Need
All the ingredients in this Classic Apple Pie Recipe are straightforward, yet each plays a crucial role in delivering perfect flavor and texture. From the crisp apples to the flaky butter crust, these elements come together beautifully to create that classic pie experience.
- 2 1/2 cups all-purpose flour: The foundation for a tender and sturdy crust that holds everything together.
- 1/2 teaspoon salt: Enhances the flavors in both crust and filling, balancing sweetness perfectly.
- 3/4 cup cold unsalted butter (cubed): Essential for a flaky crust with the perfect buttery richness.
- 1 teaspoon apple cider vinegar: Helps tenderize the dough and adds subtle brightness to the crust.
- 1/2 cup ice-cold water: Brings the dough together without melting the butter, ensuring flakiness.
- 2 tablespoons unsalted butter: Adds extra richness when dotted over the filling before baking.
- 3 pounds apples (peeled, cored, and sliced): The star ingredient, providing natural sweetness and a soft, juicy bite.
- 1/2 teaspoon cinnamon: Classic warming spice that makes the apple filling aromatic and flavorful.
- 1/4 teaspoon allspice (or apple pie/pumpkin spice): Adds layers of complexity and warmth.
- 1/4 teaspoon salt: Balances the sweetness and intensifies apple flavor.
- 1/2 cup sugar: Sweetens the filling just enough without overpowering the natural apple taste.
- 2 tablespoons brown sugar: Provides caramel notes that deepen the filling’s richness.
- 3 tablespoons cornstarch: Thickens the filling so it sets beautifully without being runny.
- 1/2 tablespoon apple cider vinegar: Brightens and balances the sweetness in the filling.
- 1 egg white: Used to brush the crust, giving it a lovely golden sheen and slight crispness.
- 1 tablespoon granulated sugar: Sprinkled on top of the crust for a subtle crunch and sparkle.
How to Make Classic Apple Pie Recipe
Step 1: Prepare the Pie Dough
Start by mixing the flour and salt in a large bowl. Cut in the cold, cubed butter until the mixture resembles coarse crumbs—this is what creates that flaky texture you’re dreaming of. Add the apple cider vinegar and ice-cold water, stirring gently until the dough just comes together. Be careful not to overwork it because you want to keep the butter pieces intact for maximum flakiness. Shape the dough into two discs, wrap them tightly in plastic, and chill in the fridge while you prepare the filling. This resting step is key to a tender, easy-to-roll crust.
Step 2: Make the Apple Filling
While the dough chills, grab a big bowl and toss your sliced apples with cinnamon, allspice, salt, white sugar, brown sugar, cornstarch, and a splash of apple cider vinegar. This combination creates a luscious filling with just the right balance of sweetness and spice. Let the apples sit for 10-15 minutes to allow the flavors to meld and the cornstarch to start working, which ensures your filling will thicken perfectly as it bakes.
Step 3: Assemble the Pie
Preheat your oven to 425 degrees Fahrenheit. Roll out one dough disc on a floured surface until it’s large enough to line your pie dish with a slight overhang. Transfer the dough carefully, then fill it with the apple mixture, dotting the top with small chunks of unsalted butter. Roll out the second dough disc and place it on top, trimming any excess dough. Crimp the edges to seal the pie elegantly. Brush the surface with egg white and sprinkle granulated sugar generously on top for that shiny, crackly finish. Don’t forget to cut a few slits to let steam escape while baking!
Step 4: Bake to Perfection
Place your pie on a baking sheet to catch any drips and bake at 425 degrees Fahrenheit for 15 minutes. Then reduce the oven temperature to 350 degrees and bake for another 45 minutes or until the crust is golden brown and the filling is bubbling through the vents. Keep an eye on the crust edges and cover them with foil if they brown too quickly. Once baked, let your masterpiece cool on a wire rack so the filling can set properly and slice cleanly.
How to Serve Classic Apple Pie Recipe
Garnishes
When serving this Classic Apple Pie Recipe, simple garnishes can elevate the experience. A scoop of vanilla ice cream melting over the warm pie is a classic darling. Alternatively, a dollop of freshly whipped cream with a dash of cinnamon can add a lovely lightness to each bite. Don’t underestimate the power of a sprinkle of finely chopped toasted nuts on top for added texture and flavor contrast.
Side Dishes
This pie pairs beautifully with a few thoughtful sides. Fresh brewed coffee or a robust black tea provides a perfect counterpoint to the sweetness of the pie. For a brunch twist, serve slices alongside creamy cheddar cheese or rich sharp gouda to add a savory balance. You might even try a simple salad with citrus vinaigrette to freshen the palate after a hearty slice.
Creative Ways to Present
If you want to impress guests or make a fun family meal out of this Classic Apple Pie Recipe, consider serving mini individual pies in ramekins or muffin tins for personal portions. For a rustic vibe, skip the lattice and use a crumb topping with oats and brown sugar. You can also spice things up by drizzling caramel sauce or a warm bourbon glaze over each slice just before serving for an extra special touch.
Make Ahead and Storage
Storing Leftovers
Classic Apple Pie Recipe leftovers are surprisingly versatile and keep well. After cooling completely, cover pie slices tightly with plastic wrap or store in an airtight container in the refrigerator for up to 4 days. This helps preserve the moisture in the filling while keeping the crust from going soggy too fast.
Freezing
You can freeze the pie either before or after baking. Wrap the unbaked pie tightly in plastic wrap and foil for up to 3 months. When ready to bake, thaw overnight in the fridge and then proceed with baking instructions. For baked leftover pie, wrap slices carefully in foil and store in freezer bags; they keep best for 1-2 months. This way, you always have a delicious treat on hand.
Reheating
To enjoy your Classic Apple Pie Recipe warm, reheat slices in a 350-degree oven for about 15 minutes or until heated through, which helps restore that flaky crust texture. Microwaving is an option for a quick fix, but the crust won’t be as crisp. Pair reheated slices with a scoop of ice cream or a drizzle of cream for the full experience.
FAQs
Can I use frozen apples for this pie?
While fresh apples give the best texture, you can use frozen apples if fresh ones aren’t available. Just thaw and drain them well to remove excess moisture before mixing with the other filling ingredients to avoid a soggy crust.
What type of apples work best?
For a perfect balance of tartness and sweetness, try using Granny Smith combined with Fuji or Honeycrisp apples. This mix helps the filling maintain a good texture and a beautifully layered flavor.
How do I prevent a soggy bottom crust?
To avoid sogginess, make sure your filling is thickened well with cornstarch and bake the pie on the lower rack of your oven. You can also blind bake the bottom crust for 10 minutes before adding the filling for extra crispness.
Can I make this pie gluten-free?
Absolutely! Substitute the all-purpose flour in the crust with a gluten-free blend that suits baking. You may need to adjust water amounts slightly, but the rest of the recipe remains the same for a delicious gluten-free pie.
What’s the best way to get a golden crust?
Brushing the crust with egg white and sprinkling sugar on top before baking gives that beautiful golden color and a subtle crunch. Also, bake at a higher temperature for the first 15 minutes and then lower it for the remainder to help set the crust quickly.
Final Thoughts
There’s something truly magical about sitting down with a slice of this Classic Apple Pie Recipe fresh from the oven—warm, comforting, and full of love baked in every bite. It’s a recipe that invites you to slow down, savor, and share a little joy. Give it a try, and you might just find your new favorite dessert to bring happiness to your table anytime.
Print
Classic Apple Pie Recipe
- Prep Time: 60 minutes
- Cook Time: 60 minutes
- Total Time: 2 hours
- Yield: 8 servings (8 slices)
- Category: Dessert
- Method: Baking
- Cuisine: American
Description
This Classic Apple Pie recipe features a flaky, buttery crust filled with tender, spiced apples for a timeless dessert that’s perfect for any occasion. The crust is made from scratch with cold butter and a hint of apple cider vinegar for extra tenderness, while the filling combines sweet and tart apples with cinnamon, allspice, and a dusting of sugars and cornstarch to create a luscious, thickened interior. Bake to golden perfection for a delightful treat.
Ingredients
Pie Crust
- 2 1/2 cups all-purpose flour
- 1/2 teaspoon salt
- 3/4 cup cold unsalted butter, cubed
- 1 teaspoon apple cider vinegar
- 1/2 cup ice-cold water
Filling
- 2 tablespoons unsalted butter
- 3 pounds apples, peeled, cored, and sliced
- 1/2 teaspoon cinnamon
- 1/4 teaspoon allspice (or apple pie/pumpkin spice)
- 1/4 teaspoon salt
- 1/2 cup sugar
- 2 tablespoons brown sugar
- 3 tablespoons cornstarch
- 1/2 tablespoon apple cider vinegar
Topping
- 1 egg white
- 1 tablespoon granulated sugar
Instructions
- Preparations: Ensure you have enough space in your fridge for chilling the pie crust later. Gather and prepare all ingredients, such as peeling, coring, and slicing the apples, measuring spices and sugars, and cubing the cold butter for the crust.
- Make the Pie Dough: In a large bowl, combine the all-purpose flour and salt. Add the cold cubed unsalted butter and use a pastry cutter or your hands to cut the butter into the flour until the mixture resembles coarse crumbs. Stir in the apple cider vinegar and gradually add ice-cold water, mixing just until the dough holds together. Handle the dough minimally to keep it flaky. Form the dough into two discs, wrap in plastic wrap, and refrigerate for at least 30 minutes.
- Prepare the Filling: In a large bowl, toss the sliced apples with cinnamon, allspice, salt, granulated sugar, brown sugar, cornstarch, and apple cider vinegar. Mix well to coat the apples evenly, which will ensure a flavorful and thick filling once baked.
- Assemble the Pie: Preheat your oven to 425°F (220°C). On a floured surface, roll out one disc of dough into a circle large enough for the pie dish. Gently transfer the dough to the dish, pressing it in without stretching. Dot the bottom crust with the 2 tablespoons unsalted butter, then add the apple filling evenly over the crust. Roll out the second dough disc and place it over the filling. Trim any excess dough and crimp the edges to seal. Cut several small slits in the top crust to allow steam to escape. Brush the top crust with egg white and sprinkle with granulated sugar for a beautiful golden finish.
- Bake the Pie: Place the pie on the middle rack and bake at 425°F (220°C) for 15 minutes. Then reduce the oven temperature to 350°F (175°C) and continue baking for an additional 45 minutes, or until the crust is golden brown and the filling is bubbly. If the edges brown too quickly, cover them with foil to prevent burning.
- Cool and Serve: Remove the pie from the oven and let it cool completely on a wire rack to allow the filling to set. Slice into 8 pieces and enjoy warm or at room temperature, optionally with a scoop of vanilla ice cream or a dollop of whipped cream.
Notes
- Use a mix of sweet and tart apples, such as Granny Smith and Honeycrisp, for best pie flavor.
- Chilling the dough is essential for a flaky crust.
- If the pie crust edges brown too quickly, cover them with foil halfway through baking.
- Let the pie cool before slicing to avoid runny filling.
- Make the dough ahead and refrigerate or freeze for convenience.
