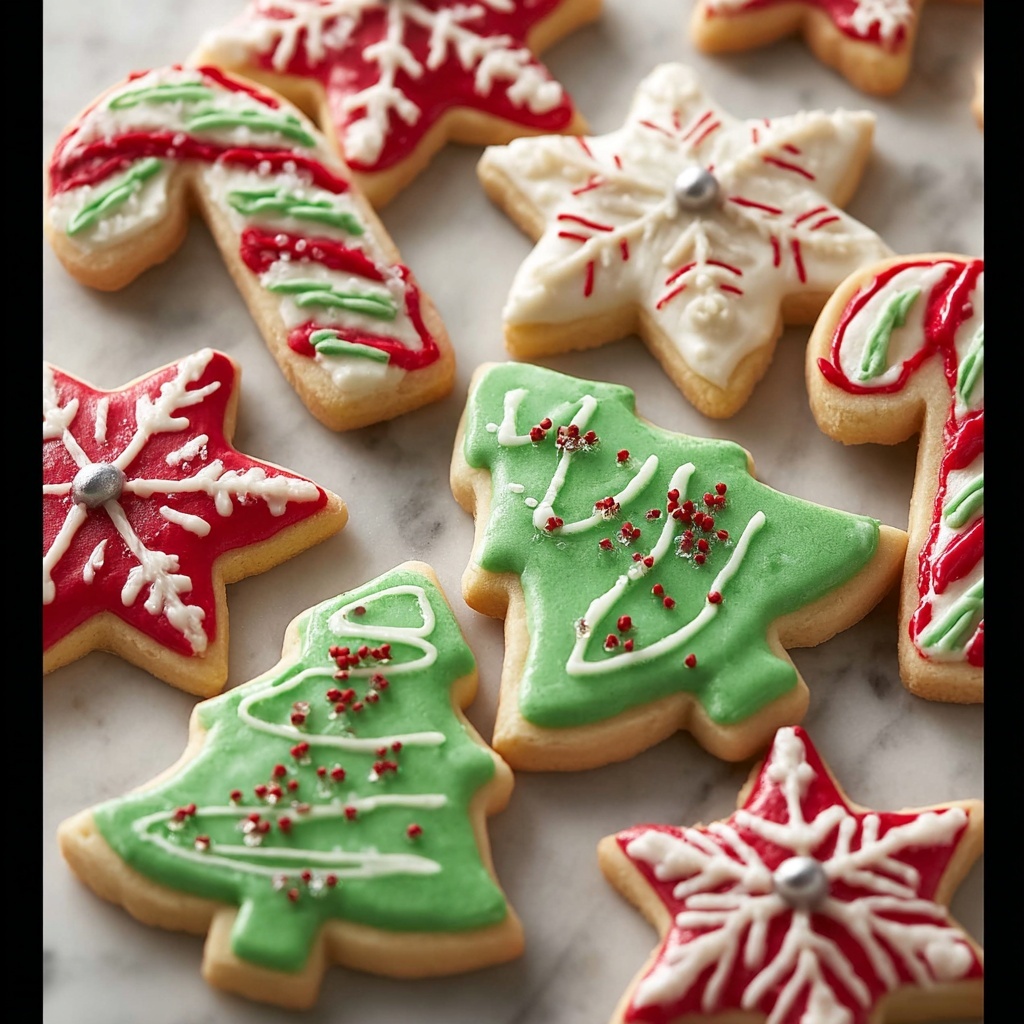
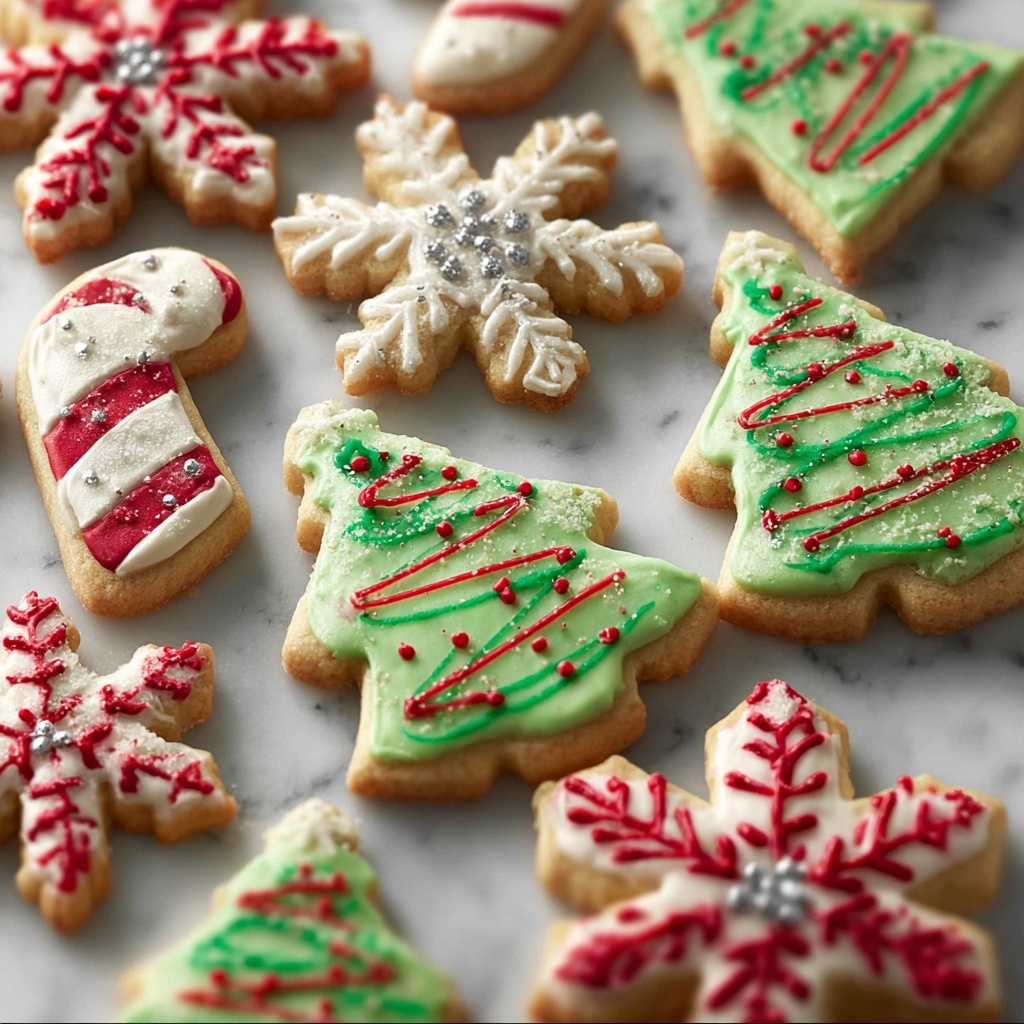
If you’re searching for a classic treat to sprinkle some holiday magic into your kitchen, this Christmas Vanilla Sugar Cookies Recipe is exactly what you need. These delightful vanilla biscuits blend buttery softness with just the right sugary snap, making them perfect for decorating, gifting, or simply enjoying with a cup of hot cocoa. Every bite bursts with vanilla warmth and a tender crumb that feels like a festive hug. Whether you’re an experienced baker or a holiday baking newbie, these cookies will quickly become a cherished tradition on your Christmas dessert table.
Ingredients You’ll Need
Gathering simple, wholesome ingredients is the first step toward baking these classic cookies that are anything but ordinary. Each element plays a crucial role, from the creamy butter that gives richness, to the superfine sugar that adds a delicate sweetness and texture.
- 225g unsalted butter, softened: Butter provides the rich, creamy base essential for tender cookies; soften it beforehand for easy mixing.
- 1 cup caster (superfine) sugar: Using superfine sugar ensures the cookies have a smooth texture and subtle sweetness without grittiness.
- 1 1/2 tsp vanilla extract: This is the heart of the recipe, infusing every cookie with warm, aromatic vanilla flavor.
- 1 large egg: Adds structure and moisture, helping the dough come together beautifully.
- 3 cups plain (all-purpose) flour: The flour gives cookies their characteristic body and chewiness.
- 3/4 tsp baking powder: A small lift agent that helps keep the cookies light and tender.
- 3/4 tsp salt: Salt balances out the sweetness and enhances the overall flavor profile.
- Icing for sugar cookies (optional): Perfect for those who want to add a festive flourish or personalized designs.
How to Make Christmas Vanilla Sugar Cookies Recipe
Step 1: Preheat and Prepare Your Baking Sheets
Begin by preheating your oven to 180°C / 350°F (160°C fan). Line two baking sheets with parchment paper to ensure your cookies bake evenly without sticking, setting the stage for perfect shapes and textures.
Step 2: Cream the Butter and Sugar
In a large bowl, beat the softened butter with the caster sugar until creamy and fluffy. This step is key: it incorporates air, resulting in lighter, melt-in-your-mouth cookies.
Step 3: Add the Egg and Vanilla
Next, add the large egg and vanilla extract to your buttery mixture, beating thoroughly until fully combined. This mix is where the cookie’s moist texture and signature vanilla essence develop.
Step 4: Incorporate the Dry Ingredients
Incorporate the flour, baking powder, and salt. Start mixing slowly so the flour doesn’t fly everywhere, then beat until just combined—the dough will look a bit clumpy, which is perfect!
Step 5: Shape the Dough
Flour your work surface lightly and scrape the dough out. Pat it together smoothly, then divide into two discs. These discs make the rolling process more manageable.
Step 6: Roll Out the Dough
Roll each disc to your desired thickness: 0.3 cm for crispier cookies or 0.6 cm for tender, softer ones. Dust your dough and rolling pin with flour to keep everything from sticking and help maintain those flawless shapes.
Step 7: Cut Out Cookie Shapes
Use your favorite cookie cutters to press out festive shapes. A knife or spatula helps gently transfer these to your prepared baking sheets. Remember to refrigerate leftover dough to keep it firm and easy to handle.
Step 8: Bake to Perfection
Pop your trays in the oven for 10 minutes, swapping racks halfway through for even baking. Your cookies should be pale golden on top, with edges just starting to turn that perfect, light golden brown.
Step 9: Cool and Finish
Let the cookies cool completely on the trays. They will continue to firm up as they cool, so resist the urge to move them too soon. Once cooled, you’ll be ready to decorate or enjoy right away.
How to Serve Christmas Vanilla Sugar Cookies Recipe

Garnishes
Nothing says Christmas like a dusting of colored sugar, a swirl of royal icing, or sprinkles that twinkle like holiday lights. Adding icing allows you to personalize each cookie with all sorts of festive patterns, making them as fun to create as they are to eat.
Side Dishes
These cookies pair wonderfully with a hot cup of cocoa, a creamy latte, or a glass of chilled milk. Consider serving them alongside a platter of other holiday treats like peppermint bark or candied nuts to create a welcoming, indulgent spread.
Creative Ways to Present
Arrange your cookies on a decorative plate, stack them in clear jars tied with red ribbon, or create a cookie tree by layering shapes with dowels. Presentation is a joyful part of holiday baking, so let your imagination run as wild as your cutter shapes!
Make Ahead and Storage
Storing Leftovers
Keep any leftover cookies fresh by placing them in an airtight container at room temperature. Properly stored, they maintain their soft yet crisp texture for up to a week, perfect for keeping the festive spirit going.
Freezing
You can freeze baked cookies for up to three months by layering them between sheets of parchment paper in a sealed freezer bag. For dough, wrap tightly and freeze for up to one month, then thaw overnight in the fridge before rolling out.
Reheating
If stored cookies become a bit firm, a quick warm-up in the microwave for 10-15 seconds or a 5-minute stint in a low oven can refresh their softness and aroma. This little trick revives that freshly baked feeling whenever you need it.
FAQs
Can I use salted butter instead of unsalted?
Absolutely! Just skip adding extra salt in the recipe since salted butter already contains it, and you’ll still get perfectly balanced cookies.
What’s the best way to roll out the dough?
Use a lightly floured surface and rolling pin, and roll gently from the center outward in all directions. Rotate the dough frequently to prevent sticking and achieve an even thickness.
How can I make my cookies crispier?
Roll the dough thinner—about 0.3 cm—and bake just until the edges turn golden. Thinner dough yields crisper, more delicate cookies.
Is it necessary to chill the dough?
Chilling leftover dough helps maintain shape during baking and prevents spreading, especially if it becomes warm while you’re cutting shapes.
Can I substitute the vanilla extract?
While vanilla is essential for authentic flavor, you could try almond extract or other vanilla-flavored options, but adjust carefully since they can be more potent.
Final Thoughts
There’s something truly heartwarming about baking the Christmas Vanilla Sugar Cookies Recipe with your loved ones—it’s more than just cookies, it’s holiday magic you can taste. I hope you’ll give this recipe a whirl and make it a sweet staple for your celebrations year after year. Happy baking and even happier holidays!
Print
Christmas Vanilla Sugar Cookies Recipe
- Prep Time: 25 minutes
- Cook Time: 10 minutes
- Total Time: 35 minutes
- Yield: 40 cookies
- Category: Dessert
- Method: Baking
- Cuisine: American
Description
Classic Christmas Sugar Cookies, also known as Vanilla Biscuits, are buttery, soft yet crisp treats perfect for holiday decorating. These easy-to-make cookies have a delicate vanilla flavor and can be rolled out and cut into festive shapes. They’re ideal for icing and sharing during Christmas celebrations.
Ingredients
Cookie Dough
- 225g / 1 cup unsalted butter, softened (or use salted butter and skip salt)
- 1 cup caster/superfine sugar (granulated/ordinary white sugar works too)
- 1 1/2 tsp vanilla extract
- 1 large egg (55-60g / 1.9-2oz)
- 3 cups plain/all-purpose flour
- 3/4 tsp baking powder
- 3/4 tsp salt
Icing (optional)
- Icing sugar and desired decorations for sugar cookies
Instructions
- Preheat Oven: Preheat your oven to 180°C / 350°F (160°C fan). Line two baking sheets with parchment paper to prevent sticking.
- Cream Butter and Sugar: In a large bowl, beat the softened butter and sugar together until creamy and smooth, about 1 minute at medium speed.
- Add Egg and Vanilla: Incorporate the egg and vanilla extract into the butter mixture, beating until fully combined.
- Combine Dry Ingredients: Add the flour, baking powder, and salt to the wet ingredients.
- Mix Dough: Start mixing slowly to avoid flour explosion, then beat until the flour is fully incorporated forming a clumpy dough.
- Prepare Dough for Rolling: Lightly dust your work surface with flour and transfer the dough out of the bowl. Pat it together gently, then cut the dough in half and shape into two discs.
- Roll Out Dough: Roll each disc out to your preferred thickness: 0.3 cm (1/8 inch) for thinner, crispier cookies or 0.6 cm (1/4 inch) for thicker, softer cookies. Sprinkle flour underneath and over the dough to prevent sticking.
- Cut and Transfer Shapes: Use cookie cutters to press out festive shapes. Carefully transfer the cutouts to the prepared baking sheets using a knife or spatula. Keep any leftover dough refrigerated until ready to bake.
- Bake Cookies: Place the trays in the oven and bake for 10 minutes, swapping the trays halfway through the baking time for even baking. Cookies should be pale golden with lightly golden edges.
- Cool Cookies: Allow the cookies to cool completely on the baking trays so they can finish cooking and firm up properly.
- Decorate (optional): Once cooled, decorate the cookies with icing and desired festive decorations as preferred.
Notes
- Using salted butter means you can skip the added salt in the dough.
- Swapping trays halfway during baking ensures even cooking and browning.
- Dough can be refrigerated if not baking all at once to keep it fresh.
- Adjust thickness when rolling out for different cookie textures.
- Cookies finish cooking on the baking tray after removal from the oven, so handle gently.
