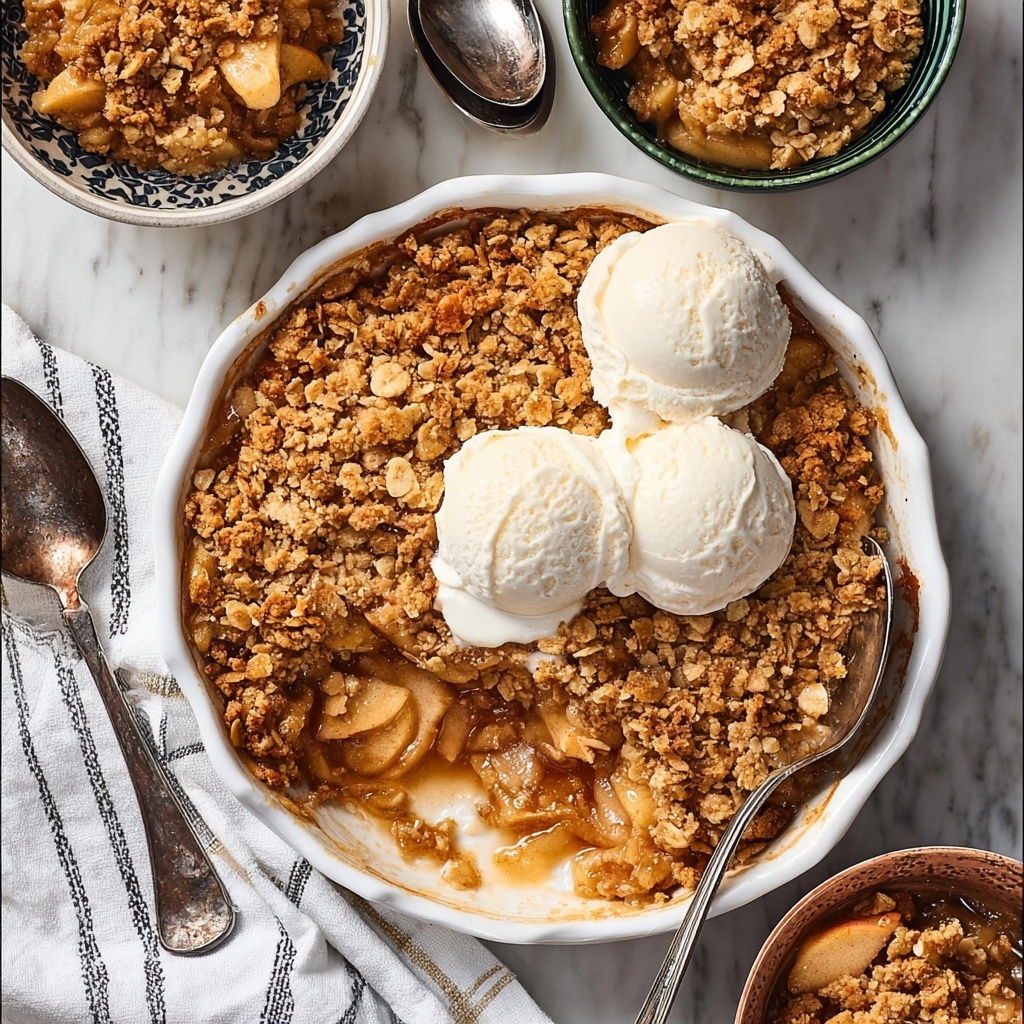
If you’ve ever wanted a dessert that feels like a warm hug on a chilly evening, then you’re going to love this Easy Apple Crisp Recipe. It combines tart Granny Smith apples with just the right amount of citrusy brightness from lemon juice and orange zest, all topped with a perfectly crumbly, buttery oat topping that bakes golden brown. Every bite delivers a beautiful medley of textures and flavors that will have you coming back for seconds — or thirds! This recipe is straightforward, comforting, and a genuine crowd-pleaser, making it a perfect staple to keep in your baking rotation.
Ingredients You’ll Need
The beauty of this Easy Apple Crisp Recipe lies in its simple, everyday ingredients that come together to create something truly magical. Each one plays an essential role—from the crisp apples providing body and tartness, to the aromatic spices and citrus that brighten the flavor, and finally the buttery, oat-packed topping lending all the right crunch and warmth.
- Granny Smith apples (8 cups sliced): Tart and firm, these apples hold their shape and add the perfect balance to the sweet topping.
- Lemon juice (2 tablespoons): Adds a fresh acidity that prevents the apples from browning and boosts the overall brightness.
- Orange zest (2 tablespoons): Infuses a subtle citrus aroma that makes every bite more vibrant and inviting.
- Brown sugar (¼ cup for filling, ½ cup for topping): Provides natural sweetness with a hint of molasses, enriching the flavor of both filling and topping.
- Kosher salt (¼ teaspoon in filling, ¼ teaspoon in topping): Enhances sweetness and deepens the overall flavor profile.
- Apple pie spice (1¼ teaspoons in filling, ½ teaspoon in topping): A warm blend of cinnamon and other spices that elevate the traditional apple crisp taste.
- Unsalted butter (½ cup, room temperature): Key to creating a rich, tender, and crisp topping; make sure it’s soft for easy mixing.
- All-purpose flour (1 cup): Gives structure to the topping and helps bind ingredients together.
- Quick oats (¼ cup): Adds delightful texture and chewiness to the topping, balancing the softness of the baked apples.
How to Make Easy Apple Crisp Recipe
Step 1: Prepare the Apple Filling
Start by tossing the sliced Granny Smith apples in a large bowl with lemon juice and orange zest. This combination keeps the apples from browning and infuses layers of citrus flavor. Then sprinkle in the brown sugar, kosher salt, and apple pie spice. Mix everything gently until the apples are evenly coated. This careful layering of flavors creates that irresistible spiced sweetness that defines the filling.
Step 2: Make the Crisp Topping
Next, it’s time for the topping — the delicious, crumbly crown of this Easy Apple Crisp Recipe. Cream together the room temperature butter and brown sugar until light and fluffy. Add the flour, oats, remaining apple pie spice, and salt. Stir everything until crumbly clumps form. The butter is the secret weapon here, binding all ingredients and creating that perfect golden crust you’ll love smashing with your spoon.
Step 3: Assemble and Bake
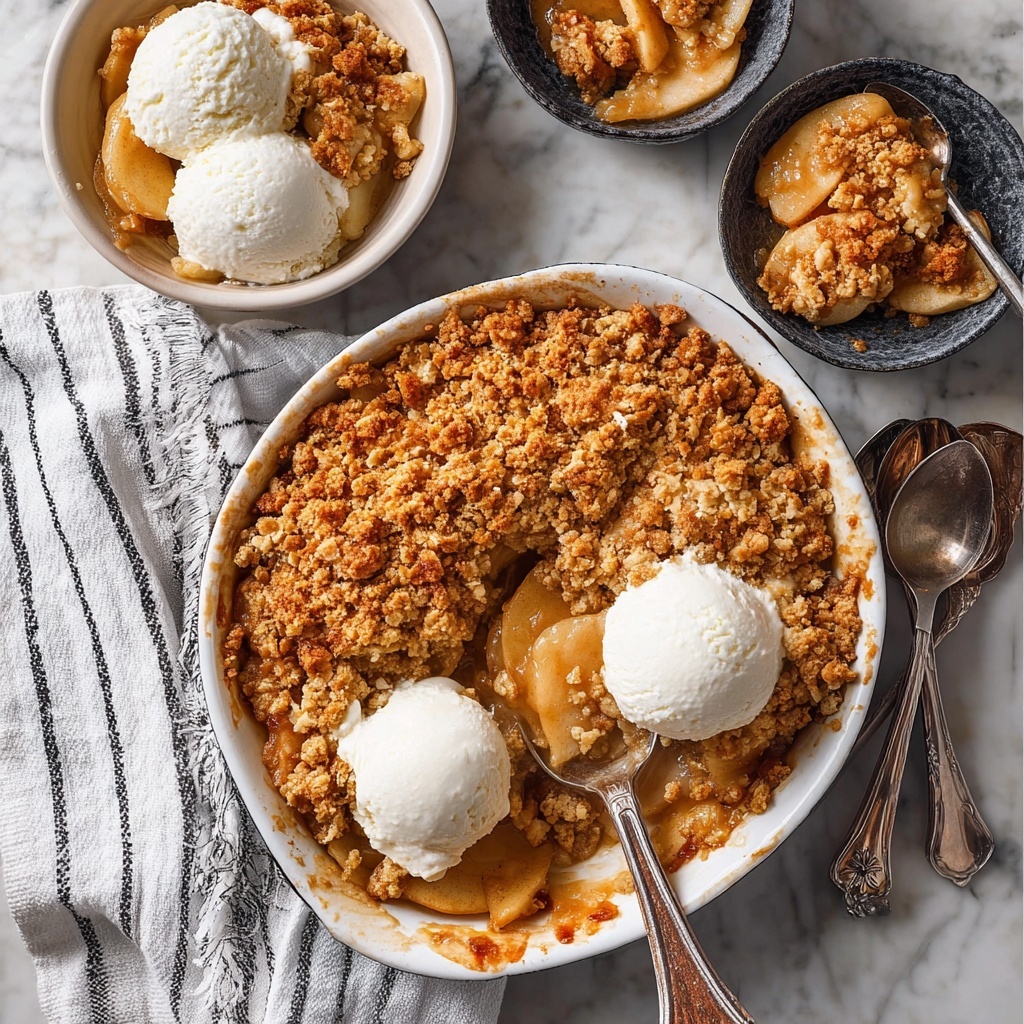
Spread the apple mixture evenly in a greased baking dish, then sprinkle the crisp topping liberally over the apples, covering the surface. Bake at 350°F (175°C) for about 60 minutes or until the topping is golden brown and the apples are tender and bubbling. The kitchen will smell heavenly! Allow it to cool slightly before serving so the juices thicken and the flavors meld beautifully.
How to Serve Easy Apple Crisp Recipe

Garnishes
One of the best parts about serving this Easy Apple Crisp Recipe is the endless garnishing options. A scoop of vanilla ice cream adds cool creaminess that melts right into the warm crisp. Alternatively, a dollop of freshly whipped cream or a drizzle of caramel sauce can elevate the dessert to fancy dinner party status in seconds. Don’t forget a sprinkle of chopped toasted nuts for a nutty crunch if you’re feeling adventurous.
Side Dishes
This dessert also pairs wonderfully with simple sides that provide a contrast in temperature and texture. Crisp apple slices or a light green salad with a honey vinaigrette make a refreshing companion. If you want something heartier, serve it alongside a steaming cup of spiced tea or a rich coffee for a cozy afternoon treat.
Creative Ways to Present
Serving this Easy Apple Crisp Recipe can be as fun as making it. Try individual ramekins for charming, personalized desserts or layer it parfait-style in clear glasses with whipped cream and chopped nuts for an attractive twist. For celebrations, top with edible flowers or cinnamon sticks for a festive touch that’s sure to spark conversation.
Make Ahead and Storage
Storing Leftovers
If you have any leftovers (and that’s always a hope), store them in an airtight container in the refrigerator. The crisp topping will soften slightly but remain delicious. Leftover apple crisp can stay fresh for up to 3 days — perfect for sneaky midnight snacks.
Freezing
Good news if you want to save some for later: this Easy Apple Crisp Recipe freezes beautifully. Wrap the cooled crisp tightly with plastic wrap and aluminum foil or use a freezer-safe container. Freeze for up to 3 months, then thaw overnight in the fridge before reheating.
Reheating
To enjoy the crisp as if it’s freshly baked, warm it in a 350°F (175°C) oven for about 20 minutes until piping hot and the topping is re-crisped. Avoid microwaving if you want to preserve that delightful crunchy texture, but if you’re in a hurry, a quick zap will do in a pinch.
FAQs
Can I use different types of apples for this recipe?
Absolutely! While Granny Smith apples give a nice tartness and hold their shape well, you can mix in sweeter varieties like Honeycrisp or Fuji for a balanced flavor and texture. Just keep in mind that juicier apples might make the filling a bit more watery.
Is it possible to make this Easy Apple Crisp Recipe gluten-free?
Yes! Simply swap the all-purpose flour for a gluten-free flour blend and ensure the oats are certified gluten-free. The texture might be slightly different but just as delicious and comforting.
Can I prepare this dessert ahead of time?
Definitely. You can assemble the apple mixture and topping separately in the fridge for up to a day, then combine and bake when ready. This makes it super convenient for busy days or entertaining.
What is apple pie spice, and can I make my own?
Apple pie spice is a blend of warm spices typically including cinnamon, nutmeg, allspice, and cloves. Making your own at home is easy and lets you adjust the ratios to your taste, creating a personalized twist on the classic flavor.
How do I know the apple crisp is done baking?
You’ll see the topping turn golden brown and crisp, and the fruit will bubble around the edges of the dish. The apples should be tender when pierced with a fork. If it’s not quite ready, give it 5–10 more minutes but keep a close watch to avoid over-browning.
Final Thoughts
This Easy Apple Crisp Recipe is more than just a dessert; it’s a little celebration of simple ingredients transformed into something deeply satisfying and heartwarming. Whether you’re treating yourself on a quiet night or impressing friends and family, it’s a reliable, feel-good classic you can always count on. Give it a try—you deserve that comforting first bite already!
Print
Easy Apple Crisp Recipe
- Prep Time: 15 minutes
- Cook Time: 60 minutes
- Total Time: 75 minutes
- Yield: 6 servings
- Category: Dessert
- Method: Baking
- Cuisine: American
Description
This easy apple crisp recipe features tender, cinnamon-spiced Granny Smith apples topped with a buttery, oat-studded crisp topping that’s golden and crunchy. Perfect for an effortless dessert, it combines tartness from fresh apples and lemon juice with warm flavors of apple pie spice and brown sugar, baked to bubbly perfection.
Ingredients
Apple Filling
- 8 cups sliced Granny Smith apples (904 grams, from about 6 apples)
- 2 tablespoons lemon juice (14 grams, from 1 lemon)
- 2 tablespoons orange zest (from 1 orange)
- ¼ cup brown sugar (52 grams)
- ¼ teaspoon kosher salt
- 1¼ teaspoons apple pie spice (4 grams)
Crisp Topping
- ½ cup unsalted butter (113 grams, room temperature, 1 stick)
- ½ cup brown sugar (107 grams)
- 1 cup all-purpose flour (120 grams)
- ¼ teaspoon kosher salt
- ½ teaspoon apple pie spice
- ¼ cup quick oats (23 grams)
Instructions
- Prepare the Apples: Preheat your oven to 350°F (175°C). In a large mixing bowl, combine the sliced Granny Smith apples with lemon juice, orange zest, ¼ cup brown sugar, ¼ teaspoon kosher salt, and 1¼ teaspoons apple pie spice. Toss everything gently to coat the apples evenly and set aside to macerate while you prepare the topping.
- Make the Crisp Topping: In a separate bowl, cream together the room temperature unsalted butter and ½ cup brown sugar until light and fluffy. Add the all-purpose flour, ¼ teaspoon kosher salt, ½ teaspoon apple pie spice, and quick oats. Mix until the mixture resembles coarse crumbs and is uniformly combined, forming the crisp topping.
- Assemble and Bake: Spread the apple mixture evenly into a greased 9×13-inch baking dish. Sprinkle the crisp topping evenly over the apples. Bake in the preheated oven for about 60 minutes, or until the topping is golden brown and the apples are bubbling and tender when pierced with a fork. Allow to cool slightly before serving.
Notes
- Use tart Granny Smith apples for a nice balance of sweetness and acidity.
- For extra crunch, substitute old-fashioned oats for quick oats.
- Serve warm with vanilla ice cream or whipped cream for a classic pairing.
- Let the apple crisp cool slightly before serving to allow the juices to thicken.
- This dessert can be stored covered in the refrigerator for up to 3 days; reheat before serving.


